Translate

Showing posts with label Kraft card. Show all posts

Friday, 15 July 2016

A HOTP Steampunk Card

Hello crafty peeps and welcome to my crafty nook! Well it's been ages since I posted anything, sorry if you've missed my creations but I've just not really been doing much crafting the past week, hopefully that will change in the next week or so. I have managed to make a couple of cards using a lovely Steampunk themed stamp set from Hot Off The Press. The first card I made was a card "just because" for my lovely husband Chris who sometimes has a lot to put up with being married to me and this is the one I'd like to share today.


HOTP Light up my life steampunk card

Close up of topper

Close up of sentiment

Card for Chris

The stamp set comes with loads of small stamps perfect for making your own background paper so that's what I did using Memento Rich Cocoa inked images onto a panel of Kraft card stock. I stamped the chained light bulbs onto a square panel of cream card stock and coloured the bulbs in using a bright yellow Flex marker. I added clear Spectrum Noir Shimmer pen to the three light bulbs on the left and added Glossy Accents to all the bulbs, I put the panel to one side while I worked on the rest of the card. I stamped out the sentiment then used a square punch to cut it out and went around the edges with Walnut Stain distress ink to tie it in with the rest of the card. Once the Glossy Accents had fully dried I mixed a little bit of Nuvo Acrylic paint with water until it was a runny (but not too runny) consistency and then loaded up an old stiff bristled brush and flicked it onto the topper panel and the background panel. I used two colours - silver and pearlised white. I left both pieces to dry while I cut a piece of Kraft card slightly bigger than the topper. I made a card blank out of another sheet of the cream card that I used for the topper. Once the paint was dry I added the topper to the square of Kraft card using d/s tape then added the background card to the card blank. Finally I added the topper and the sentiment as shown using foam tape. The splatters of acrylic paint have dried raised which gives the card a bit of texture - as regular readers will know my husband is sight impaired so I try to add texture to all my cards so even if he can't see it very well (he has a bit of sight in one eye and can see some colours but not all unfortunately) he'll still be able to feel the various textures and enjoy the card in a different way.

I really enjoyed making this card, the stamp set is amazing and it's really going to get a lot of use especially for men's cards. I liked getting messy but I've got to say I didn't enjoy the smell of the Nuvo paint and it lingered for a couple of days in my crudy so I'll probably use it sparingly. I made a second card using this stamp set but I can't share it just yet as it's for my friend Adam's birthday (today!) and I want him to see it first.  Hopefully he'll get it today or tomorrow and I'll be able to add a new blog post over the weekend. As always if you have any questions or comments then please leave them in the usual places, I may not always respond but I love to read each and every one of them. Until next time - keep crafting!

Love and crafty hugs,

Sarah xxx

Thursday, 16 June 2016

Get Well Pop up Flower Box card

Hello crafty peeps and welcome to my crafty nook! I hope you are all well, it's nearly the weekend again which means even more time for crafting - yay. I'm still sort of missing my mojo but I have made some cards or at least started them. I'd like to share a get well/thinking of you card I've made for Chris's step-grandad. He came to visit recently and wasn't feeling well so my in-laws took him to the local hospital, unfortunately they managed to miss the fact that the poor man has an abscess on his appendix and he's now in St James' hospital being nursed back to enough health that he can be operated on for a second time (first time was keyhole to drain the abscess). I know a lot of hospitals in the UK have banned flowers from the wards so I decided to send Gramps a pop up box card filled with flowers (manly flowers of course!) to brighten up his bedside and to let him know that he's in our thoughts and prayers.


Envelope made using Mr Mister scrapbook double sided paper


Flowers are seen to be a feminine card item so I tried to make this card be more masculine by using Kraft card for the card blank and decorating it with wood plank printed paper panels from the Papermania Mr Mister double sided 12" x 12" scrapbook paperstack. I've used a different colour palette to the one I'd use for a female card and although there is a bit of pink amongst the flowers it's a special paper which changes colour as it is moved and the light hits it so I think it's gender neutral. I used a number of dies most of which came free with different magazines the exceptions being the two sizes of pointed ending petal flowers and the leaves.  The card was made in the usual way and the only real difference construction wise is that I used thicker widths of acetate than usual so that I had something to stick the leaves and flower heads to.

I'm hoping to have another card to share with you later on today or tomorrow - it needs to dry first before I can take any photos of it. As always if you have any questions or comments about the card featured in this blog post then please leave them in the usual places. Until next time - keep crafting!

Love and crafty hugs,

Sarah xxxx

Sunday, 26 April 2015

Tool Time Bookmark

Hello crafty peeps and welcome to my crafty nook! I hope you are all well and enjoying this lovely spring weather, I've been avoiding it indoors as everyone seems to be cutting their grass at the moment and its playing havoc with my hay fever, still it's nice to view it through panes of glass lol. I haven't been up to much crafting this week as I'm still dealing with the kitchen, it's amazing I managed to empty it overnight but it's taking WEEKS to put everything back. I blame this on my desire to have things perfect and to be honest my lovely husband's unthinking sabotage, every time I get one area sorted he comes along and wrecks it! It is really disheartening and exhausting to keep cleaning the same areas repeatedly. Moan over (for now anyway lol)

I decided to have a little break yesterday and made a bookmark using the Tool Time die set I mentioned in the last post (I knew it would be a good investment!).

Kraft card Tool Time bookmark

I have a folder of scraps of kraft card stock so I used one of them to use as the base of the bookmark. I carefully lined up a labels shape die near the top of the bookmark and secured it with washi tape so it didn't shift while cutting and then I lined the cutting plates of my Sizzix Big Shot so that the top edges were on the middle section of the die then ran it through my machine. Because the cutting plates don't cover all the die it means it isn't subjected to the pressure that the covered areas of the die are and I got a partial cut (the photo below shows this flap more clearly). I removed the tape from the die and using a eyelet setter and punch added a gold coloured eyelet to the point of the flap (as shown). I die cut all the pieces I needed using scraps of kraft card and the MFT Tool Time die set. I covered the parts of the tools I wanted to look metallic with Versamark ink and silver embossing powder then I heat set it using a heat gun. The handles were coloured using markers and the tools were assembled using Dovecraft pearl effects in clear (fantastic adhesive even if it's not designed as one). It's important to use a strong adhesive to any surface that's been heat embossed because the embossing powder contains wax and a lot of glues just slide off. I used the same 'glue' to fix the tools onto the bookmark.

Bookmark with page 'grabber' open

A bookmark maybe a bit 'old hat' in these days of Kindles etc but I'm intending on including it with a book for someone's birthday, the book is a wood workbook so I thought the tools were a cute addition to the bookmark. The 'page grabber' at the top of the bookmark means that even if you shake the book or accidentally drop it, it should still mark the place you want saving. I really enjoyed making the bookmark, it's a quick gift idea that's thin enough to include in cards without adding too much bulk so I think I'll be making quite a few more especially for Christmas - and for those with electronic books I'll just have to buy a real book for them to read. lol.

I hope you've enjoyed reading this post and if you make a bookmark yourself, I'd love to see them. As always if you have any comments or questions then please leave them in the usual places. Until next time - keep crafting!

Love and crafty hugs,

Sarah xxx

Sunday, 8 March 2015

An Anniversary Card featuring - yes you've guessed it another Morehead stamp!

Hello crafty peeps and welcome to my crafty nook! As promised earlier, I'd like to share a first anniversary card I made for my very special friend, Adam and his lovely wife Victoria. I made this card a couple of weeks ago and I've been dying to share it with you but obviously I wanted Adam and Victoria to see it first.

First Anniversary card featuring Morehead Marriage stamp
I'm afraid I hadn't realised that the photo quality was so poor - I have some other photos which don't have the sentiment on so I'll add those to this blog too.


Victoria and Adam's wedding colour scheme last year was pink (I made the buttonholes for the wedding party) so I wanted pink to be the dominant colour on the card, I teamed this with Kraft card to stop it from being too girly. I made the flower using a die from Sizzix (can't remember which one - sorry) and I cut out five flowers which I then shaped using a Woodware Shaping Tool and the wrong side of a mouse mat. The process of rubbing the die cut flowers with the rounded end of the shaper tool against a soft surface like the underside of a mouse mat causes the fibres in the card or paper to break down and stretch as a result the petals begin to curl in upon themselves and the more you rub, the tighter the petals get. Each layer of the flowers was made by applying a little more pressure so it gets tighter and tighter towards the bud centre. Shaping with fingers helps to get the petals to layer upon each other to form the tight bud then I just layered them together using a quick drying glue.

Buttonholes for Wedding Party 2014
I thought you might like to see the flowers that I made for the wedding last year. The roses are made from handmade paper and the leaves are taken from the stems off silk flowers. Again please excuse the photo quality - this was taken using a very old camera phone.

Here are a few more photos of the first Anniversary card.


As you can probably tell from the last three posts, I'm really loving working with the Crafter's Companion Morehead stamps. Next month, Docrafts will be bringing out some more Simply Gorjuss stamps and hopefully I'll be able to get my mitts on them, and then I'll bore you all with endless blog posts featuring them! I suppose like a lot of other crafters once I fall in love with a product I tend to 'do it to death' as it were until the next lot of stamps catch my eye then I repeat the cycle until the next lot and so on. I do keep practically all my stamps though and every now and then dig out my older sets and have a play, I've invested a lot of money in my stamps and it seems foolish to get rid of them just because they've fallen out of favour. Craft styles tend to come back after a while (Oriental stamps for example) and it means it's possible to make a card in the latest style without investing in new stamps. *my penny's worth is now over*

I still have one more Mothering Sunday card to make and when I've made it (not sure of the theme yet) I'll share it here in my crafty nook. As always if you have any questions, comments, desire to let me know that someone does actually read this blog (I know you're out there - I can hear you breathing! lol) then please leave a comment in the box below or in the comments form in the sidebar. You can always come say hi on Facebook - don't be shy, I rarely bite! Until the next time - keep crafting!

Love and crafty hugs,

Sarah xxx

Monday, 9 February 2015

Counting Chickens and a card for my Dad-in-law

Hello crafty peeps and welcome to my crafty nook! I hope you have all had a splendid weekend. I'm a bit late posting this because my 'lovely' cat decided to stick his claw into the palm of my hand last week and it's been too painful to craft until yesterday :(. Before I get on with the card I just had to share this with you... Last week I got a letter from my gas supplier e.on to say sorry for the fact they've been overcharging me for nearly 4 years through my card meter and that they would be sending me a cheque in a few days to cover what they've overcharged me in the past, what they are planning on overcharging me in the next two months (you think they'd get their fingers out and sort it ASAP wouldn't you??) and interest on it all. So I got pretty excited thinking that as they'd sent a separate letter in advance of the refund it was going to be a substantial amount because when they got in trouble last time and sent me a compensation payment it just arrived and that was for £37! The next few days were spent daydreaming about what I could buy with this windfall; craft stuff (obviously!), maybe replace my falling to bits camera with a better one - a new bed frame perhaps? (Ours is being held together at Chris's side with string and elephant tape!) On Saturday there was a white envelope in the post (strangely no e.on logo on it though) and excitedly I opened it and glanced at the cheque attached to the bottom of the letter. Now brace yourself..............................................................................

.......£3.92. I shook the envelope out in case a zero had fallen out inside but no such luck! Lol Chris and I howled with laughter, all those pipe dreams for less than 4 quid!!! I'm in two minds to keep it and frame it to remind me not to count my chickens in future, I suppose you could say that e.on sent me a REALITY CHECK!!!! lol

Anyway enough with that nonsense, time to share a card with you. It's my father-in-law's birthday on Saturday (Valentine's Day) and I bought some Crafter's Companion S.W.A.L.k stamps sets from Every Craft's A Pound about 6 months ago. One of the sets I bought was a 'paw'fect pal set called "Prickly" and although the sentiment is a Grandpa one I loved the main image and it reminds me of my dad-in-law so I had to use it.

Close up of "Prickly" Topper

ProMarkers Used

Hair - Ice Grey 1 and blender

Skin - Blush and Dusky Pink

Shirt - Ice Grey 1

Boots - Pear Green and Lime Green

Jeans - Denim Blue, China Blue and blender

Tank Top - Pastel Beige

Gloves - Lime Green

Hedgehogs - Sandstone, Caramel, Terracotta, Cocoa and Henna

Grass - Grass

Tongue and Ears - Salmon Pink

Flower - Lime green, Lime Zest and Red

Birthday Card for Dad

Close up of Topper

Sentiment from Clearly Besotted Stamps mini banners stamps and die

The sky was coloured in using Dovecraft 'Brights' chalks and the sentiment was stamped onto Kraft card using my usual ink. The square brads are Making Memories and the baker's twine wound between them is from Dovecraft. The paper is what I had left over from making Les's birthday card on my last post. I added some Dovecraft 3D effect clear pearls onto the boots and the hedgehogs' noses to make them shine.

I hope you like my latest card - they'll be another Challenge on the Passion for ProMarkers blog tomorrow so once I've made a card I'll post it here on this blog.

Until next time - keep crafting!

Love and crafty hugs,

Sarah xxx

Thursday, 5 February 2015

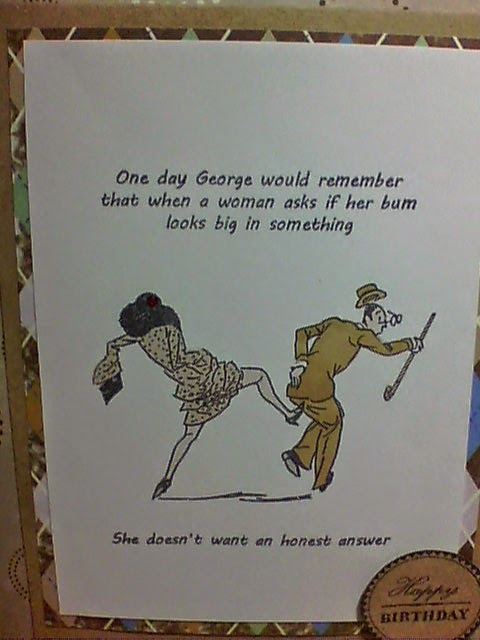
Acid Drops and Whatnots "Does my bum look big?"

Hello crafty peeps, welcome to my crafty nook! Nearly the weekend again, not sure where this week's gone. It's my hubby's best friend's birthday on the 10th and Chris asked me to make a card for him. The timing was perfect because this week's challenge on Passion for ProMarkers is "One For The Boys" (male themed makes). There isn't a lot of ProMarker colouring but it is there on the stamped image so I'm entering it in the challenge but plan on submitting a second entry once it's made.

Acid Drops and Whatnots card

For this card I used a stamp set from one of my favourite company's - Acid Drops and Whatnots, I don't have a huge collection of the stamp sets but I try to purchase a couple or three sets every time they have a sale. The featured stamp is from their last sale (aciddropsandwhatnots.co.uk click on this link and then on the Sale Stamps and Topper Sets to purchase this stamp set for the reduced price of £6.99) and is one of my favourites as it's one of the few stamp sets I own which are suitable for men's cards. Because it's a vintage image I wanted to keep the colours muted (ProMarkers used are Caramel, Putty, Almond, Sandstone, Cool Grey 1 and Vanilla) and just added a splash of colour to the lady's hat by adding a small red gem. The papers are cut down from a Dovecraft 12" x 12" paper pack and I'm afraid I can't remember the name of it as I bought it 6 years ago and the front cover's gone walkabout - those pesky craft gremlins probably stole it! The card base and card layer are both Kraft card purchased from my local craft shop and I used a sentiment taken from a Kirstie Allsopp stamp set that came free with one of my craft magazines, probably Simply Homemade or Crafts Beautiful. I stamped it on a piece of scrap kraft card using my usual ink. The inside of the card is stamped using a sentiment taken from a Docrafts Papermania stamp set from the Heritage Press range. Here are a couple of additional photos.

Nice Aim Madam!

Inside of card.

I had a lot of fun making this card and I really hope Les (Chris's friend) likes it. If you'd like to follow along with this week's challenge click on the link promarkerchallenge.blogspot.co.uk/2015/02/week-282one-for-boys.html. As always if you have any questions or comments please leave in the box below or use the comments form in the side bar. Until next time - keep crafting!

Love and crafty hugs,

Sarah xxx

Friday, 28 November 2014

Robot card for Jack

Hello crafty peeps - welcome to my crafty nook! I hope you've managed to get some crafty Black Friday bargains - I haven't due to lack of funds (we've only bought TWO Christmas presents so far - eek!!) but I've been drooling over all the bargains out there.

To distract me from all the stuff I can't afford to buy I've been looking through my crafty stash and have used a few things that I've had for a while but haven't had the chance to use yet, and I've made a Robot themed card for my nephew who celebrates his birthday on the 29th December.

Robot card with movable cogs.

This card was made using a Kaisercraft stamp set called "Technologic" and the HB2U stamp came from a Clearly Besotted Stamp set called "TEXT ME". I embossed the black cardstock using a Sizzix embossing folder called "Dots", the folder isn't that large so I embossed first one side of the card then lined up the folder to emboss the other side. To highlight the dots I rubbed over it with silver gilding wax (sorry don't know the make as it came free with a magazine and the packaging doesn't have any details). I stamped, coloured then fussy cut the gears and punched a hole through the centres so that I could add brads through them and the embossed background. It's not lined up perfectly and I should have used thicker card but if you move the cogs they do actually move the others which I LOVE!!! I'm not going to go into any further details about how this card was made because it's just stamping and colouring with a hint of dry embossing. Of course if you do want a more detailed "How to make" please leave a comment below.

Close up of Robots

Another view of the Robot card with movable gears!

PRODUCTS USED

Kaisercraft "Technologic" Clear Stamps
Clearly Besotted "TEXT ME" stamps

Dovecraft 3mm "Masculine" brads

Sizzix 657253 Dots & Flowers set #2

Silver gilding wax

Memento Tuxedo Black Ink

Kraft card
White card
Black card

ProMarkers in Ice Grey 1 & 2

Clear Wink of Stella Brush Marker

I hope you've enjoyed seeing my new creation, I'm planning on working on my Christmas cards over the weekend (I'm so behind!) so hopefully I'll have something to share on Monday. Until then - keep crafting!

Love and crafty hugs,

Sarah xxx