Translate

Showing posts with label Crafter's Companion Morehead stamps. Show all posts

Sunday, 8 March 2015

An Anniversary Card featuring - yes you've guessed it another Morehead stamp!

Hello crafty peeps and welcome to my crafty nook! As promised earlier, I'd like to share a first anniversary card I made for my very special friend, Adam and his lovely wife Victoria. I made this card a couple of weeks ago and I've been dying to share it with you but obviously I wanted Adam and Victoria to see it first.

First Anniversary card featuring Morehead Marriage stamp
I'm afraid I hadn't realised that the photo quality was so poor - I have some other photos which don't have the sentiment on so I'll add those to this blog too.


Victoria and Adam's wedding colour scheme last year was pink (I made the buttonholes for the wedding party) so I wanted pink to be the dominant colour on the card, I teamed this with Kraft card to stop it from being too girly. I made the flower using a die from Sizzix (can't remember which one - sorry) and I cut out five flowers which I then shaped using a Woodware Shaping Tool and the wrong side of a mouse mat. The process of rubbing the die cut flowers with the rounded end of the shaper tool against a soft surface like the underside of a mouse mat causes the fibres in the card or paper to break down and stretch as a result the petals begin to curl in upon themselves and the more you rub, the tighter the petals get. Each layer of the flowers was made by applying a little more pressure so it gets tighter and tighter towards the bud centre. Shaping with fingers helps to get the petals to layer upon each other to form the tight bud then I just layered them together using a quick drying glue.

Buttonholes for Wedding Party 2014
I thought you might like to see the flowers that I made for the wedding last year. The roses are made from handmade paper and the leaves are taken from the stems off silk flowers. Again please excuse the photo quality - this was taken using a very old camera phone.

Here are a few more photos of the first Anniversary card.


As you can probably tell from the last three posts, I'm really loving working with the Crafter's Companion Morehead stamps. Next month, Docrafts will be bringing out some more Simply Gorjuss stamps and hopefully I'll be able to get my mitts on them, and then I'll bore you all with endless blog posts featuring them! I suppose like a lot of other crafters once I fall in love with a product I tend to 'do it to death' as it were until the next lot of stamps catch my eye then I repeat the cycle until the next lot and so on. I do keep practically all my stamps though and every now and then dig out my older sets and have a play, I've invested a lot of money in my stamps and it seems foolish to get rid of them just because they've fallen out of favour. Craft styles tend to come back after a while (Oriental stamps for example) and it means it's possible to make a card in the latest style without investing in new stamps. *my penny's worth is now over*

I still have one more Mothering Sunday card to make and when I've made it (not sure of the theme yet) I'll share it here in my crafty nook. As always if you have any questions, comments, desire to let me know that someone does actually read this blog (I know you're out there - I can hear you breathing! lol) then please leave a comment in the box below or in the comments form in the sidebar. You can always come say hi on Facebook - don't be shy, I rarely bite! Until the next time - keep crafting!

Love and crafty hugs,

Sarah xxx

Saturday, 7 March 2015

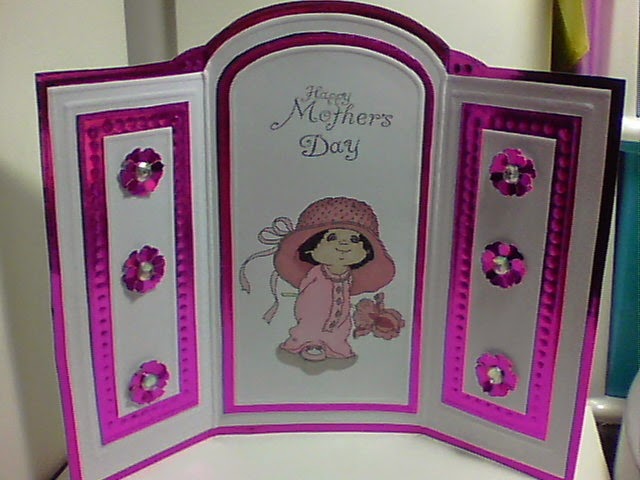
Mother's Day card for my mum-in-law and bonus Pink Version for my mum (made since blog post)

Hello crafty peeps and welcome to my crafty nook! As promised I'd like to share my latest project with you, a Mother's Day card for my lovely mum-in-law Denise. I chose matching images for my Mother's Day cards this year Moreheads' "Girl" stamp for my mum and the Moreheads' "Boy" stamp for Chris's mum, so that I could make them look a bit like us as children by using different hair colours and skin tones. If I had any artistic ability I'd have hand drawn some glasses on the "Boy" stamp but I'm not going to risk ruining the card by adding them on. Actually I'm surprised Crafter's Companion didn't think to add them to the image in the first place - the stamp reminds me a bit of 'The Milky Bar Kid'.

Crafter's Companion Morehead stamp "Boy" card
I stamped the "Boy" image onto a sheet of Image Digicolor A4 card 300gsm using Memento Tuxedo Black ink and coloured in using ProMarkers. My lovely hubby had ginger hair as a child and very pale skin so I coloured the image in accordingly. Once it was coloured in I cut it down to the required size and embossed some blue satin board (from The Works) using The Glitter Girls "The Big Screen" embossing board and ball tool. I cut the embossed shape out then embossed the various layers which I also cut out. I stuck them together as shown using Dovecraft clear 3D pearl effects (it's for making pearl embellishments but is a fantastic glue!) I used a ticket corner punch on the corners of the image and added it to the central panel of the card blank. I don't tend to use peel offs these days but thought the silver Happy Mother's Day went well with the blue satin card so added it to the top of the central panel. I punched out six flowers using Tonic's build a flower punches (each flower is made up of two petal shapes which you layer and weave together to make a new flower, I have 4 punches and the flower combinations are endless!) and added a gem to the centres then I I added them to the side panels as shown using pop glue dots. I've bend the side panels slightly forward so the card stands without needing a separate plate stand.

Close up of "Boy" topper

Jewelled flowers on side panels

The Wilky Bar Kid (Chris's suggestion!)

I really enjoyed making this card though it was quite frustrating when things went wrong while embossing the card - I had to cut down one A4 sheet of card to just the white panels on the front because the washi tape I used to stick the paper to the board ripped the surface as I peeled it off. This card has made me realise how much I love my Glitter Girls Embossing Boards and I've moved them to a more accessible area in my crudy (craft/study room) so I may be making a few more in the future. I'll have an Anniversary card to share with you tomorrow but until then - keep crafting!

Love and crafty hugs,

Sarah xxx

Hi everyone just a quick update, I liked making this card so much that I've made a pink "Girl" version - photos below.


Wednesday, 4 March 2015

Lilac and Lemon - hmm

Hello crafty peeps and welcome to my crafty nook! Today I'd like to share my entry for this week's blog challenge over at Passion for ProMarkers - Lovely Lilacs and Lemons. Looking at the challenge title, I may have taken things a bit too literally. We were allowed to add touches of other colours (skin, hair, grass, sky etc) but apart from that you have to stick to the two colours as stated.

Bookatrix Mother's Day card featuring Morehead "Girl" stamp 
This card is actually my sixth attempt at the theme but I didn't like how the others turned out (this is the only completed card) I'm sure I'll be able to salvage some usable elements from the reject pile. I'd always planned on using this Crafter's Companion stamp set Morehead's "Girl" for my mum's card, I'm going to do the matching "Boy" stamp on my mum-in-law's card at some point, but I hadn't thought to use the lemon/lilac combo. Being so restricted reminded me of my early days of ProMarker colouring because I had to use the saturation method to get any tonal difference in the colours, the image is flatter than it would be if I'd used a light, medium and dark yellow or purple but I rather liked the challenge of getting the colour differences in the image just using one colour - I did this all the time before getting the full range of pens. The pansy was made using the Build A Pansy stamp set by DoCrafts, it's about a gazillion years old so I don't think it's still available, and coloured in using Lilac, Lemon and Burnt Sienna Promarkers - this colour combination with the addition of Tan was also used to colour the girl image *forgot to mention the Cool Grey 2 that I used to ground the image - sorry*. The paper lace was made by punching out white card using a Martha Stewart lace punch then colouring it with lemon or lilac ProMarkers. The mum stamp was free with a stamping mag. The lemon and lilac gems were from The Works. The cardstock was from Crafter's Companion or rather from a prize I won from QCME for a card competition but it didn't say what sort of card it is. I used the Glitter Girls Bookatrix embossing board and tool to dry emboss the book shapes which I cut out with scissors.


I've made a matching box to put the card in (mainly because one of my original ideas for this challenge was to make a card featuring just the pansies), I added extra pen on the edges of the paper lace to give it a two tone appearance.

Here are some more photos.


I can't say that this has been the easiest of challenges but it has been very satisfying. I'm rather pleased to have made a card using only 5 different ProMarkers, though I'm not sure I'd stick quite so rigidly to the colour combo next time (I'm sure others will have used the light/medium/dark combo - it's highly likely that lilac and lemon have featured in the seasonal ProMarker selections which I don't own). I hope my mum likes it :)

I shall be working on the "Boy" card this weekend so hopefully I'll have another card to share with you soon. As always if you have any comments or questions then please leave them below or why not click onto my Facebook page and come say hi - I'd like that! Until next time - keep crafting!

Love and crafty hugs,

Sarah xxx