Translate

Tuesday 31 May 2016

Ever Decreasing Circles

Hello crafty peeps and welcome to my crafty nook! I hope you all had a brilliant Bank Holiday weekend. It's a wet and windy Tuesday here on the East coast - definitely staying inside and crafting weather. I was up most of the night unable to sleep due to the wind (and Jinx was hogging the bed!) so I've made a couple of cards to share with you today. I actually started quite a few more but they weren't going the way I'd hoped for so I'll put them away until another day and I'll try to salvage them then.

If you are a regular reader of this blog then you've probably noticed that I usually have a hand coloured image so I thought I'd challenge myself to make a couple of cards which have little or even no stamping on at all, instead I've used dies and embossing folders to embellish my cards. I wanted to make two cards using circle dies as I really like circles and I have a set of Spellbinders large nesting dies and a 4" Sizzix Bigz die. I have used both for these cards.

Flamingo Circles Gatefold Card

Close up of card front with hot pink vellum flamingo

Circles gatefold card - open

Sentiment from Verity Rose 'Cupcake' stamp set

Inside of card with embossed side panels

Close up of Vellum flamingo inside open card

Clock Circle Easel Card

Close up of Easel topper


Easel card shut for posting

Decorated base with raised gear stopper

I love the way you can take the same items and yet make two very different cards with them. The flamingos were die cut out of neon hot pink vellum using a die from the Crafter's Companion Verity Rose 'Sunbeam' collection. While the vellum was still in the die, I placed it on a piece of funky foam with the die face down and embossed all the open areas with an embossing tool, I flipped the die over and added some detail to the eye and the beak using an alcohol marker. I die cut a simple heart shape out of the pink vellum scraps. For the instructions on how to make a circle gatefold card, please click on this link http://smwcraftynook.blogspot.co.uk/2016/05/circle-gatefold-card.html - I used a super smooth 300gsm cardstock for the base and embossed the front panels and the two side panels using Crafter's Companion Just For Men Signature Collection by Sara Davies 'Pop Dotty' embossing folder. I die cut a number of circles using the Spellbinders Nestabilities dies out of black and white card and embossed them as shown. I love the quirky sentiment from the CC Verity Rose 'Cupcake' stamp set and thought it was perfect for the flamingos as I personally think they are both "graceful and silly".

I used similar supplies to make this circle easel card but I used Sheena's Stamping card for the base as it's more sturdy than the super smooth card that I used for the flamingo card. I cut my card to 8.5" x 4.25" and scored it 4.25" using a scoreboard. I carefully lined the the square card blank so most of the circle of the Bigz die was covered but a little of the circle die was visible above the folded edge of the card - this is so the card appears to be a circle but remains joined together at the top to form a circle card blank. Using the scoreboard I scored the top part of the card in half (at 2" as my die is 4"), this becomes the mechanism for the easel. I die cut another circle of card using the same die out of white card then black. I die cut another circle out of the black piece so it formed a frame shape as shown using one of the Spellbinders Nestabilities circle dies. I put the spare black circle to one side for later use. I put a small piece of white card into a CC Just For Men Signature Collection by Sara Davies 'Time Piece' embossing folder and ran it through my Big Shot, once embossed I lined up a circle die around the embossed clock face and die cut it out. I then very carefully went over the hands etc of the embossed clock with a black gel pen. I die cut a gold circle out using a die and matted the clock face onto it as shown. I added foam squares to the back of the black frame and thicker foam tape to the layered clock face then die cut a lot of gears using CC Just For Men Signature Collection by Sara Davies 'Cogs and Gears' Dies out of gold mirror card. Once these were cut I added the clock face to the centre of the large white die cut circle and stuck the gears and cogs down as shown with wet glue. I added one of the circle centres from a gear onto the middle of the clock face as shown and once the gears were well stuck down I added the black frame over the edges of the cogs lining it up with the edge of the white circle. I added wet glue to the lower half of the finished panel and stuck it firmly to the easel mechanism of the card. I then die cut even more cogs and gears for the base. I cut the large gears in half both under the clock face and on the card base as the whole gear wouldn't show. I sketched around the black card circle that I'd put aside previously with a pencil and filled in the outer part of the card base with gears and cogs being careful that the edges of the halved ones were well inside the pencil circle. Once the edge was filled with gears and cogs, I added the black circle over them so that the cut edges were covered but there was still plenty of the gears etc showing. I made a stopper for the easel out of spare gears as shown.

Sorry this has been such a long blog post but I wanted to have both cards on the same post to demonstrate how you can get two very different cards using similar supplies. I really enjoy working with the Signature Collections especially the Just For Men collection. I've only got a couple of dies and the embossing folders so far but I've found them to be very versatile and not just for men as the flamingo card demonstrates! I look forward to adding to my collection soon. I hope you've enjoyed this blog post, as always if you have any questions or comments then please leave them in the comment section below. If this weather persists then I'll have some more cards to share with you soon, until then - keep crafting!

Love and crafty hugs,

Sarah xxx

Sunday 29 May 2016

Tool Time Tool Box card

Hello crafty peeps and welcome to my crafty nook! I hope you are all enjoying the bank holiday weekend (if you are having one where you are of course). I've not really noticed the weather as I've been holed up in my crudy sorting things out and trying to make some cards. I have plenty of ideas but getting them to turn out right in the real world is being rather challenging at the moment. *big sigh*

Tool Time Pop Up Tool Box


I'd like to share a masculine card with you today, it's based on one of my favourite cards - the pop up box card. I've been making these sort of cards for about a year and love them. I got an embossing folder from Crafters' Companion that's part of the Just for Men Signature Collection by Sara Davies (I got all of the embossing folders and although I have some similar, these folders are a different size to the ones in my collection). The one called 'Checkerplate' really caught my eye as it remind me of embossed steel. My father-in-law is the person I turn to when we need any handyman stuff doing so I thought a tool box card would be perfect for him either for Father's Day or when we want to say thanks. I didn't want to make the box the same dimensions as my usual pop up box cards as a tool box tends to be shallower and narrower than a cardboard box so I started off by making a paper template before I started to cut into my card. If you ever want to alter dimensions of cards then I'd suggest trying it out with copier paper first as it's a lot cheaper than card stock - your card won't stand up obviously but you can see if your measurements actually work.

Once I'd made a paper model of the tool box I cut a sheet of A4 card down to 14 cm but left it full length. I scored the card at 4cm, 14cm, 18cm and 28cm, then rotated the card so the short side was at the top of the scoring board and scored it at 6 cm. I then burnished the score lines well. I cut down the 28cm scoreline to the 6cm scoreline then tapered the cut on an angle to the edge of the card so that I could stick this card flap to the inside of the left hand side of the card once I'd decorated the box panels. I cut all the remaining score lines down to 6cm to make box flaps but removed the shortest flaps completely leaving just the flaps on the longest sides. I cut two pieces of pale blue pearlised metallic card to 3.5cm by 7.5cm, two pieces of the same card cut to 7.5cm x 9.5cm and finally two pieces of the card cut to 5.5cm by 9.5cm. I embossed these pieces of card with the 'Checkerplate' embossing folder. I went over the embossing with some silver gilding wax then buffed it up. I added these embossed panels to the relevant parts of the card. Once the card was decorated I stuck the flap to the inside of the left hand side of the card using double sided tape. Usually a pop up box card has two strips of card inside the box to float the elements from using acetate but because this tool box is narrower than a normal box card I only added a single strip of card that was cut to 14cm x 6cm (this is deeper than a normal strip to support the weight of the die cut tools.) I scored both ends 2cm in and added wet glue to the flaps and slid it into place inside the card - the bottom of the card strip is level with the box card bottom edges. I then die cut a load of tools using My Favorite Things Die'namics "Tool Time" dies. There are a similar set of tool dies in the CC Just for Men Signature Collection by Sara Davies but I haven't bought them yet as I already had the Tool Time. As much as I love the Signature Collection (and I really want it all) I have limited funds for crafting so can't justify paying full price for an item that's really similar to the one I've already got, saying that if it's ever on sale it's be straight in my basket assuming I have some money in my account lol. Most of the MFT tools come in at least two parts (some are three) so I die cut the whole tool in either Kraft card stock or silver mirror card then die cut the matching pieces in either a coloured card or more of the mirror card depending on what piece it was, I then stuck all the tool pieces together. It was at this point that I realised I would need a second tool for each one cut for the backs of the tools as they can be seen due to the way the tool box is fully opened. The hammer and saws had to be die cut on the reverse of the card so that the outlines matched. The screwdrivers and wrenches are symmetrical  so line up regardless of how they are die cut. Once the tools had backs I stuck them to the inside of the card as shown, I tried to angle the tools and placed them in different heights to make the layout look more appealing. I had a hammer left over so attached it to the outside of the tool box with it's head glued to the inside so it looks like someone's balanced it there until they need it. I haven't added a sentiment to this card yet as I'm not sure what occasion I'll use it for but I have added white card panels to the underside of the flaps. Here are some more photos of the finished card.


I really enjoyed making this card, it was quite time consuming die cutting all the parts to the tools but I'm very pleased with how they've turned out and they are certainly substantial! I really like the embossed metal effect I got using the Checkerplate embossing folder and I can see myself using it a lot for other masculine cards. I've got a few more cards to share with you but this has turned out to be a rather long blog post so I'll write about them another day. I hope you all enjoy your Bank Holiday Monday and I hope you have lots of crafty fun. As always if you have any comments or questions then please leave them in the comments section below and until next time - keep crafting!

Love and crafty hugs,

Sarah xxx

Friday 27 May 2016

Starlet Double Wiper Card

Hello crafty peeps and welcome to my crafty nook! It's the start of another bank holiday weekend here in the UK which means extra craft time - woo hoo! I've been working on a couple of projects recently and I'd like to share the first with you now. One of the designer team's cards on Passion for Promakers intrigued me last week as it was a card shape I'd not come across before so I clicked on the link and discovered it was something called a wiper card. I looked on Youtube and found a tutorial by Splitcoaststampers https://www.youtube.com/watch?v=SDrn0UG2Bto (please click the link for instructions on how to make a single wiper card). There was also a tutorial for a window wiper card (a double wiper) by Tinkerella on Youtube https://www.youtube.com/watch?v=6Z0NqSscvhQ. This second tutorial makes a card slightly smaller than the first tutorial so I decided to combine the two ideas and make a double wiper card in the larger size.

Starlet card front

Close up of "Startlet" ~Verity Rose from Crafter's Companion

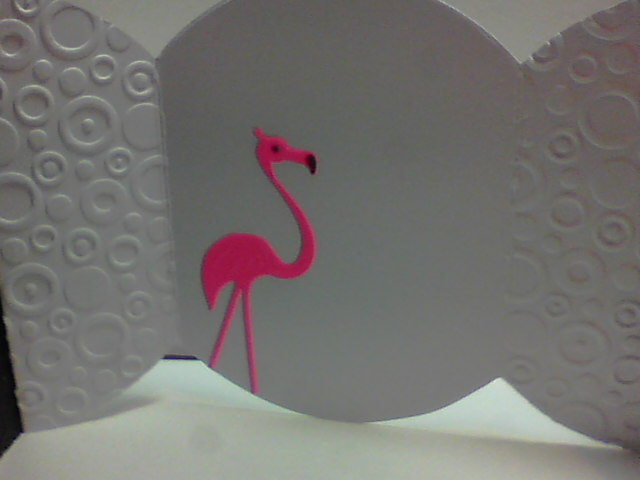
Open double wiper card (front)

Double star on the right front wiper

Die cut clapper board left wiper

Back view of open double wiper card

double star back wiper

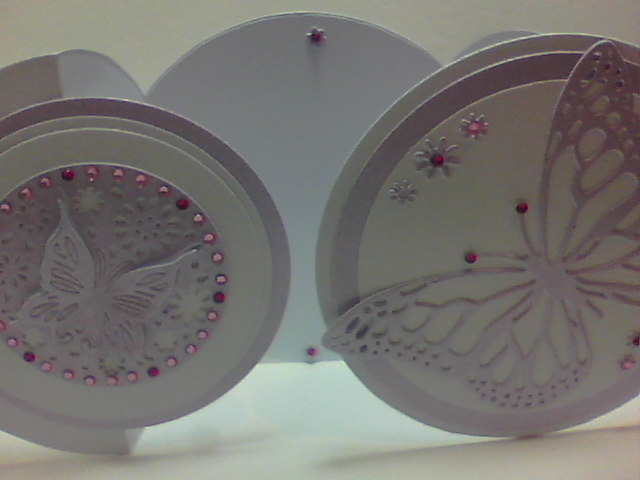
Side panels with die cut stars on rear of card

Side panels with die cut stars on front of card

Starlet is ready for her close up *winks*
Sorry there are so many photos but there are a lot of elements to this card and I wanted you to be able to see the full effect (without seeing it in person) as best as I could. If I had a proper camera I would have videoed a tutorial and added it to this blog but unfortunately my camera finds it difficult to take unblurry photos most of the time lol (it must be in a good mood at the moment because these are really clear for a change!)

In addition to the Crafter's Companion Verity Rose "Starlet" stamp, I used the matching accessories stamps and dies (camera), a Kanban Tickets stamp set (the stars on the ticket), a nesting Creative Dies set "stars", a Tim Holtz Ticket strip die, a labels die set (back panel die cut) and a movie themed set of dies from First Editions (small stars, clapper board and film strip.) The papers were from a 6" x 6" paper stack by Dovecraft Basic Blacks and the silver, holographic black and glitter card were scraps left from other projects. Starlet's skin and eyes were coloured in using Promarkers (three shades of green on her eyes!) and her clothes and hair etc were coloured in using Crafter's Companion Sparkle brush markers in black and grey. I added a Craftworks Card Candi in silver foil on her head piece.

I really love this card and I'll admit that it isn't the easiest card to make in fact my first attempt at making a double wiper card went drastically wrong and my wipers were visible when the card was 'shut' and vanished when it was opened lol - I'm still not sure what went wrong. This card is a little on the thick side so you'll probably end up paying extra postage on it so I recommend hand delivering it - for the look on the recipient's face as much as saving postage. I can see a lot of potential cards - Hallow'een would be great for this sort of card as you could have pop-up ghosts or vampire bats and you can always have sentiment panels on the wipers too so you can personalise the card for any occasion. I hope I've inspired you to make your own wiper card, I haven't written the instructions because the Splitcoaststampers tutorial is brilliant and I know I find it easier to watch a video rather than follow written instructions (I write all the new to me card styles down in a book for future reference) but if you'd like a written tutorial on how to make this card then please leave a message in the comments section and I'll try to do a detailed written tutorial with photos of each step in the near future.

I hope you've liked this card as much as I have (I want to keep it!!) and if it inspires you to make your own version then please let me know and share a link to your blog in the comments section as I'd love to see what everyone comes up with. I'm hoping to add a new blog post in the next day or two as I've made a fantastic card for Father's Day that I'd like to share. Until next time - keep crafting!

Love and crafty hugs,

Sarah xxx

Monday 23 May 2016

Spellbound Card

Hello crafty peeps and welcome to my crafty nook! I hope you've had a brilliant weekend and are raring to go for the week ahead. My mum asked me to make a card for a friend's birthday who likes pastels and butterflies. I didn't want to make a card solely featuring butterflies so decided to use a new stamp set I purchased during the Crafter's Companion sale a few weeks ago.

Spellbound Birthday Card

Close up of stamped image

Lindsay Mason Designs Verse

I really love the Flights of Fantasy by Morgan Fitzsimons stamps and "Aoife" (I hope I never have to pronounce that!) is such a beautiful image. I coloured the image in with Promarkers (vanilla,blush, Sandstone, cinnamon, lilac, lavender, amethyst, blossom, pale pink, powder blue, leaf green) and went over the wings of Aoife with CC Clear Sparkle pen and then coated them with Glossy Accents. I embossed a panel of silver mirror card using a Darice wood grain embossing folder and added it behind the main topper. I cut a sheet of A4 purple card to 29cm and scored it in half at 14.5cm to make a card blank then added a panel of Sarabooks purple paper on top before adding the matted and layered topper. I added three purple gems to the bottom right hand corner as shown and stamped a sentiment inside. I die cut two small butterflies using CC Sara Signature dies and added them to the inside with dots of Glossy Accents.

I haven't added a birthday sentiment to this card in case my mum doesn't like it so I'll be able to use it for someone else if I need to plus this is such a beautiful image I thought the recipient might like to frame it afterwards (I'm thinking about doing a number of these fairies and framing them for Christmas presents).

I hope you like my latest card, I really love the images and look forward to making more cards, I'd like to experiment with different colouring mediums instead of my usual Promarkers. As always if you have any questions or comments then please leave them in the usual places. Until next time - keep crafting!

Love and crafty hugs,

Sarah xxx

Friday 20 May 2016

Happy 7th Anniversary Passion for Promarkers Blog!

Hello crafty peeps and welcome to my crafty nook! I hope you've had a brilliant week, I can't believe it's almost the weekend again. Have you got anything special planned? As you might have realised from this post title, it's a very special week for the wonderful Passion for Promarkers Blog as they are celebrating their 7th anniversary. Wow, I wonder if I'll be celebrating seven years of blogging myself? If you are a regular reader of my blog then you'll know about the fantastic blog challenge PFP has on a weekly basis. I don't enter every week but I do make a point of checking out the themes they have every week and enter when I'm making a card that fits in with the challenge. I don't tend to enter the challenges that don't fit in with my own needs purely for the reason that if I don't have a card to make for my own use then the card I do make ends up cluttering my crudy and that's a room bursting at the seams as it is lol. I've made an exception this week though as I thought the theme of spots and/or stripes sounded like a lot of fun plus I want to start revisiting some of my older stamp sets and this was a perfect opportunity to do so.

Passion for Promarkers have got some fantastic prizes (as always) to give away for this week's challenge so if you'd like to join in then please click on the link http://promarkerchallenge.blogspot.co.uk/2016/05/week-346special-anniversary-challenge.html . You can enter up to three times but they won't be giving out top five badges like most weeks (I'm still very proud of my own in the sidebar) as they will have lots of entries to check out.

Acid Drops & Whatnots "Birthday Splash" card
Close up of image coloured with Promarkers

Spots and stripes themed card

To make this card I used the following products: Acid Drops & Whatnots "Birthday Splash" stamp set free with Papercraft Essentials Issue 95. Papermania Capsule Collection "Spots & Stripes>Brights" 6" x 6". Blue linen card Crafter's Companion Clear Sparkle pen. Glossy Accents (for the water - it's hard to see in photos). Starfish charm, red glitter enamel dots and Bakers Twine. Foam pads and DS tape. Memento Tuxedo Black ink. 5" x 5" white card blank and envelope. Promarkers in Cool Grey 1, Almond, Cool Aqua, Tea Green, Indigo Blue and Midnight Blue.

I didn't have an exact match for the dark blue stripes in the paper so I combined my two darkest blues to colour in the bathing suit of this quirky character.It's hard to tell in the photos but the card is very sparkly in real life and I even added touches of it to the Bakers Twine.

I hope you like my latest card, it's very simple but a lot of fun to make and it was good to challenge myself to use a stamp set that's been languishing in my stash for a couple of years. I do hope you click on the link and check out the Passion for Promarkers blog, even if you don't join in with the challenge it's a great place for inspiration and to check out what other crafters are making.

I hope you all have a brilliant weekend and as always if you have any questions or comments then please leave them in the usual places. Until next time - keep crafting!

Love and crafty hugs,

Sarah xxx

Monday 16 May 2016

Anime/Manga cartoon card

Hello crafty peeps and welcome to my crafty nook! I hope you've all had a brilliant weekend, I'm finally feeling my old self but still have coughing fits (I've just coughed as if demonstrating it lol) four or five times a day so I'm not 100% quite yet. Please excuse if there are any extra letters etc in this post, the keyboard is playing silly beggars and keeps adding extra ones for some reason.

I'd like to share the card I made for my nephew Liam. He celebrated his 13th birthday yesterday. A couple of months ago I asked my sister what he was into as last year he was really into Friday Night at Freddie's. I actually saved extra prints of some of the main characters AND I know where they are so I was kind of hoping he'd want a card similar to last year. But it wasn't to be, he's now really into Anime and Manga. After looking online I can certainly see why they appeal to teenage boys (and let's face it those teens who aged but never grew up!), I was a bit flummoxed to be honest as I knew my drawing abilities were no where near what was required for an anime character (imagine stick figures and me with my tongue out as I concentrate hard to make the figures straight - you get the idea!), I didn't want to copy and print from something online as for a start I don't think that's very honest and also not very creative (I'll admit that's what I did for last year's card!) so I put in anime and manga stamps in my search box and finally Flonz Craft came up. Wow what a fantastic site! It's a New Zealand company but don't be put off by that, everything is in NZ dollars but if you click on the £ icon it converts it to our currency and the prices are amazing! I bought four stamps altogether and they only cost £2.10 each, I think the postage was about the same amount. The stamps vary from 2.5" x 3" up to 2.5" x 3.5" so aren't huge but they do sell stamps sets for about £8.99 with bigger images on but I wanted to get the least provocative images I could as without seeming a prude I didn't think some of the images were age appropriate for a 13 year old (I'm not sure Liam would agree though lol). The stamps took a couple of weeks to arrive and I did end up contacting the site in the end as my order status remained in progress for the entire time I was waiting but it was just a site error and my stamps arrived the very next day. I'll be totally honest with you, the packaging isn't great but then for £2.10 per stamp you can't expect it to be, it does come with some detailed instructions for stamp care that I liked and 12% off my next order which I really liked! Liam's favourite colours at the moment are red and black so I coloured the image in those colours and matted and layered the finished panel with black and red card stock. I forgot to take photos of the envelope before I addressed it but added some of the stamps as envelope art. Here are some photos of the finished card featuring "Neko Girl Asking".


I have a small confession to make - this image is supposed to have a tail to go with the cat ears but I slipped when i was colouring the black background so ended up going over it completely. I used a number of dies from different die companies including Sizzix (for the 13 today) and an American Crafts set for the speech bubble etc. I used Flexmarkers for the colouring with a little bit of Real Color Brush marker for the eyes (I've found a website that sells them individually so bought two to try - can't remember what the website is called though!!) I wouldn't say this was my best colouring but I find it easier to colour large images and these stamps are quite small. I am quite pleased with how it's come out and I'm considering purchasing one of the larger sets as I think this style of card may appeal to men - the 12% off  is a great incentive too!

I didn't make anything over the weekend as my husband treated me to the first six books of the Thursday Next series by Jasper Ffordes which arrived on Thursday (lol) I resisted their siren call until after I finally cleaned the oven (it took hours!!!) but I ended up getting "Lost In A Good Book" by reading "Something Rotten", I love the visual puns JF makes with names of people and places (Fay Bentos, Millon De Floss for example) and this book has had me laughing out loud quite a few times, if you've not read any Jasper Ffordes I'd really recommend you trying him.

This has turned out to be a long post so I hope I've not bored you too much! As always if you have any questions or comments then I'd love to hear from you, please leave them in the comment section below. Until next time - keep crafting!

Monday 9 May 2016

Circle Gatefold Card

 Hello crafty peeps and welcome to my crafty nook! I hope you've all enjoyed the weekend, we've had really beautiful weather here in Bridlington and the trees on the street have burst into blossom practically overnight. I've only one card to share with you today, as I mentioned in my last post I thought it was possible to make a shaped gatefold card with a 300gsm card stock if you used a Bigz die and I was right. I don't own many Bigz dies at least not ones that cut solid shapes but I do have a 4" circle Bigz die and I have a set of Spellbinders layering circle dies so I thought I'd give it a go. The card is made exactly the same way as the the gatefold card on my last blog post so please read the next blog post and check out Dawn's video on how to construct the basic card. The main difference is because Bigz dies are solid you need to mark the centre of the edges of the dies so your piece of card lines up, you only need to cut the card to 4 1/4" by 11" as well which makes it a bit easier to centralise your card base before you cut and it's a good idea to stick the "gates" of your card down so they don't slip while you run it through the die cutting machine. I used Adorable Scoreable card stock for my layers along with my usual 300gsm super smooth card stock which I also used to make the card blank. I had planned on using stamped images on the card but nothing really gelled so in the end I used some beautiful dies from the Crafter's Companion Sara's Signature Collection.

Front of closed circle gatefold card

Close up of card front

Open Circle Gatefold card

It took ages to add the gems to the diecut holes round the edge of the panel!

Close up of open card - the inside has been left blank

This wasn't the easiest card to make not helped by the fact that I added the large die cut butterfly on the front with the card shut and when I opened it I realised it was on upside down. I ended up cutting another white panel of card and layering it over the top of the original 3D die cut butterfly, rotating the card 180 degrees and adding a second diecut 3D butterfly panel on the left side instead of the right hand panel. The only good thing was as a result of the second die cut panel, I had a few more extra flowers from the waste so I added them to the card as shown. It is possible to make this card with nesting dies alone but as I mentioned on my last post you can only cut through a maximum of 250 gsm for the first cut through the folded card which can make the central panel a bit flimsy. To be honest it probably wouldn't be too much of a problem for a circle gatefold card as it has plenty of bottom to balance on unlike my labels cards.

I hope you've enjoyed my latest card and if it inspires you to make your own version then please leave a link in the comments section as I would love to see what you come up with. Hopefully I should have a new card to share with you soon. Until next time - keep crafting!

Love and crafty hugs

Sarah xxx

Thursday 5 May 2016

A Few New Cards To Share

Hello crafty peeps and welcome to my crafty nook! I hope you are all well and looking forward to the weekend. I've managed to make a few cards this week even though I'm still not 100% (I'm running at about 45% at the moment lol). This cough/bug is proving very hard to get rid of and I'm not feeling as creative as I would like. I'm just going to do a card share as I'm not really sure if anyone gets anything out of my usual tutorial style blog post - if you like them then leave a comment please!

The cards I'm sharing today are fairly self explanatory with the exception of the Golden Anniversary cards (identical apart from one opens from the left and the other the right) and as I didn't come up with the design I may as well just link the YouTube video I watched rather than explaining how  it's made myself - one thing I would add is to use card that's no more than 250 gsm as the thinlets dies aren't deep enough to go through all the layers for the initial cut with any thicker card stock - you may be able to use 300 gsm card stock if you have a suitable Bigz die but I haven't tried it yet. You can use thicker card for the layers but I'd suggest adding a layer to the inside panel too so it doesn't buckle from the side 'gates'. Here is the link for the YouTube video I watched https://www.youtube.com/watch?v=vUyefCETO2Y it's the lovely Dawn from Dawn's Stamping Thoughts. In my early crafting/actually having internet days I found Dawn to be an amazing demonstrator of cards and I learnt a lot from her. One of the best things about watching Stampin' Up! demonstrators like Dawn is that you get to learn loads of new card folds and techniques as well as basic card making skills. Here are the two cards I made inspired by Dawn's video, I don't own any Stampin' Up! dies so used the largest nesting labels dies that I have.

Closed Labels Gatefold Card - folds flat for posting

Gatefold Card fully opened for display

Close up of left hand panel

Close up of right hand panel which slots behind the front panel to close

My second Identical Card but panels reversed

This card opens by pulling the left panel carefully from behind the right (reversed for the first card)
 My mum asked me to make this for her neighbour's parents but didn't have a lot of details to give me which is why it's very simply decorated. The card when folded flat is only 4" x 4" but opens out to make a much bigger impression.

Verity Rose Split Panel Card

Close up of the Verity Rose Character

I made an envelope for the card using scrapbook paper

I made this card for Chris's auntie Margy who celebrates her birthday tomorrow. I had made a card for Margy a couple of months ago but ended up giving it to someone else when I was going through a bit of a creative dry spot and I needed a card in a hurry. I actually think I prefer this one. The backing patterned card is from Crafter's Companion's Kimono collection and the card is Adorable Scoreable in a pale blue colour - this card was from a prize I won years ago but I've been hoarding it for special occasions like this one, the blue is just perfect for this image which was coloured in with Flexmarkers and a little bit of silver Sparkle pen.

I've made a couple of other cards but the birthdays for the people involved haven't happened yet so I don't want to share just in case they see them. As it's Margy's birthday in a few hours I thought it would be okay to put it up a bit early. Hopefully I'll get a bit of crafting done over the weekend but it really depends how I feel - as much as I love crafting a lot of the products I regularly use like glues and alcohol markers have a detrimental effect on my chest and I spend half the night after the crafting session coughing crud up so I'm not crafting as much as I'd like to be doing. Perhaps this is an opportunity to try some different techniques I'd certainly like to improve my pencil colouring and painting with watercolours. I'd love to see what you've all come up with so please leave a link to your blogs in the comments section. Until next time - keep crafting!

Love and crafty hugs,

Sarah xxx