Translate

Showing posts with label Circle Gatefold Card. Show all posts

Wednesday, 8 June 2016

Starlet Circles Gatefold Card and A Handy Hint

Hello crafty peeps and welcome to my crafty nook! I hope you're all having a brilliant week, I've been making some cards for family birthdays which I can't share just yet so I decided to take part in this week's Passion for Promarkers Blog challenge. I haven't been able to take part since their anniversary blog challenge so I was really pleased when I saw that this week's theme is "anything but square" - though it's actually quite rare for me to make a square card so maybe it would be more of a challenge to make a square one lol. If you would like to join in this week's blog challenge or you are just curious about what the design team have come up with, then please click on the link http://promarkerchallenge.blogspot.co.uk/2016/06/week-349anything-but-square.html .

Starlet Circle Gatefold Card

 I don't have an occasion in mind for this card so I've used my current favourite stamp - CC Verity Rose 'Starlet'. I decided to make another circle gatefold card as it's about as far away from being a square as you can get plus I really enjoy making this style of card. I made the card blank first out of a sheet of Sheena's stamping card cut to 4 1/4" x 11". I scored it at 2.5", 4", 7", 8.5" and die cut it using my 4" Sizzix Bigz die - you really need a Bigz die if you are using card above 250gsm (you will need to run your thinner dies and card a couple of times as they have to cut through three thicknesses of the card to make this card blank). I die cut another piece of stamping card using the same die and also a black circle. I used the biggest of my large circles nesting dies by Spellbinders to turn the circle into a frame and used the waste circle for my right hand panel, I centred a Creative Dies nesting star die on this black circle and ran it through my Big Shot machine. I then die cut the same sized star out of silver mirror card. I die cut five small stars out of the silver card waste and put them to one side, then I die cut the next size up star out of another piece of silver mirror card. I stamped the 'Starlet' image out onto the stamping card circle and coloured her in using Flexmakers. I added the black circle frame over the stamped image using a Stick It! Glue pen then went around the edge with a black marker to cover up any white areas showing. I placed the silver star into the die cut space inside the smaller black circle and stuck a white card circle to the back so the star wouldn't fall out or show when the card's open and added it to the right hand half circle panel of the card blank. You have to add this piece first before the main image. I closed the card blank so the star circle was centred over both halves and added a thin line of glue around the circle panel of the left hand half circle then added the main topper to this glued area. You need to hold it in place for a few minutes until the glue sets firmly. I tucked the inner right hand panel behind the front panel in the 'pocket' that was formed by only gluing the outside part of the topper to check that it was placed correctly. I added the silver single star to the black star with glue then added this double star to the middle section of the card blank. I added the five small stars around the large silver as shown.

Close up of the left panel

Open Circle Gatefold Card

Right hand 'gate' with inset star and raised mini stars

Centre double star

I really enjoyed making this card, there was a lot of die cutting but my job was made a lot easier using this:-

Not just a tool holder!

You're probably wondering why I decided to share my tool caddy and the reason is those two black strips on the front of the plastic pot. The strips are actually magnetic tape and I use them to keep my dies safe while I'm die cutting. The tape is self adhesive but I added Scotch Glue to the back because the strips kept falling off to begin with but since I've stuck them with glue, they've not shifted. Sizzix have recently come up with a tool caddy that attaches to the side of Big Shot machine - I think it's partly magnetic but it inspired me to make my own magnetic storage for when I'm die cutting. My machine isn't on my desk as I don't have room for it so I line my dies up at my desk then take the pieces to be die cut at the machine. It made sense for me to have the tape on my desk so I can put the dies I'm not using straight away on the strips to keep them safe for when I do want to use them.  Here are the magnetic strips in action.

No more losing dies for me!

Since taking these photos I've added a third strip of magnetic tape so it can hold bigger/more dies. I bought the magnetic tape from Amazon and it was very cheap - I would recommend adding a stronger adhesive to the back of it if you use this idea as it it rather annoying for the strips to fall off with the dies attached (and defeats the purpose!) I'd love to see what you come up with if you make your own so please leave a link in the comments section if you do. As always I'd love to hear from you so please leave any questions or comments in the section below and until next time - keep crafting!

Love and crafty hugs,

Sarah xxx

Tuesday, 31 May 2016

Ever Decreasing Circles

Hello crafty peeps and welcome to my crafty nook! I hope you all had a brilliant Bank Holiday weekend. It's a wet and windy Tuesday here on the East coast - definitely staying inside and crafting weather. I was up most of the night unable to sleep due to the wind (and Jinx was hogging the bed!) so I've made a couple of cards to share with you today. I actually started quite a few more but they weren't going the way I'd hoped for so I'll put them away until another day and I'll try to salvage them then.

If you are a regular reader of this blog then you've probably noticed that I usually have a hand coloured image so I thought I'd challenge myself to make a couple of cards which have little or even no stamping on at all, instead I've used dies and embossing folders to embellish my cards. I wanted to make two cards using circle dies as I really like circles and I have a set of Spellbinders large nesting dies and a 4" Sizzix Bigz die. I have used both for these cards.

Flamingo Circles Gatefold Card

Close up of card front with hot pink vellum flamingo

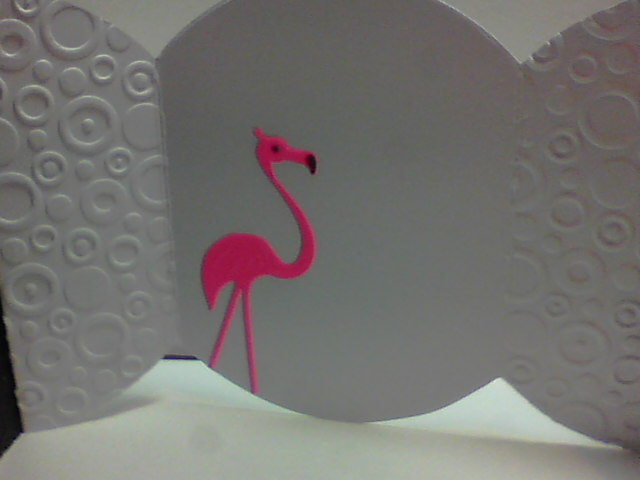
Circles gatefold card - open

Sentiment from Verity Rose 'Cupcake' stamp set

Inside of card with embossed side panels

Close up of Vellum flamingo inside open card

Clock Circle Easel Card

Close up of Easel topper


Easel card shut for posting

Decorated base with raised gear stopper

I love the way you can take the same items and yet make two very different cards with them. The flamingos were die cut out of neon hot pink vellum using a die from the Crafter's Companion Verity Rose 'Sunbeam' collection. While the vellum was still in the die, I placed it on a piece of funky foam with the die face down and embossed all the open areas with an embossing tool, I flipped the die over and added some detail to the eye and the beak using an alcohol marker. I die cut a simple heart shape out of the pink vellum scraps. For the instructions on how to make a circle gatefold card, please click on this link http://smwcraftynook.blogspot.co.uk/2016/05/circle-gatefold-card.html - I used a super smooth 300gsm cardstock for the base and embossed the front panels and the two side panels using Crafter's Companion Just For Men Signature Collection by Sara Davies 'Pop Dotty' embossing folder. I die cut a number of circles using the Spellbinders Nestabilities dies out of black and white card and embossed them as shown. I love the quirky sentiment from the CC Verity Rose 'Cupcake' stamp set and thought it was perfect for the flamingos as I personally think they are both "graceful and silly".

I used similar supplies to make this circle easel card but I used Sheena's Stamping card for the base as it's more sturdy than the super smooth card that I used for the flamingo card. I cut my card to 8.5" x 4.25" and scored it 4.25" using a scoreboard. I carefully lined the the square card blank so most of the circle of the Bigz die was covered but a little of the circle die was visible above the folded edge of the card - this is so the card appears to be a circle but remains joined together at the top to form a circle card blank. Using the scoreboard I scored the top part of the card in half (at 2" as my die is 4"), this becomes the mechanism for the easel. I die cut another circle of card using the same die out of white card then black. I die cut another circle out of the black piece so it formed a frame shape as shown using one of the Spellbinders Nestabilities circle dies. I put the spare black circle to one side for later use. I put a small piece of white card into a CC Just For Men Signature Collection by Sara Davies 'Time Piece' embossing folder and ran it through my Big Shot, once embossed I lined up a circle die around the embossed clock face and die cut it out. I then very carefully went over the hands etc of the embossed clock with a black gel pen. I die cut a gold circle out using a die and matted the clock face onto it as shown. I added foam squares to the back of the black frame and thicker foam tape to the layered clock face then die cut a lot of gears using CC Just For Men Signature Collection by Sara Davies 'Cogs and Gears' Dies out of gold mirror card. Once these were cut I added the clock face to the centre of the large white die cut circle and stuck the gears and cogs down as shown with wet glue. I added one of the circle centres from a gear onto the middle of the clock face as shown and once the gears were well stuck down I added the black frame over the edges of the cogs lining it up with the edge of the white circle. I added wet glue to the lower half of the finished panel and stuck it firmly to the easel mechanism of the card. I then die cut even more cogs and gears for the base. I cut the large gears in half both under the clock face and on the card base as the whole gear wouldn't show. I sketched around the black card circle that I'd put aside previously with a pencil and filled in the outer part of the card base with gears and cogs being careful that the edges of the halved ones were well inside the pencil circle. Once the edge was filled with gears and cogs, I added the black circle over them so that the cut edges were covered but there was still plenty of the gears etc showing. I made a stopper for the easel out of spare gears as shown.

Sorry this has been such a long blog post but I wanted to have both cards on the same post to demonstrate how you can get two very different cards using similar supplies. I really enjoy working with the Signature Collections especially the Just For Men collection. I've only got a couple of dies and the embossing folders so far but I've found them to be very versatile and not just for men as the flamingo card demonstrates! I look forward to adding to my collection soon. I hope you've enjoyed this blog post, as always if you have any questions or comments then please leave them in the comment section below. If this weather persists then I'll have some more cards to share with you soon, until then - keep crafting!

Love and crafty hugs,

Sarah xxx

Monday, 9 May 2016

Circle Gatefold Card

 Hello crafty peeps and welcome to my crafty nook! I hope you've all enjoyed the weekend, we've had really beautiful weather here in Bridlington and the trees on the street have burst into blossom practically overnight. I've only one card to share with you today, as I mentioned in my last post I thought it was possible to make a shaped gatefold card with a 300gsm card stock if you used a Bigz die and I was right. I don't own many Bigz dies at least not ones that cut solid shapes but I do have a 4" circle Bigz die and I have a set of Spellbinders layering circle dies so I thought I'd give it a go. The card is made exactly the same way as the the gatefold card on my last blog post so please read the next blog post and check out Dawn's video on how to construct the basic card. The main difference is because Bigz dies are solid you need to mark the centre of the edges of the dies so your piece of card lines up, you only need to cut the card to 4 1/4" by 11" as well which makes it a bit easier to centralise your card base before you cut and it's a good idea to stick the "gates" of your card down so they don't slip while you run it through the die cutting machine. I used Adorable Scoreable card stock for my layers along with my usual 300gsm super smooth card stock which I also used to make the card blank. I had planned on using stamped images on the card but nothing really gelled so in the end I used some beautiful dies from the Crafter's Companion Sara's Signature Collection.

Front of closed circle gatefold card

Close up of card front

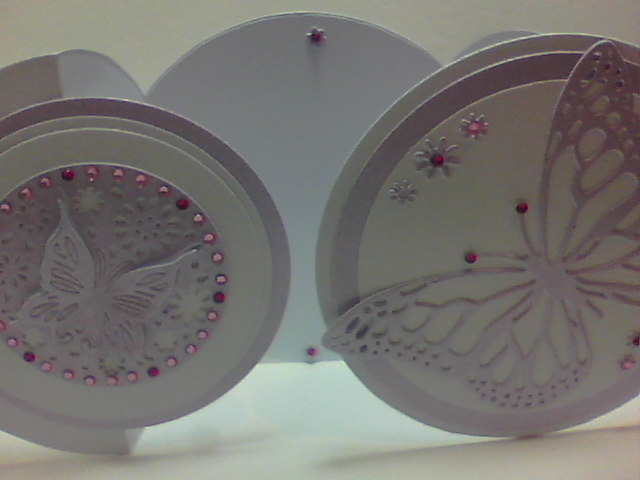
Open Circle Gatefold card

It took ages to add the gems to the diecut holes round the edge of the panel!

Close up of open card - the inside has been left blank

This wasn't the easiest card to make not helped by the fact that I added the large die cut butterfly on the front with the card shut and when I opened it I realised it was on upside down. I ended up cutting another white panel of card and layering it over the top of the original 3D die cut butterfly, rotating the card 180 degrees and adding a second diecut 3D butterfly panel on the left side instead of the right hand panel. The only good thing was as a result of the second die cut panel, I had a few more extra flowers from the waste so I added them to the card as shown. It is possible to make this card with nesting dies alone but as I mentioned on my last post you can only cut through a maximum of 250 gsm for the first cut through the folded card which can make the central panel a bit flimsy. To be honest it probably wouldn't be too much of a problem for a circle gatefold card as it has plenty of bottom to balance on unlike my labels cards.

I hope you've enjoyed my latest card and if it inspires you to make your own version then please leave a link in the comments section as I would love to see what you come up with. Hopefully I should have a new card to share with you soon. Until next time - keep crafting!

Love and crafty hugs

Sarah xxx