Hello crafty peeps and welcome to my crafty nook! I hope you've all had a wonderful weekend and if you're in the UK (or elsewhere) have managed to take advantage of the beautiful weather. If it's too hot for you, just think it's only four weeks or less until the summer holidays so it's BOUND to be grotty weather for then 😉
I thoroughly enjoyed doing last week's challenge over at Passion for Promarkers so I've decided to follow along this week too - it's a sketch challenge and as it's my husband's cousin's birthday tomorrow I decided to use the sketch to make a 16th birthday card.
Probably for the first time ever, I actually chose the patterned paper before I coloured in the image. I used almost a full sheet of 8" x 8" Pick 'n' Mix premium paper by First Edition - there are some gorgeous papers in the pack including two foiled designs, two glitter effect designs and four spot UV designs, the rest of the papers are double sided like the one I used and there are three of each design. After I had chosen the patterns I wanted and cut them to the right size, I glued them to a 5" x 7" card blank in the positions shown on the sketch. I got a scrap of card out of my stash and stamped a border on it from the 'Georgina' Wonky Tonk stamp set from Which Craft? I coloured over the image completely in Pale Pink then I went over the hearts and the flowers with either Cocktail Pink or Rose Pink Promarkers. I stamped the main image in the stamp set and coloured her in using Blush and Vanilla for her skintones, Violet for her eyes and Pale Pink, Cocktail Pink and Rose Pink for her hair. I edged around the panel using the darkest shade and added it to the card front.
Below is a souped up version of the card which I've sent off, I added a couple of layers of Clear Wink Of Stella to her hair and diecut a 16 out of speciality card which I added to the bottom right of the card- it's actually a coppery colour but I went over it using an Antique Pink Flexmarker so it has pink tones to it which change as you tilt the card. For this souped up version, I also added a stamped sentiment inside which reads "Wishing you a FANTASTIC BIRTHDAY" it's a Sentimentals stamp by Crafters Companion, I stamped it in VersaMark Onyx Black ink and sprinkled it with a holographic embossing powder which turns the letters into rainbow colours after it's been heat set and if you tilt the card into the light. I also stamped the Georgina character inside using Memento Tuxedo Black ink which I left uncoloured.
I really enjoyed this week's challenge over at Passion for Promarkers please click the link for more details http://promarkerchallenge.blogspot.co.uk/2017/06/week-400sketch.html .
As always if you have any questions or comments then please leave them in the usual places and until next time - keep crafting!
Love and crafty hugs,
Sarah xxxx
Translate
Showing posts with label ProMarkers. Show all posts
Tuesday, 20 June 2017
Sunday, 3 July 2016
1st Birthday Card Featuring Tiny Tatty Teddy
Hello crafty peeps and welcome to my crafty nook. I hope you've all had a wonderful weekend, I'm still trying to get my head around the fact that it's already July! I've just the one card to share with you today, a first birthday card for Taio who's celebrating his birthday on Tuesday. I decided to use one of the boy Tiny Tatty Teddy stamps combined with a bunting die by Dovecraft and a 1 today die by Sizzix. I also used one of the Birthday Sentimentals by Crafter's Companion. I decorated an envelope made with the WRMK Envelope Punch Board using the Child's Play stamp set by Clearly Besotted Stamps.
I'm still loving the split panel card design and I thought it worked very well with this image. I stamped it out onto super smooth card stock and coloured it in using ProMarkers, I fussy cut it out and added some CC Sparkle Pen in clear on Tatty's nose and patches. I added foam tape to the back and stuck it to a panel of silver glitter card. I mounted this onto a scrap of blue card stock. The card blank was made by cutting a sheet of A4 card stock at 10.5cm (sorry I'll be mixing my metric with imperial here!) and then scored it at 14cm. I lined the fold crease up to the 2 inch mark on my trimmer and cut off the short front panel (A4 is 29 and a bit cm which is hard to score exactly in half. By scoring at 14cm one side of this card blank was nearly 2cm longer than the other but as it's being cut off it doesn't matter). From this cut off piece I trimmed off a 2" section to form the bottom of the card front. I added blue pieces of card to the 2" panels as shown. I die cut the smallest size of bunting using the Dovecraft die out of some more silver glitter card and carefully glued the top edge of each triangle to a short length of baker's twine. I carefully lined the loose panel of card to the bottom edge of the card blank and held it in place with a paperclip. I added a strip of d/s tape to the top and bottom back side of the decorated panel and stuck it to the top and bottom panels of the card blank as shown. I then removed the paperclip as it was no longer required. I diecut the number 1 and the word today out of more silver glitter card and added it to the bottom panel using dots of wet glue - I'd like to point out that the t is crooked by the die design not by me mucking it up lol. I added tiny foam pads to the underside of the punting and added them to the top of the card. I stamped a sentiment on the left hand side of the card.
The envelope was made using my envelope punch board by WRMK and I decorated the front using a couple of stamps from the Child's Play set by Clearly Besotted Stamps and coloured them in using ProMarkers.
I hope you like my latest card, it's really shimmery so should appeal to a one year old (it appeals to me anyway lol) I'm expecting a delivery tomorrow from Every Craft's A Pound as they've had a load of Tonic Studio Punches available on their website, I've ordered 17 out of the 18 available (the one I didn't order was a holly punch and I have quite a few already) I've only got a couple of Tonic Studio punches in my stash because the craft shop in town and the one I used to go to sell mainly Woodware and Martha Stewart punches. I personally love the Woodware punches but wouldn't recommend the MS ones as I've broken a couple trying to punch through card - for the price of a MS punch you would expect it to be able to punch through more than paper but apparently not! I'm not really sure where exactly I'm going to store 17 border/strip punches as I imagine they'll be quite bulky but at a saving of £10.99 per punch (yes you read that right - I saved £10.99 per punch as they are only a pound each!!) I couldn't pass them up especially as I've wanted some border punches for a while (the ones I have are Martha Stewart!). If Create and Craft are to be believed the Tonic Studio punches are very powerful so hopefully they're not going to break if I punch the edge of my cards (and if they do I only paid a pound for them!)
I'm looking forward to sharing what I come up with once I've had a play with the punches. If you have any questions or comments please leave them in the usual places and until next time - keep crafting!
Love and crafty hugs
Sarah xxx
I'm still loving the split panel card design and I thought it worked very well with this image. I stamped it out onto super smooth card stock and coloured it in using ProMarkers, I fussy cut it out and added some CC Sparkle Pen in clear on Tatty's nose and patches. I added foam tape to the back and stuck it to a panel of silver glitter card. I mounted this onto a scrap of blue card stock. The card blank was made by cutting a sheet of A4 card stock at 10.5cm (sorry I'll be mixing my metric with imperial here!) and then scored it at 14cm. I lined the fold crease up to the 2 inch mark on my trimmer and cut off the short front panel (A4 is 29 and a bit cm which is hard to score exactly in half. By scoring at 14cm one side of this card blank was nearly 2cm longer than the other but as it's being cut off it doesn't matter). From this cut off piece I trimmed off a 2" section to form the bottom of the card front. I added blue pieces of card to the 2" panels as shown. I die cut the smallest size of bunting using the Dovecraft die out of some more silver glitter card and carefully glued the top edge of each triangle to a short length of baker's twine. I carefully lined the loose panel of card to the bottom edge of the card blank and held it in place with a paperclip. I added a strip of d/s tape to the top and bottom back side of the decorated panel and stuck it to the top and bottom panels of the card blank as shown. I then removed the paperclip as it was no longer required. I diecut the number 1 and the word today out of more silver glitter card and added it to the bottom panel using dots of wet glue - I'd like to point out that the t is crooked by the die design not by me mucking it up lol. I added tiny foam pads to the underside of the punting and added them to the top of the card. I stamped a sentiment on the left hand side of the card.
The envelope was made using my envelope punch board by WRMK and I decorated the front using a couple of stamps from the Child's Play set by Clearly Besotted Stamps and coloured them in using ProMarkers.
I hope you like my latest card, it's really shimmery so should appeal to a one year old (it appeals to me anyway lol) I'm expecting a delivery tomorrow from Every Craft's A Pound as they've had a load of Tonic Studio Punches available on their website, I've ordered 17 out of the 18 available (the one I didn't order was a holly punch and I have quite a few already) I've only got a couple of Tonic Studio punches in my stash because the craft shop in town and the one I used to go to sell mainly Woodware and Martha Stewart punches. I personally love the Woodware punches but wouldn't recommend the MS ones as I've broken a couple trying to punch through card - for the price of a MS punch you would expect it to be able to punch through more than paper but apparently not! I'm not really sure where exactly I'm going to store 17 border/strip punches as I imagine they'll be quite bulky but at a saving of £10.99 per punch (yes you read that right - I saved £10.99 per punch as they are only a pound each!!) I couldn't pass them up especially as I've wanted some border punches for a while (the ones I have are Martha Stewart!). If Create and Craft are to be believed the Tonic Studio punches are very powerful so hopefully they're not going to break if I punch the edge of my cards (and if they do I only paid a pound for them!)
I'm looking forward to sharing what I come up with once I've had a play with the punches. If you have any questions or comments please leave them in the usual places and until next time - keep crafting!
Love and crafty hugs
Sarah xxx
Thursday, 2 June 2016
Fifteen Shades of Grey
Hello crafty peeps and welcome to my crafty nook! I hope you are all well and looking forward to the weekend. It's hard to believe it's June already, it doesn't seem like five minutes ago we were celebrating the start of 2016 and now we're nearly halfway through. Talking about 'June' I lost the month of June stamp from one of my Kaisercraft stamp sets (which as it was a calendar stamp set made it a bit useless) last year and I finally found it yesterday! I only have to find my Cat's Pyjamas Villain-esque moustache die and I'll been as happy as a cat in PJ's (which probably isn't that happy really when you think about it lol). It's even smaller than the June stamp so I'm not going to hold my breath.
Today's card features my beloved 'Starlet' from the Crafter's Companion Verity Rose range. I'm not sure what it is about Starlet that's captured my imagination but I'm really loving colouring her in different ways at the moment. Today I've coloured in Greyscale and as the title suggests I've used 15 shades of grey to colour her in! I used Promarkers Warm Greys 1 - 5, Cool Greys 1 - 5 and Ice Greys 1- 5. I stamped the image using Memento Tuxedo Black ink onto Sheena's stamp card and there was a little bleeding outside the outside edge of the image when I coloured her in but not too much. Once I'd coloured the image I added white highlights to her eyes and pearl necklace using a while gel pen and added some Spectrum Noir clear Sparkle brush marker to her hair gem then covered it with a thin layer of Glossy Accents. I used a ticket corner punch to remove the corners and mounted the topper onto a piece of black card stock. I layered this onto a piece of silver glitter card. I cut a sheet of A4 black card down to 28cm and scored it in half at 14cm. Using a score board I dry embossed two lines down each side of the card front and three top and bottom of the card for added interest and then added some thin strips of glitter card between the embossed borders. I added the topper panel to the card leaving a larger space below so I can add a sentiment at a later date. I decided the silver glitter strips were a bit 'in your face' so went over them with a black marker so that the card appears a slate grey. Unfortunately as I was colouring the strips in I managed to smear black marker ink all on the topper - I nearly cried! Luckily I remembered it was alcohol based so used my Promarker blender pen all over the outside lines of the stamped image paying special attention to the smudge marks. I'll be honest with you, to begin with the blender pen made the marks look worse but I decided to let the piece dry and see what happened before panicking. I watched a couple of programmes on TV then when I went back in to my crudy I found that the marks had practically vanished.
Here are a couple more photos.
I really enjoyed making this card today even if I did nearly ruin it with smudge marks *note to self - remember to wipe your hands in future*. I got a couple of small orders in the post today (both from Craft Stash - a Let's Celebrate stamp and an emoji die by Spellbinders) so I'm hoping to have a play with them over the weekend. I'd also like to colour one of the Verity Rose images in browns so it looks sepia. I've never tried that before but I think the images would suit that style. As always if you have any questions or comments then please leave them in the comment section below. I hope you all have a brilliant weekend, hopefully the weather will improve and it won't be quite so cold! Until next time - keep crafting!
Love and crafty hugs,
Sarah xxx
| Sorry the image isn't very clear - I think the camera is sulking. |
Today's card features my beloved 'Starlet' from the Crafter's Companion Verity Rose range. I'm not sure what it is about Starlet that's captured my imagination but I'm really loving colouring her in different ways at the moment. Today I've coloured in Greyscale and as the title suggests I've used 15 shades of grey to colour her in! I used Promarkers Warm Greys 1 - 5, Cool Greys 1 - 5 and Ice Greys 1- 5. I stamped the image using Memento Tuxedo Black ink onto Sheena's stamp card and there was a little bleeding outside the outside edge of the image when I coloured her in but not too much. Once I'd coloured the image I added white highlights to her eyes and pearl necklace using a while gel pen and added some Spectrum Noir clear Sparkle brush marker to her hair gem then covered it with a thin layer of Glossy Accents. I used a ticket corner punch to remove the corners and mounted the topper onto a piece of black card stock. I layered this onto a piece of silver glitter card. I cut a sheet of A4 black card down to 28cm and scored it in half at 14cm. Using a score board I dry embossed two lines down each side of the card front and three top and bottom of the card for added interest and then added some thin strips of glitter card between the embossed borders. I added the topper panel to the card leaving a larger space below so I can add a sentiment at a later date. I decided the silver glitter strips were a bit 'in your face' so went over them with a black marker so that the card appears a slate grey. Unfortunately as I was colouring the strips in I managed to smear black marker ink all on the topper - I nearly cried! Luckily I remembered it was alcohol based so used my Promarker blender pen all over the outside lines of the stamped image paying special attention to the smudge marks. I'll be honest with you, to begin with the blender pen made the marks look worse but I decided to let the piece dry and see what happened before panicking. I watched a couple of programmes on TV then when I went back in to my crudy I found that the marks had practically vanished.
Here are a couple more photos.
| A close up of the Starlet 15 shades of grey card |
| Can you spot where the smear marks were?? |
Love and crafty hugs,
Sarah xxx
Friday, 27 May 2016
Starlet Double Wiper Card
Hello crafty peeps and welcome to my crafty nook! It's the start of another bank holiday weekend here in the UK which means extra craft time - woo hoo! I've been working on a couple of projects recently and I'd like to share the first with you now. One of the designer team's cards on Passion for Promakers intrigued me last week as it was a card shape I'd not come across before so I clicked on the link and discovered it was something called a wiper card. I looked on Youtube and found a tutorial by Splitcoaststampers https://www.youtube.com/watch?v=SDrn0UG2Bto (please click the link for instructions on how to make a single wiper card). There was also a tutorial for a window wiper card (a double wiper) by Tinkerella on Youtube https://www.youtube.com/watch?v=6Z0NqSscvhQ. This second tutorial makes a card slightly smaller than the first tutorial so I decided to combine the two ideas and make a double wiper card in the larger size.
Sorry there are so many photos but there are a lot of elements to this card and I wanted you to be able to see the full effect (without seeing it in person) as best as I could. If I had a proper camera I would have videoed a tutorial and added it to this blog but unfortunately my camera finds it difficult to take unblurry photos most of the time lol (it must be in a good mood at the moment because these are really clear for a change!)
In addition to the Crafter's Companion Verity Rose "Starlet" stamp, I used the matching accessories stamps and dies (camera), a Kanban Tickets stamp set (the stars on the ticket), a nesting Creative Dies set "stars", a Tim Holtz Ticket strip die, a labels die set (back panel die cut) and a movie themed set of dies from First Editions (small stars, clapper board and film strip.) The papers were from a 6" x 6" paper stack by Dovecraft Basic Blacks and the silver, holographic black and glitter card were scraps left from other projects. Starlet's skin and eyes were coloured in using Promarkers (three shades of green on her eyes!) and her clothes and hair etc were coloured in using Crafter's Companion Sparkle brush markers in black and grey. I added a Craftworks Card Candi in silver foil on her head piece.
I really love this card and I'll admit that it isn't the easiest card to make in fact my first attempt at making a double wiper card went drastically wrong and my wipers were visible when the card was 'shut' and vanished when it was opened lol - I'm still not sure what went wrong. This card is a little on the thick side so you'll probably end up paying extra postage on it so I recommend hand delivering it - for the look on the recipient's face as much as saving postage. I can see a lot of potential cards - Hallow'een would be great for this sort of card as you could have pop-up ghosts or vampire bats and you can always have sentiment panels on the wipers too so you can personalise the card for any occasion. I hope I've inspired you to make your own wiper card, I haven't written the instructions because the Splitcoaststampers tutorial is brilliant and I know I find it easier to watch a video rather than follow written instructions (I write all the new to me card styles down in a book for future reference) but if you'd like a written tutorial on how to make this card then please leave a message in the comments section and I'll try to do a detailed written tutorial with photos of each step in the near future.
I hope you've liked this card as much as I have (I want to keep it!!) and if it inspires you to make your own version then please let me know and share a link to your blog in the comments section as I'd love to see what everyone comes up with. I'm hoping to add a new blog post in the next day or two as I've made a fantastic card for Father's Day that I'd like to share. Until next time - keep crafting!
Love and crafty hugs,
Sarah xxx
| Starlet card front |
| Close up of "Startlet" ~Verity Rose from Crafter's Companion |
| Open double wiper card (front) |
| Double star on the right front wiper |
| Die cut clapper board left wiper |
| Back view of open double wiper card |
| double star back wiper |
| Side panels with die cut stars on rear of card |
| Side panels with die cut stars on front of card |
| Starlet is ready for her close up *winks* |
In addition to the Crafter's Companion Verity Rose "Starlet" stamp, I used the matching accessories stamps and dies (camera), a Kanban Tickets stamp set (the stars on the ticket), a nesting Creative Dies set "stars", a Tim Holtz Ticket strip die, a labels die set (back panel die cut) and a movie themed set of dies from First Editions (small stars, clapper board and film strip.) The papers were from a 6" x 6" paper stack by Dovecraft Basic Blacks and the silver, holographic black and glitter card were scraps left from other projects. Starlet's skin and eyes were coloured in using Promarkers (three shades of green on her eyes!) and her clothes and hair etc were coloured in using Crafter's Companion Sparkle brush markers in black and grey. I added a Craftworks Card Candi in silver foil on her head piece.
I really love this card and I'll admit that it isn't the easiest card to make in fact my first attempt at making a double wiper card went drastically wrong and my wipers were visible when the card was 'shut' and vanished when it was opened lol - I'm still not sure what went wrong. This card is a little on the thick side so you'll probably end up paying extra postage on it so I recommend hand delivering it - for the look on the recipient's face as much as saving postage. I can see a lot of potential cards - Hallow'een would be great for this sort of card as you could have pop-up ghosts or vampire bats and you can always have sentiment panels on the wipers too so you can personalise the card for any occasion. I hope I've inspired you to make your own wiper card, I haven't written the instructions because the Splitcoaststampers tutorial is brilliant and I know I find it easier to watch a video rather than follow written instructions (I write all the new to me card styles down in a book for future reference) but if you'd like a written tutorial on how to make this card then please leave a message in the comments section and I'll try to do a detailed written tutorial with photos of each step in the near future.
I hope you've liked this card as much as I have (I want to keep it!!) and if it inspires you to make your own version then please let me know and share a link to your blog in the comments section as I'd love to see what everyone comes up with. I'm hoping to add a new blog post in the next day or two as I've made a fantastic card for Father's Day that I'd like to share. Until next time - keep crafting!
Love and crafty hugs,
Sarah xxx
Monday, 23 May 2016
Spellbound Card
Hello crafty peeps and welcome to my crafty nook! I hope you've had a brilliant weekend and are raring to go for the week ahead. My mum asked me to make a card for a friend's birthday who likes pastels and butterflies. I didn't want to make a card solely featuring butterflies so decided to use a new stamp set I purchased during the Crafter's Companion sale a few weeks ago.
I really love the Flights of Fantasy by Morgan Fitzsimons stamps and "Aoife" (I hope I never have to pronounce that!) is such a beautiful image. I coloured the image in with Promarkers (vanilla,blush, Sandstone, cinnamon, lilac, lavender, amethyst, blossom, pale pink, powder blue, leaf green) and went over the wings of Aoife with CC Clear Sparkle pen and then coated them with Glossy Accents. I embossed a panel of silver mirror card using a Darice wood grain embossing folder and added it behind the main topper. I cut a sheet of A4 purple card to 29cm and scored it in half at 14.5cm to make a card blank then added a panel of Sarabooks purple paper on top before adding the matted and layered topper. I added three purple gems to the bottom right hand corner as shown and stamped a sentiment inside. I die cut two small butterflies using CC Sara Signature dies and added them to the inside with dots of Glossy Accents.
I haven't added a birthday sentiment to this card in case my mum doesn't like it so I'll be able to use it for someone else if I need to plus this is such a beautiful image I thought the recipient might like to frame it afterwards (I'm thinking about doing a number of these fairies and framing them for Christmas presents).
I hope you like my latest card, I really love the images and look forward to making more cards, I'd like to experiment with different colouring mediums instead of my usual Promarkers. As always if you have any questions or comments then please leave them in the usual places. Until next time - keep crafting!
Love and crafty hugs,
Sarah xxx
| Spellbound Birthday Card |
| Close up of stamped image |
| Lindsay Mason Designs Verse |
I really love the Flights of Fantasy by Morgan Fitzsimons stamps and "Aoife" (I hope I never have to pronounce that!) is such a beautiful image. I coloured the image in with Promarkers (vanilla,blush, Sandstone, cinnamon, lilac, lavender, amethyst, blossom, pale pink, powder blue, leaf green) and went over the wings of Aoife with CC Clear Sparkle pen and then coated them with Glossy Accents. I embossed a panel of silver mirror card using a Darice wood grain embossing folder and added it behind the main topper. I cut a sheet of A4 purple card to 29cm and scored it in half at 14.5cm to make a card blank then added a panel of Sarabooks purple paper on top before adding the matted and layered topper. I added three purple gems to the bottom right hand corner as shown and stamped a sentiment inside. I die cut two small butterflies using CC Sara Signature dies and added them to the inside with dots of Glossy Accents.
I haven't added a birthday sentiment to this card in case my mum doesn't like it so I'll be able to use it for someone else if I need to plus this is such a beautiful image I thought the recipient might like to frame it afterwards (I'm thinking about doing a number of these fairies and framing them for Christmas presents).
I hope you like my latest card, I really love the images and look forward to making more cards, I'd like to experiment with different colouring mediums instead of my usual Promarkers. As always if you have any questions or comments then please leave them in the usual places. Until next time - keep crafting!
Love and crafty hugs,
Sarah xxx
Monday, 4 April 2016
A card share
Hello crafty peeps and welcome to my crafty nook! I hope you all had a brilliant Easter etc. Things have been rather quiet in my crafty nook which is why I've not blogged for nearly a month. It's partly down to the state of my craft space, I sometimes think there may be something in the feng shui principal of clearing spaces to increase creativity, I certainly struggle to create anything when my crudy is as messy as it has been in recent weeks. I still have a lot of work to do in my tiny craft space but I've made a start which is something.
I have managed to make a couple of cards over the weekend. It was my mum-in-law's birthday on Saturday and it's Gramps's birthday today (Monday). I made a Verity Rose card for mum and a Wine Buffs card for Gramps (he's notorious for being difficult to buy and craft for!) The Wine Buff stamp set has a number of accessories for him to hold so I decided to add a balloon to the image.
All of the images were coloured in using Promarkers (some are getting a bit dry though) and I went over the shell and part of Sunbeam's hat with clear Spectrum Noir Sparkle pen - I take back all I said about the inferior sparkle, if you shake well before each use it's even more shimmery than the Wink of Stella! The shell paper is from a Craftworks 8" x 8" paper pack called Harbour Boulevard, I bought it last year for £6.50 (36 sheets with 6 designs) but it came out 2014. I didn't want to waste any of the paper so I cut out the inside of the paper leaving a 2" frame which I then covered with some striped blue paper from my stash (not a 100% positive but think it may have come from The Works in a scrapbook kit). After stamping and colouring the Sunbeam image, I cut it into a square and matted it onto silver mirror card leaving a thin border around the image. I die cut 4 flamingos out of holographic card and stuck them down in the corners using tiny blobs of glue and added the coloured in panel to the centre as shown. I recently got a Happy Birthday die from Tattered Lace so I die cut that out of the same card as the birds.
I've got all but one of the stamp sets available in the Verity Rose range and I love them so much, Sunbeam is only the second one I've stamped with so far but I'm very excited about what I can make with them. I hope you like the card I made for mum-in-law.
I stamped the Wine Buffs image onto a die cut circle of Sheena's Stamping Card and though I like it for coloured pencils I think I prefer my usual supper smooth card stock for Promarker colouring as I got a slight bleed outside of the outline something that rarely happens with my regular card (which is a heck of a lot cheaper too!). I coloured the image using Flexmarkers then added some clear Shimmer pen to the balloon (which you can't actually see on the photo). The blue large dot paper was from a pack of 6" x 6" Docrafts Basics Dots and Stripes. I added this to a 5.5" square card blank and trimmed off the excess.. The sentiment on the front of the card was from the How Old! stamp set and I added silver Shimmer pen to the nails after cutting out the stamped image. I added it under the circle panel of card using foam tape. The stamped sentiment inside the card was taken from the Fabulous Fellas Sentiment stamp set. Both the stamp sets used on this card were bought in the £1 sales from Katy Sue Designs a few months ago. If you don't already shop at Katy Sue Designs (Flower Soft is probably their most well known product) then check them out online and sign up for their newsletter, they regularly have sales on and unlike other sites they don't just sell unpopular (or old) stamp sets but ones that return to the full price after the sale ends. I've had some real bargains from the site and the quality of the stamps (clear acrylic ones for ease of use) is very good - these images were the first time I've stamped with them and they didn't need any priming.
I hope you've liked the cards, I had a lot of fun making them and the Sunbeam card went down very well (Gramps hasn't opened his yet). Hopefully it won't be quite so long between blog posts and I'll have some stamps and news to share soon (look out after the 20th for some exciting news!) As always if you have any comments or questions then please leave them in the usual places and until next time - keep crafting!
Love and crafty hugs,
Sarah xxx
I have managed to make a couple of cards over the weekend. It was my mum-in-law's birthday on Saturday and it's Gramps's birthday today (Monday). I made a Verity Rose card for mum and a Wine Buffs card for Gramps (he's notorious for being difficult to buy and craft for!) The Wine Buff stamp set has a number of accessories for him to hold so I decided to add a balloon to the image.
| Sorry about the slightly out of focus image |
| Close up of Sunbeam Verity Rose Image |
| Close up of die cut Flamingo - comes with matching stamps |
| A bit of envelope art featuring the flamingo from the Verity Rose accessories stamps |
All of the images were coloured in using Promarkers (some are getting a bit dry though) and I went over the shell and part of Sunbeam's hat with clear Spectrum Noir Sparkle pen - I take back all I said about the inferior sparkle, if you shake well before each use it's even more shimmery than the Wink of Stella! The shell paper is from a Craftworks 8" x 8" paper pack called Harbour Boulevard, I bought it last year for £6.50 (36 sheets with 6 designs) but it came out 2014. I didn't want to waste any of the paper so I cut out the inside of the paper leaving a 2" frame which I then covered with some striped blue paper from my stash (not a 100% positive but think it may have come from The Works in a scrapbook kit). After stamping and colouring the Sunbeam image, I cut it into a square and matted it onto silver mirror card leaving a thin border around the image. I die cut 4 flamingos out of holographic card and stuck them down in the corners using tiny blobs of glue and added the coloured in panel to the centre as shown. I recently got a Happy Birthday die from Tattered Lace so I die cut that out of the same card as the birds.
I've got all but one of the stamp sets available in the Verity Rose range and I love them so much, Sunbeam is only the second one I've stamped with so far but I'm very excited about what I can make with them. I hope you like the card I made for mum-in-law.
| How Old! Wine Buffs Card for Gramps |
| Close up of topper |
| Fabulous Fellas Sentiment |
I hope you've liked the cards, I had a lot of fun making them and the Sunbeam card went down very well (Gramps hasn't opened his yet). Hopefully it won't be quite so long between blog posts and I'll have some stamps and news to share soon (look out after the 20th for some exciting news!) As always if you have any comments or questions then please leave them in the usual places and until next time - keep crafting!
Love and crafty hugs,
Sarah xxx
Friday, 11 December 2015
Help someone's stolen the first week of December! (JK)
Hello crafty peeps and welcome to my crafty nook! I hope you are all well and my thoughts and prayers go out to any who have been affected by the recent storms *hugs*.
I had hoped to have added a post to my crafty nook before now but between internet connection problems and a really bad migraine that's still lurking, I've not really had a lot of time to write about the things I've been making. Plus I'm almost 100 per cent sure that someone has stolen part of December *looks around suspiciously* - it's the only logical conclusion to why I'm so far behind in my Christmas preparations. I've made a grand total of THREE Christmas cards and one measly present. And if I'm honest the cards were made weeks ago!
I would like to share the solitary present I've made so far - a fairy door. The Works have had some really cute fairy doors to decorate for months but when I went to order some using Click and Collect they were out of stock and haven't come back in yet. So kicking myself I've trawled the internet for some reasonably priced alternatives. I eventually went with Daisymoon Designs and ordered 6 doors @ £1.15 each and a wishing tree mini pack which has laser cut wooden pieces e.g. hearts, toadstools and flowers. They had a choice of two door styles and I went with the stone cladding effect for the door frame. Unlike the doors from The Works, these don't open but they are still very cute and anyway I think it takes magic fairy dust to open fairy doors otherwise the wee folk wouldn't get any peace at all! My only complaint with my order was that the doors only came with 4 door handles so two of the doors will have to have a gem or similar for a door knob, unfortunately the MDF is far to thick for me to use a Tim Holtz Hitch fastening otherwise I would have been using them for all the doors, and a couple of the wishing tree mini pack pieces were of poor quality compared to the rest. I haven't complained about these things to Daisymoon mainly down to the fact that I developed a migraine not long after making my first door up. That brings me to a bit of a warning - I've not used MDF before and I'm a complete novice to altered decor pieces but it's probably advisable to seal the doors with Gesso before colouring them in using Promarkers. Because I'm new to this I didn't have any Gesso in (it's on my need to buy list now!) so I just coloured onto the untreated MDF. Fortunately I was in the lounge as I coloured instead of my tiny crudy otherwise I may very well have passed out from the fumes if I'd been crafting in my usual place, as it is I've had a migraine headache so severe that I haven't been able to do anything for two day without feeling nauseous and dizzy. Admittedly I do get regular migraines but not as bad as this one has been. So please be careful and work in a well ventilated room and ideally seal your MDF before colouring.
The door comes in four pieces including the door handle and window. I started by colouring these with Silver Metallic Promarker. The actual door was coloured with walnut Promarker and I went over it a couple of times to give it a deep rich colour. There are 15 'stones' in the door frame so I coloured two each in the colours of the rainbow with an extra purple as it's one of my favourite colours. Once the pieces had dried I stuck them together as shown using Scotch Quick drying adhesive, I then put the door to one side while I made the key charm. This was very simple to make, I have some silver key charms amongst my stash which are all different, I really liked this design as it reminds me of the Queen of Hearts and so I added a silver jump ring to the top loop and threaded it onto some brown elastic cord from my stash. I then threaded three jingle bells also from my stash and tied a knot in the cord. When the glue had set on the door, I added three layers of clear Wink of Stella to the rainbow stones to make it extra shimmery and added the key to the door knob. I've made a deep box lined with fantasy fairy papers to put the door in and the recipient can either display the door in the box or have the door leaning against the wall.
I had hoped to have added a post to my crafty nook before now but between internet connection problems and a really bad migraine that's still lurking, I've not really had a lot of time to write about the things I've been making. Plus I'm almost 100 per cent sure that someone has stolen part of December *looks around suspiciously* - it's the only logical conclusion to why I'm so far behind in my Christmas preparations. I've made a grand total of THREE Christmas cards and one measly present. And if I'm honest the cards were made weeks ago!
I would like to share the solitary present I've made so far - a fairy door. The Works have had some really cute fairy doors to decorate for months but when I went to order some using Click and Collect they were out of stock and haven't come back in yet. So kicking myself I've trawled the internet for some reasonably priced alternatives. I eventually went with Daisymoon Designs and ordered 6 doors @ £1.15 each and a wishing tree mini pack which has laser cut wooden pieces e.g. hearts, toadstools and flowers. They had a choice of two door styles and I went with the stone cladding effect for the door frame. Unlike the doors from The Works, these don't open but they are still very cute and anyway I think it takes magic fairy dust to open fairy doors otherwise the wee folk wouldn't get any peace at all! My only complaint with my order was that the doors only came with 4 door handles so two of the doors will have to have a gem or similar for a door knob, unfortunately the MDF is far to thick for me to use a Tim Holtz Hitch fastening otherwise I would have been using them for all the doors, and a couple of the wishing tree mini pack pieces were of poor quality compared to the rest. I haven't complained about these things to Daisymoon mainly down to the fact that I developed a migraine not long after making my first door up. That brings me to a bit of a warning - I've not used MDF before and I'm a complete novice to altered decor pieces but it's probably advisable to seal the doors with Gesso before colouring them in using Promarkers. Because I'm new to this I didn't have any Gesso in (it's on my need to buy list now!) so I just coloured onto the untreated MDF. Fortunately I was in the lounge as I coloured instead of my tiny crudy otherwise I may very well have passed out from the fumes if I'd been crafting in my usual place, as it is I've had a migraine headache so severe that I haven't been able to do anything for two day without feeling nauseous and dizzy. Admittedly I do get regular migraines but not as bad as this one has been. So please be careful and work in a well ventilated room and ideally seal your MDF before colouring.
| Rainbow fairy door with lots of sparkle |
I hope you like my latest project. I had a couple of craft goodies arrive through the post this week and once my last parcel arrives I'll be sharing my crafty buys with you all here in my crafty nook. As always if you have any questions or comments then I'd love to see them so please leave them in the usual places and until next time - keep crafting!
Love and crafty hugs,
Sarah xxx
Tuesday, 30 June 2015
A CAS card for Kate (entry for Passion For ProMarkers Blog Challenge)
Hello crafty peeps and welcome to my crafty nook! I hope you are all enjoying the mini heatwave, it's going to be even hotter tomorrow. I've even opened the window in my crudy so it must be hot! I've made a few cards since my last blog post but I'm only going to share one with you today as I'm waiting for the recipients to get their cards before I add them to my blog as at least one person who will be getting a card in the next day or two reads my blog and the other (actually both people are) is a Facebook friend so might see the card beforehand on my timeline. I'm fairly certain my friend Kate doesn't read my blog and as far as I know she doesn't go on Facebook anymore so I'm safe to show her card here. I've chosen a 'clean and simple' card to send to Kate for two reasons, it's her style and it fulfills the challenge over at Passion for ProMarkers. I really wanted to enter the challenge last week but was unable to enter it in time due to having a migraine that's still lingering 4 days after it started. I was determined to submit a card for this week's challenge and the theme of Clean and Simple suited me down to the ground.
I've used a Crafter's Companion stamp from the Party Paws range and coloured it in using a combination of ProMarkers and FlexMarkers. Once the image was coloured in I mounted it onto a white card blank using 3mm foam tape to give it a bit more interest while preserving the CAS feel to it. I also highlighted some of the image using clear Wink of Stella brush marker. I really like the CAS style mainly because I'm not very good at colouring in the backgrounds but feel obliged to with most cards.
I hope you like my latest card - I think these images from Crafter's Companion are so cute and I can't wait to have a play with the other two images I have. As always if you have ant questions or comments then please leave them in the usual places and until next time - keep crafting!
Love and crafty hugs,
Sarah xxx
| Clean and Simple "Party Paws" card |
I've used a Crafter's Companion stamp from the Party Paws range and coloured it in using a combination of ProMarkers and FlexMarkers. Once the image was coloured in I mounted it onto a white card blank using 3mm foam tape to give it a bit more interest while preserving the CAS feel to it. I also highlighted some of the image using clear Wink of Stella brush marker. I really like the CAS style mainly because I'm not very good at colouring in the backgrounds but feel obliged to with most cards.
| The card from a different angle x |
I hope you like my latest card - I think these images from Crafter's Companion are so cute and I can't wait to have a play with the other two images I have. As always if you have ant questions or comments then please leave them in the usual places and until next time - keep crafting!
Love and crafty hugs,
Sarah xxx
Thursday, 5 February 2015
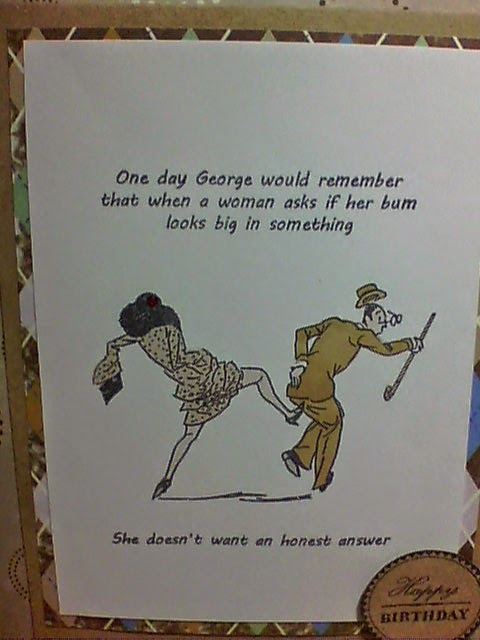
Acid Drops and Whatnots "Does my bum look big?"
Hello crafty peeps, welcome to my crafty nook! Nearly the weekend again, not sure where this week's gone. It's my hubby's best friend's birthday on the 10th and Chris asked me to make a card for him. The timing was perfect because this week's challenge on Passion for ProMarkers is "One For The Boys" (male themed makes). There isn't a lot of ProMarker colouring but it is there on the stamped image so I'm entering it in the challenge but plan on submitting a second entry once it's made.
For this card I used a stamp set from one of my favourite company's - Acid Drops and Whatnots, I don't have a huge collection of the stamp sets but I try to purchase a couple or three sets every time they have a sale. The featured stamp is from their last sale (aciddropsandwhatnots.co.uk click on this link and then on the Sale Stamps and Topper Sets to purchase this stamp set for the reduced price of £6.99) and is one of my favourites as it's one of the few stamp sets I own which are suitable for men's cards. Because it's a vintage image I wanted to keep the colours muted (ProMarkers used are Caramel, Putty, Almond, Sandstone, Cool Grey 1 and Vanilla) and just added a splash of colour to the lady's hat by adding a small red gem. The papers are cut down from a Dovecraft 12" x 12" paper pack and I'm afraid I can't remember the name of it as I bought it 6 years ago and the front cover's gone walkabout - those pesky craft gremlins probably stole it! The card base and card layer are both Kraft card purchased from my local craft shop and I used a sentiment taken from a Kirstie Allsopp stamp set that came free with one of my craft magazines, probably Simply Homemade or Crafts Beautiful. I stamped it on a piece of scrap kraft card using my usual ink. The inside of the card is stamped using a sentiment taken from a Docrafts Papermania stamp set from the Heritage Press range. Here are a couple of additional photos.
I had a lot of fun making this card and I really hope Les (Chris's friend) likes it. If you'd like to follow along with this week's challenge click on the link promarkerchallenge.blogspot.co.uk/2015/02/week-282one-for-boys.html. As always if you have any questions or comments please leave in the box below or use the comments form in the side bar. Until next time - keep crafting!
Love and crafty hugs,
Sarah xxx
| Acid Drops and Whatnots card |
For this card I used a stamp set from one of my favourite company's - Acid Drops and Whatnots, I don't have a huge collection of the stamp sets but I try to purchase a couple or three sets every time they have a sale. The featured stamp is from their last sale (aciddropsandwhatnots.co.uk click on this link and then on the Sale Stamps and Topper Sets to purchase this stamp set for the reduced price of £6.99) and is one of my favourites as it's one of the few stamp sets I own which are suitable for men's cards. Because it's a vintage image I wanted to keep the colours muted (ProMarkers used are Caramel, Putty, Almond, Sandstone, Cool Grey 1 and Vanilla) and just added a splash of colour to the lady's hat by adding a small red gem. The papers are cut down from a Dovecraft 12" x 12" paper pack and I'm afraid I can't remember the name of it as I bought it 6 years ago and the front cover's gone walkabout - those pesky craft gremlins probably stole it! The card base and card layer are both Kraft card purchased from my local craft shop and I used a sentiment taken from a Kirstie Allsopp stamp set that came free with one of my craft magazines, probably Simply Homemade or Crafts Beautiful. I stamped it on a piece of scrap kraft card using my usual ink. The inside of the card is stamped using a sentiment taken from a Docrafts Papermania stamp set from the Heritage Press range. Here are a couple of additional photos.
| Nice Aim Madam! |
| Inside of card. |
I had a lot of fun making this card and I really hope Les (Chris's friend) likes it. If you'd like to follow along with this week's challenge click on the link promarkerchallenge.blogspot.co.uk/2015/02/week-282one-for-boys.html. As always if you have any questions or comments please leave in the box below or use the comments form in the side bar. Until next time - keep crafting!
Love and crafty hugs,
Sarah xxx
Sunday, 1 February 2015
Tatty Twinkles Card for Millie
Hello crafty peeps and welcome to my crafty nook! Can you believe it's February already!!! It's typical February weather here and it sounds like a gale's blowing outside so I'm very relieved to be tucked up warm indoors. I mentioned in my last posting that it's my niece's birthday next week so as promised I'd like to share the card I've made for her. Originally I wanted to combine the Clearly Besotted stamp set "Life's a Circus"- ( which incidentally is currently part of the up to 75% clearance sale over at Clearly Besotted stamps and is reduced from £9.00 to only £3.15!! Guess which price I paid - grr) - with Tatty Twinkles "Goldfish" stamps but I couldn't get them to look right together. So I decided to just concentrate on using the TT Goldfish stamps.
I stamped the TT image onto a sheet of white 300gsm card stock * cut to 5" x 5" * using Memento Tuxedo Black ink and coloured it in using ProMarkers and Kaisercraft Fusion Alcohol markers for the sky and water. As regular readers know I love my ProMarkers and have all the single to buy colours (though not the limited editions sets) but I've found that things like ice, snow, glass and water are quite difficult to find the right shade of ProMarker to colour them in with. I don't have the necessary skill to blend the right colours with the pens I have so I bought some Kaisercraft Fusion pens from Every Craft's A Pound to bridge the gap. Please note that I don't use them on card entries for the ProMarker Challenges or at least I haven't up to now, my main image is always done with ProMarkers otherwise it would be cheating and what's the point of that? If I use any other colouring medium (usually chalks for the sky as you get a cloud look without having to mask off areas) I always put it in the text. Anyway back to the card I coloured Tatty Twinkles in using the ProMarkers but coloured the water in the goldfish bag using 'Frost' KC fusion pen and the sky with 'Arctic'. I dotted Tatty's hair ribbons with Sakura Gell Roll Clear Star pen and added it to her shoes and the pocket of her pinafore. I coated the water part of the goldfish bag with clear wink of stella.Once I was happy with the colouring I matted the finished image onto black card cut to 5.5" x 5.5" and then layered this onto a sheet of paper taken from a 6" x 6" paper pad by Crafter's Companion called 'Everyday with Barkley' which are double sided. I matted this onto black card cut to 6.5" square. I covered an 8" square scalloped card blank with holographic film which I bought from The Works - its really pretty but extremely difficult to cut with a paper trimmer and even harder to trim around the scallop edges. I centred the image onto the holographic card blank as shown. I made the flower using a second sheet of the double sided designer paper from CC and "Daisies" Sizzix Bigz die. I laid each flower shape on the underside of a mouse mat and using a circular motion with a ball tool rubbed the outer part of the centre causing the petals to stick up and outwards - I wanted the flower to mimic the spikiness of Tatty's hair. The die cuts the centre out of each flower layer which makes it a little bit difficult to layer the different sizes together so I cut a rough circle out of card and stuck the largest flower onto it then layered the smaller sizes onto it using tacky glue, once it had dried I added a half backed pearl and used red liner tape to stick it to the card. The "Goldfish" stamp set has a number of other stamps aside from the main image and one of them is a ticket, I stamped this out onto a scrap of card and fussy cut around it. I then coloured over it using Pale Pink ProMarker which I also used on Tatty's dress. I made the Happy Birthday ticket by die cutting a Tim Holtz ticket strip using white card, I tore one of the tickets off the strip and stamped the ticket outline using a Ticket themed stamp set by Kanban (came out 2012), once the ink was dry I coloured over it using Rose Pink ProMaker and highlighted parts of both tickets using the clear star gell roll pen. I cut two lengths of craft wire, one pink and the other pale purple and using a paintbrush handle wrapped one rotation of wire around it to form a loop with each piece of coloured wire. I carefully removed the looped wire from the handle and circled the wire around the loops to form flat spirals. I twisted the bottom of the two pieces of wire together then adhered them under the flower using a pop glue dot. I added the tickets to the spirals as shown. I haven't decorated the inside of the card yet but there are lots of fairground themed stamps included in the stamp set.
Here are a few more photos of the finished card.
| Tatty Twinkles "Goldfish" 8" x 8" scalloped card |
Here are a few more photos of the finished card.
| Close up of spiky daisy and ticket embellishments |
| Close up of Tatty Twinkles - so cute! |
SUPPLIES USED
Tatty Twinkles "Goldfish" stamp set
Kanban Tickets stamp set (2012)
Crafter's Companion Everyday with Barkley Luxury Designer Paper Pad
Sizzix Daisy Bigz Die
Tim Holtz tickets strip die
Craft wire in pink and purple
Half backed pearl
Card stock in white and black
Holograpic adhesive film
ProMarkers in: Rose Pink, Pale Pink, Baby Pink, Oatmeal, Vanilla, Soft Peach, Caramel, Cocktail Pink, Sandstone, Pastel Beige, Cool Grey 4 + 5, Black, Walnut, Pumpkin, Clear Blender.
Kaisercraft Fusion Alcohol Ink Pens in Arctic and Frost
Clear Wink of Stella Brush Marker
Sakura Gell Roll pen in Clear Star
I've really enjoyed making this card for Millie and I hope she likes it too. I'm expecting a delivery from Sizzix on Monday - it was ordered 16/1/15! - which I will share once it's arrived. If you have any questions or comments then please leave them below. I hope you all have a wonderful weekend and until next time - keep crafting!
Love and crafty hugs,
Sarah xxx
Subscribe to:
Posts (Atom)