Translate

Showing posts with label Clear Wink of Stella. Show all posts

Friday, 17 June 2016

Rainbow Cupcake Card

Hello crafty peeps and welcome to my crafty nook! I hope you've all had a brilliant week, do you have any crafty plans for this weekend? I got a small order from The Works click and collect today so I'm looking forward to playing with my new Dovecraft dies. I'm not sure if you've seen but Dovecraft have brought out a range of basic dies including a really gorgeous painted style Happy Birthday which I really wish I'd ordered as I didn't see it on the website last time I looked. I ordered two sets - a cat with a paw print and a banners die, they only cost £3 each which I think is the usual price. I also got a pack of mirror card (£1 for 6 mixed sheets) and a pack of six different style and coloured holographic card. I've found most own brand cardstock to be of an excellent quality from The Works and this is no exception.

This week's challenge over at Passion For Promarkers is "Food and Drink". For more details and to check out what the design team have come up with please click on this link http://promarkerchallenge.blogspot.co.uk/2016/06/week-350food-and-drink.html .   I decided to use one of the Verity Rose stamps by Crafter's Companion - Cupcake for my card. I'll be totally honest, Cupcake was actually the last of the Verity Rose stamps that I bought because it's not an image that really thrilled me (unlike the others) but I've found it to be a really useful image to have because lots of people like cupcakes. Here is the card I came up with.

Rainbow cupcake card

Slightly better photo of the card

Close up of Cupcake image

I wish I could take a photo that actually shows how sparkly these cupcakes are!

Hello Cupcake!

In addition to the main Cupcake image, I used the companion stamp set and matching dies for the cupcakes. I found it easier to diecut the shape first then stamp the image onto it. I used the same cupcake stamp to decorate the black panel. I used clear Versamark ink to stamp the image on the black card then dusted over the watermarks with mica powders using a spare blusher brush (I don't wear blusher so it's always a brush that goes spare if I get any make up brushes given) I've not used this technique much before but I think that next time I'll use an anti static bag first before stamping as the powder is quite hard to get off the card (you can't really see in the photos but the black card has a thin coating of the mica powder all over it and not just on the watermarks as I wanted). I coloured all the images using Promarkers and added Dovecraft pink glitter glue to some of the cupcake toppings and Clear Wink of Stella and Glossy Accents to the rest. I also added the WOS and Glossy Accents to the gems in Cupcake's hair band. I should probably point out that I diecut the scalloped oval before adding the stamped image but that was only after I'd already finished one topper only to have the die shift as I was running it through the Big Shot and accidentally chopped the side of her face off. I really should have used more tape to stick it down! The scalloped oval dies are from Creative Dies. The paper layers are from an A4 paper pad I got from the Pound Land a few years ago. I've not added a sentiment to this card because I'm not sure who I shall give it to but I'm quite pleased with how it's turned out, I really like how the mica coated cupcakes almost change colour as they hit the light (another thing that's hard to show in photos) and it's definitely a technique I'd like to do more of.

I hope you like my latest creation, I need to practice doing brown eyes next as I'm tending to stick with greens or blues at the moment so hopefully I'll have a brown eyed beauty card to share with you soon. As always if you have any questions or comments then please leave them in the usual places. I hope you all have a brilliant weekend and until next time - keep crafting!

Love and crafty hugs,

Sarah xxx

Wednesday, 13 April 2016

Get Whale Soon

Hello crafty peeps and welcome to my crafty nook! I hope you are all well and enjoying the wonderful spring weather. I'm still not very well but I've managed to make a card for my nephew Chris who is recovering after having surgery last week.


Close up of the Get Whale Soon card

New stamp for the back of my cards (my pins are at the ready!)

A departure from my usual style, I've not done any colouring on this card. The whale and sentiment are from a Clearly Besotted Stamps set called ' Whale Done!' and the waves were made using a Clearly Besotted Stamps die. The whale and spurt were stamped using Distress Inks and the clouds were die cut using a Poppy Stamps Die called Flying High (I think). I saw the stamp from the back panel on Facebook and had to order it as it made me giggle, it took a while to get here as it's from the USA but it was well worth the wait. I added some clear wink of stella to the clouds and waves and added a googly eye to the whale.

Sorry this is a shorter than usual post, I'm still feeling really ill and want to get back to my sick bed. As always if you have any questions or comments then please leave them in the usual places. Until next time - keep crafting!

Love and crafty hugs,

Sarah xxx

Sunday, 22 March 2015

Check It Out!

Hello crafty peeps and welcome to my crafty nook! Today I'd like to share a card I've made for a good friend of mine, Kate who I've kind of lost touch with and it's inspired by this week's blog challenge over at Passion for ProMarkers. The theme is 'Check It Out' which I thought went perfectly with a MFT stamp - Pure Innocence "On A Picnic".

On A Picnic card inspired by the PFP challenge Check It Out!

The red and green checked papers came from the Riverside Revels paper stack from Dovecraft and I really love the red check paper because it's printed on canvas so has great texture which I accentuated by distressing the edges with a craft knife - it reminds me of a picnic blanket and I think it goes brilliantly with the picnic themed stamp set. The green plaid hill and sky paper came from a Travel themed scrapbook paper stack by DCWV which I've had for donkey's years. I just drew a curved hill top and cut it out with scissors. The main image and picnic basket were coloured in using ProMarkers and then I fussy cut both images out and arranged as shown. I used some foam tape to raise the picnic basket off the card. I used a 'hello' die from Clearly Besotted Stamps to die cut the word out twice, once in black and once using a scrap of metallic blue card I had left over from another project. I layered the two together slightly off set to give a shadow effect and stuck it down using Tattered Lace Detail glue. I made a 6.5" square card blank out of two sheets of A4 kraft card (one sheet was cut to 6.5" square and the other was cut to 7" x 6.5" and scored 0.5" in on the longest side to form a hinge which I stuck to the back of the 6.5" panel).

Close up of the main image

Close up of Hello

Close up of picnic basket
 I added clear Wink of Stella to the little girl's hair bow and to the picnic basket.

I hope you like my latest card, it's quite simple but I'm not keen on making heavily embellished cards. I'll be making a matching envelope using my WRMK envelope punch board assuming it goes up to 6.5" square envelopes - I shall have to check. Please feel free to comment in the usual places if you have any questions and until next time - keep crafting!

Love and crafty hugs,

Sarah xxx

Friday, 23 January 2015

New Driver Card and haul from Every Craft's A Pound

Hello crafty peeps, welcome to my crafty nook! I can't believe it's already a week since my last post - I don't know where the time's gone. I hope you are all well and have something fun planned for the weekend -my plan is to hibernate or just hide in my crudy lol. I'm still (yes STILL!) sorting my crudy out and I've finally put away some Christmas stuff that got left on my desk after making Christmas cards last year, I thought I'd put it all away put I think it hides when I'm not looking. Because my crudy is very small I tend to have boxes stacked on top of each other and I don't have any work surfaces clear (when I'm crafting my free space is about the size of an A4 sheet of paper and when I use my trimmer it hangs off the edge of the desk) so I have to balance everything on my hip or on the floor when I'm tidying my stash (not much clear space there either) which makes putting things away turn into quite a production. Plus I'm a bit idle.

I literally have an A4 sheet of paper worth of space!

Just like last week I have my little crafty helper keeping an eye on things as I blog but instead of sitting on my head he's curled up on the pull out shelf of the computer desk - it's really sweet and he's keeping my wrists warm as they are resting on him! Only problem is I keep having to stop typing every couple of lines or so as Jinx gets fidgety if I don't stroke him regularly. Small price to pay to have a contented cat.

Passion for ProMarkers Blog Challenge week 280 - New Beginnings

New Driver card entry 

Click here to join in: promarkerchallenge.blogspot.co.uk/2015/01/week-280-new-beginnings.html

As always I'm doing the Passion for ProMarkers Blog Challenge which is called "New Beginnings", I've started this project three times so far, the first two attempts were for Shhh Baby Asleep Door signs as I wanted to do something a bit different than a baby card but I ended up scrapping them as I couldn't get them to look the way I had them in my head. Then I decided to do a car themed card as my nephew is taking his driving test soon and it would be good to have a card with a purpose this week. I've had two orders from "Every Craft's A Pound" this year and ECAP has started giving away a free gift with every order - stamps this time round. The first free stamp set I got was called Vroom Vroom and has a sleek sports car as it's main image and the second stamp set I got free was called Beep Beep and has the front grill of a car with number plate style greetings to stamp in the empty registration plate. I stamped the sports car out and coloured it with red poppy and red ProMarker but couldn't get it to look shiny so I decided to cheat and coated it with some Dovecraft clear 3D pearl effects (it's a bit like a clear raised glue or Glossy Accents and is AMAZING for sticking sequins to projects - once it dries those suckers won't shift!) unfortunately it dried streaky as I didn't put an even amount on the car. Stupidly I was being a bit stingy with it as I only have one bottle (did the same with Glossy Accents, never used it as it was nearly a fiver for a bottle and now it's gone yellow!) which is really daft as it only cost £1 in the first place (will definitely be buying more bottles assuming ECAP still sell it when I place my next order). So I scrapped that idea and instead settled on a cute Mini car image from a stamp set called "New Beginnings". I stamped the image onto a panel of white card stock towards the left hand side of the card using Memento Tuxedo Black ink then masked off the area above the bonnet using a heart shaped post it note (bonnet and post it note both curve slightly) and stamped a flower half on the bonnet in the same ink, then I stamped a different flower on the door of the Mini. Both stamps came from a set I got free from Crafts Beautiful magazine in 2011 which featured cupcakes and flowers. The wheels of the car were a little patchy so I stamped them again on a spare piece of card and fussy cut round them. I coloured all images using ProMarkers then stamped some hearts (stamp used from "Scientifically Speaking - Clearly Besotted) in red ink behind the back of the car so it looks like they are coming out of the exhaust and stamped more flowers using black ink which I then coloured in. I added a black road using Black Wink of Stella which I also added to the re-stamped wheels. The door handle, bumpers, wing mirror base and trim around the headlight were coloured in using ProMarkers Metallic silver marker. I added clear Wink of Stella to the windows, flowers and lights of the image. I added the new wheels using sticky foam tape so they are slightly raised on the car. I coloured the sky using Dovecraft Brights chalks then stamped W3LL DON3 from the Beep Beep stamp set and punched out a star from glitter card which I added to just under the sentiment. I glued some sequins onto the hearts and flower exhaust plume using the Dovecraft clear Pearl Effects. Once the sequins where dry I mounted the panel onto corrugated silver card and then matted it onto black card.  I made a card blank using tie dyed card from DCWV which I think ties in nicely to the hippy style of the mini.

Close up of topper

This car is probably a bit girly for my nephew but I couldn't resist making it pink and flowery. It's taken me a lot longer than usual to make a card for this challenge after all my false starts but I'm rather pleased with how it's turned out.

Haul from Every Craft's A Pound


I couldn't resist putting in an order to ECAP after I saw all the lovely Steampunk themed metal embellishments. I've just taken a photo of the complete box of goodies as many of them are multiples of the same thing - the quality is poorer than usual and I can't take another as I've put everything away so please bare with me. My order included Papermania Chronology Clock Faces, Cogs, Keys, book plates and clock hands though they are more like game spinners than hands. Four Urban background stamps (Chronology again) three bottles of Dovecraft 3D pearl effect in black, silver and cream and an embossing folder called Diamond Frame which matches the Docraft Art Deco release from last year. My final item was the free stamp set mentioned above. Check out the latest deals at ECAP here: www.everycraftsapound.co.uk - there are loads of Crafters' Companion goodies just in.

I hope you've enjoyed sharing my card and haul from ECAP. As always if you have any questions or comments please leave them below or in the comments form in the sidebar. I have a birthday card to make this weekend for Isobel's daddy which I'll post once I've made it (unless it's too hideous to share!) so until next time - keep crafting!

Love and crafty hugs,

Sarah xxx

Friday, 16 January 2015

Passion for ProMarkers Blog Challenge week 279 - Teddy Bears

Hello crafty peeps - welcome to my crafty nook! I can't believe it's nearly the weekend again - where has this week gone? I hope you've all had a good week and have lots of crafty plans for the weekend. My "crudy" still leaves a lot to be desired but one good thing has come from all this chaos - I've finally found the star dies that the craft gremlins had stolen inside a Amazon cardboard wrapper of all places (I save them in case I can think of a way to re-use them!), fingers crossed they'll put the water colour pencils in a place I'm going to look very soon too lol. Please excuse any typos that I may miss, my fur baby Jinx is being 'challenging' and keeps standing on the keyboard, in front of the screen or on my head! Not sure how he quite manages the last one as he is quite a big cat - I can only conclude that I have a giant head!!!

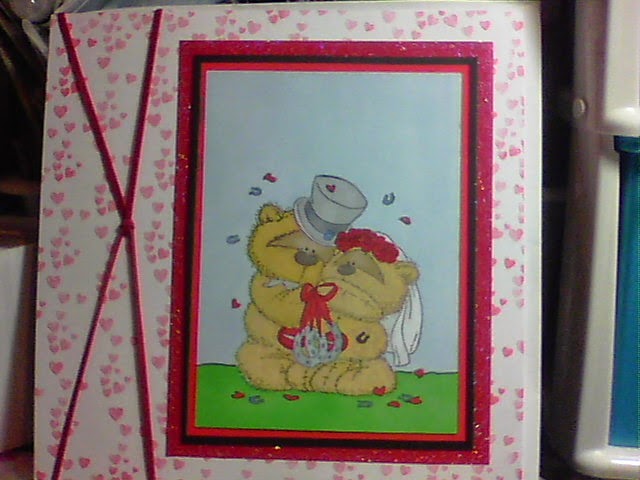
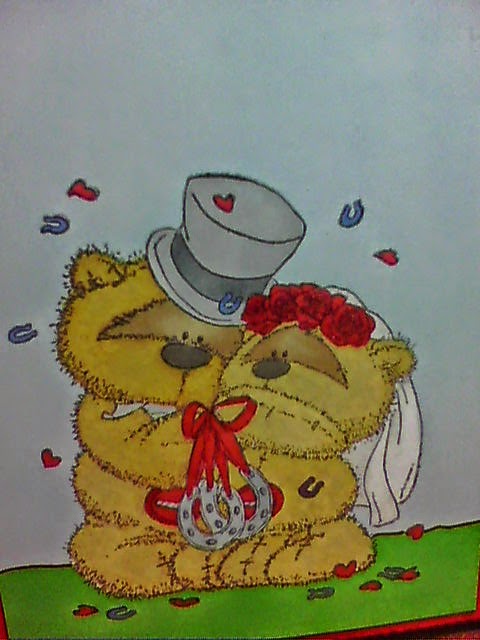
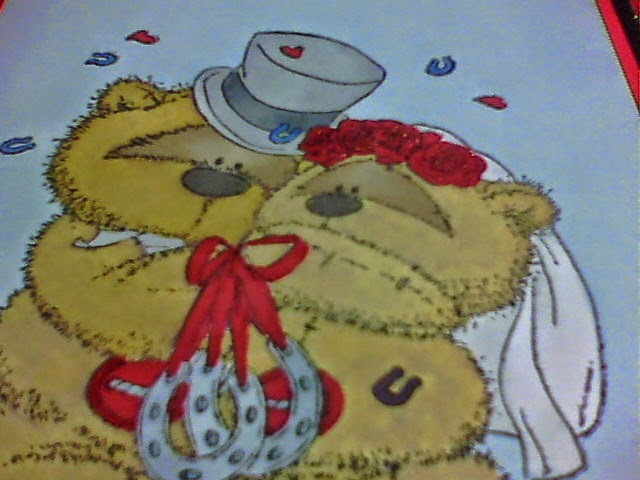
Anyway back to the main reason for this blog post - this week's challenge is Teddy Bears and one that I again found challenging (but not as challenging as Jinx!) not because I don't have the right supplies but because I have too many (what a lovely complaint to have, right?) and it was extremely difficult to chose which bear stamp to use. In the end I chose a Fizzy Moon stamp called Wedding Bells which I bought at the beginning of last year from my local craft shop. TBH I usually rigorously follow the coloured image on the packaging which is fine when it's something like "Tatty Teddy" or the "Forever Friends" bear where the images are well known but I think a little experimentation is good for images that don't have that brand recognition (saying that I haven't been in a card shop for about 10 years so I've no idea if Fizzy Moon is as popular as the two brands already mentioned - people may be horrified with the way I've coloured the two bears!) One of the reasons I've started to take part in the challenges on Passion for ProMarkers is to push myself out of my crafting comfort zone and not following the packaging of this stamp really did do that (babysteps still) saying that though the colouring isn't that different to the original. I've also tried a new way of colouring fur (new to me anyway) and instead of using pens in the same colour wave (yellows with yellows etc) I've actually blended mustard yellow with either caramel (Bride) or cinnamon (Groom) AND if that wasn't Avant Garde enough I scribbled the brown colours all over the images (obviously keeping inside the lines - I'm not that much of a rebel!) before going over it with the mustard! - Yes you did read that right, I SCRIBBLED!!! lol As usual my camera lets me down so you can't see how much texture this method gives the bears, they look all nubbly and worn in real life, just like the ted does that I've had since I was born. My husband and I married relatively late in life (we'll probably be pensioners when we celebrate our silver wedding anniversary) so I find the thought of middle aged bears getting married oddly comforting and I think other late bloomers would like it on their wedding card too.

Fizzy Moon Wedding Bells 8" x 8" card
I stamped the card blank all over using a heart stamp from the Clearly Besotted range called "Love Chemistry" (I think) * I've checked and the Clearly Besotted Stamp set used is actually called "Scientifically Speaking", sorry about any confusion caused, the hearts are meant to bubble out of a test tube or beaker but I thought they'd be perfect to reduce the starkness of the white card blank. I layered the main image on red card, black card and then holographic paper from Paper Cellar. I originally made red paper roses to stick on the top right and bottom left corners of the card but couldn't bring myself to clutter the card up (now that would truly be a hard challenge for me - use lots of embellishments!) so I made a couple of red felt coiled roses which I still couldn't face using lol. Instead I off centred the stamped image and added two lengths of suede cord tied in a knot in the centre which I added to the left hand side of the card. I've just realised I've forgotten to add a sentiment - please pretend it's there.

Here are some close ups.


I couldn't resist adding some clear Wink of Stella to the roses, hearts and belly buttons on the bears.

I hope you like my new card, as always if you have any questions or comments please leave them below or in the comments form in the side bar if you want to say something not for public viewing.


A Few Sites You Might Like To Visit


click to enter teddy bear challenge

Every Crafts A Pound has got some FABULOUS new stock in including Papermania's Chronology metal embellishments and stamps - very steampunk and similar to Tim Holtz clock faces, cogs and spinners but only £1!!!!

Please let me know if you like having sites to visit on my blog and if you do I'll continue to link sites as appropriate on my posts. Until next time - keep crafting!

Love and crafty hugs,

Sarah xxx

Saturday, 3 January 2015

Entry#1 for Passion for ProMarkers week 277 Mega Christmas Challenge

DIE CUT, FREE, GLITTER

Entry#1 for Passion for ProMarkers Mega Christmas Challenge

Hello crafty peeps and welcome to my crafty nook! I hope you are all enjoying the first weekend of 2015, I'm in the middle of a huge re-organisation of my living  room and my "Crudy" after purchasing a much bigger than I thought sideboard/dresser from one of the local second hand shops using some of the Christmas money I was given by very generous relatives! The unit is 5 ft 4 " long and almost 6 ft high, my husband would love for me to get rid of some rather outdated 70's units but I rather like them so they're staying lol. Instead I'm hoping to replace a desk I've had since I was about 12 (plus a cupboard) with a rather battered but still functional black sideboard in my crudy and put the "new" oak sideboard in it's place in the living room. It means I'm going to be rather busy for quite a while emptying the black sideboard of around 800 books and various other stuff (can't really remember what's in the cupboards apart from a rather pretty coffee service), moving the sideboard out of the way and replacing it with the two halves of the new sideboard then putting everything away so Chris doesn't trip over the boxes and bags. Then I'll have to repeat the whole process in the crudy (probably even more stuff in there than the living room - I'm a craft hoarder!) To make things even more 'interesting' I'd really like to have everything sorted by Wednesday 7th Jan '15 as it's my mum's birthday and I've invited her over for a meal.

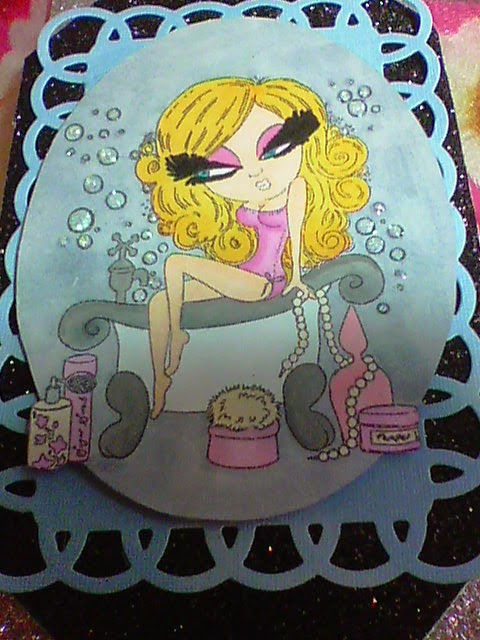
 Unfortunately I'm rather a Procrastinating Princess and I've already got distracted today making the above card for the Passion for ProMarkers blog challenge. I wasn't actually planning on entering but I've still got loads of diamond fold accordion blanks just crying out to be decorated and I treated myself to some Crafter's Companion "Scruffy Little Cat" stamps when they were in the sales (they still may be on sale so check out the Crafter's Companion Website). I've coveted these stamps for months now ever since they appeared on "Create and Craft" tv channel. I couldn't afford them at the time but I'm really glad I waited as they were only a couple of pounds each and stamp beautifully. I decided to use the Die Cuts, FREE, Glitter, choice of the craft bingo card (pearls were my FREE item). I hope the judges are ok with my interpretation of Glitter as I haven't actually used loose glitter just glitter card and glitter glue. For some extra sparkle I added black wink of stella to the main image's eyelashes, silver WOS to the bath fittings and clear WOS to the powder puff and over the eye shadow. The main image was stamped using Black Tuxedo ink and coloured in using ProMarkers. As always I apologise for the photo's quality, it doesn't do justice to the glitter card in the slightest. Below are some more photos including close ups of the ProMarker colouring.

Closed card ready for DL sized envelope

Close up of Image coloured with ProMarkers


With Added Red Glitter Hearts
I hope you've enjoyed this card share, as always if you have any comments or questions I'd love to hear from you so please leave them in the space below. I'm off to do a bit of packing and I think I hear the siren call of the crudy so I may have to do a bit of crafting too (I have to make a card for my mum!) so until next time - keep crafting!

Love and crafty hugs,

Sarah xxxx

P.S. I've just had to delete then re-submit my link on Passion for ProMarkers Mega Christmas Challenge because I'd somehow managed to link my draft version of this post instead of my actual blog post - D'oh! Sorry for any confusion caused. Sarah xxx

Friday, 28 November 2014

Robot card for Jack

Hello crafty peeps - welcome to my crafty nook! I hope you've managed to get some crafty Black Friday bargains - I haven't due to lack of funds (we've only bought TWO Christmas presents so far - eek!!) but I've been drooling over all the bargains out there.

To distract me from all the stuff I can't afford to buy I've been looking through my crafty stash and have used a few things that I've had for a while but haven't had the chance to use yet, and I've made a Robot themed card for my nephew who celebrates his birthday on the 29th December.

Robot card with movable cogs.

This card was made using a Kaisercraft stamp set called "Technologic" and the HB2U stamp came from a Clearly Besotted Stamp set called "TEXT ME". I embossed the black cardstock using a Sizzix embossing folder called "Dots", the folder isn't that large so I embossed first one side of the card then lined up the folder to emboss the other side. To highlight the dots I rubbed over it with silver gilding wax (sorry don't know the make as it came free with a magazine and the packaging doesn't have any details). I stamped, coloured then fussy cut the gears and punched a hole through the centres so that I could add brads through them and the embossed background. It's not lined up perfectly and I should have used thicker card but if you move the cogs they do actually move the others which I LOVE!!! I'm not going to go into any further details about how this card was made because it's just stamping and colouring with a hint of dry embossing. Of course if you do want a more detailed "How to make" please leave a comment below.

Close up of Robots

Another view of the Robot card with movable gears!

PRODUCTS USED

Kaisercraft "Technologic" Clear Stamps
Clearly Besotted "TEXT ME" stamps

Dovecraft 3mm "Masculine" brads

Sizzix 657253 Dots & Flowers set #2

Silver gilding wax

Memento Tuxedo Black Ink

Kraft card
White card
Black card

ProMarkers in Ice Grey 1 & 2

Clear Wink of Stella Brush Marker

I hope you've enjoyed seeing my new creation, I'm planning on working on my Christmas cards over the weekend (I'm so behind!) so hopefully I'll have something to share on Monday. Until then - keep crafting!

Love and crafty hugs,

Sarah xxx

Another sprinkling of fairy dust...

Hello crafty peeps - welcome to my crafty nook! First of let me apologise for any typos that may occur on this post, I'm slowly recovering from a migraine that's laid me low for the last couple of days and as I still have the residue of it I'm trying not to look at the screen too often so I don't trigger it again - thank goodness for learning how to touch type, I'm practically doing this with my eyes closed! I've decided not to enter the Passion for Promarkers challenge this week but will be concentrating on making cards for birthdays in December so I can get them sent before the post gets clogged up with the Christmas cards etc. With that in mind I have one card to share today - another fairy sprinkles card, this time for my sister Teresa.

Fairy sprinkles Birthday Card

As you can see this card is very similar to the one I made for my sister-in-law last week. Ideally I would have liked to have made the fairy into a steampunk fairy but wasn't sure how to go about it with only very limited stamps (tbh I was afraid to start stamping gears in case I totally ruined it - I think this card is really pretty!) The main differences are the distress ink blending colours and I've layered the fairy topper onto gold holographic card instead of silver. Oh and I stamped the fairy sprinkles in black ink instead of the white I used last time which turned out to be a tactical error as it wasn't as easy to colour over the sprinkles with the jelly gel pens.

PRODUCTS USED

Lavinia Fairy Stamps free with papercraft essentials magazine

Distress Inks in: Scattered Straw, Spiced Marmalade and Fired Brick

Blending tool and blending pads

Memento Tuxedo Black Ink

Clear Wink of Stella Brush marker

Cream card 300gsm
Black card (The Works)
Gold holographic card (the Works)
Black Holographic Glitter card (The Works)

8" x 8" 300gsm Card blank Craft UK Limited (local craft shop £7.20 for 25 with envelopes)

Sikorea 10 colour Jelly Gel Glitter Pens

Lol just noticed a really big difference to this card and the one I did for Sue - I've forgotten to add the butterfly rub-ons! I may add them later - I quite like the card as it is.

Well that's all my craft news for now, I have a card for my nephew to make and I'm thinking Aliens or Robots would be a good choice. So until next time - keep crafting!

Love and crafty hugs,

Sarah xxx

Monday, 24 November 2014

A sprinkle of fairy dust....

Hello crafty peeps - welcome to my crafty nook! This week I need two cards for two special people - my sister-in-law Susan and my dear friend Jean. I've made a card for Sue and I'd like to share it with you.

Birthday card for my Sister-In-Law who's celebrating a significant birthday on Friday!

Originally this card was only 5" x 5" but I managed to mess up the verse inside so cut the card front off with a pair of scissors (next time I'd use a paper trimmer cos this is wonky!) I started off by colouring the card using Salty Ocean distress ink and a blender tool then added Dusty Concord until I had the desired effect. I stamped the main fairy image from a Lavinia Stamps set that I got free with papercraft essentials magazine sometime this year. I also stamped the three toadstools and the fairy dust twice using Memento Tuxedo black ink. The fairy wishes sentiment on the bottom right hand side came from a fairy stamp set that I got through the post yesterday with Cardmaking & Papercraft magazine (may not be available quite yet in the shops - subbies get it early). I coloured over the fairy wings with clear Wink of Stella and as it's a water colour and distress inks are water reactive, it bleached the wings as well as making them shimmer which I really like. I added some WOS to the toadstool caps too for added interest and shimmer. I coloured the fairy dust using some jelly gel glitter pens by Sikorea (not a spelling error, just a knock off brand from a pound shop type of place but actually really sparkly!). The butterflies are rub-ons from Crafters' Companion - a range called "Fairyopolis" (*I checked my packaging and I got the name wrong - this is the correct spelling, sorry for any confusion caused!) and it's hard to see on this photo but I added WOS to their wings too. Actually please excuse the quality of this photo, it really doesn't do this card justice (my camera is quite old and falling to bits - I have the battery fastened on with washi tape!). I mounted this finished panel onto black holographic glitter card then mounted this panel onto a 6" x 6" piece of Dovecraft "Fantasy" designer papers which features fairies and dragons, I've had it for years and wish I'd bought two packs as the dragons would look fantastic on a "Game of Thrones" themed card. I mounted this panel onto some more black holographic glitter card and added this panel to some silver holographic card. I matted this onto some plain black card which I added some clear WOS to as this card just screams to be blinged up. Finally I cut a piece of cream card stock to 7.5" x 7.5" and blended Salty Ocean and Dusty Concord distress inks onto it until I got a smooth blended effect. I added clear WOS to the edges of the card then centred the main panel onto it before sticking the finished topper onto a scalloped edged 8" x 8" card blank.

Here are a few more photos of the card.


PRODUCTS USED:

Lavinia Stamps "The Clouds Are Lined With Silver.."

Dovecraft 6" x 6" "Fantasy" Designer Paper Pack (DCDP72) copyright 2007 (blimey I have had these a long time!)

Crafters' Companion *"Fairyopolis"*  (see note in main text) rub-ons

Sikorea 10 Colour Jelly Gel glitter pens

Memento Tuxedo Black ink

Tim Holtz Distress inks in Salty Ocean & Dusty Concord

Blending tool and pads

Clear Wink of Stella (WOS) brush marker

cream card stock
Black holographic glitter card (The Works)
Silver holographic card (The Works)
Black card stock (the Works)

Scalloped Edged 8" x 8" card blank and envelope (from local craft shop)

I hope you've enjoyed my latest card, as always please leave any comments or questions below and I'll answer them as soon as I can both here and on your blogs if you have them. I will add another post once I've made the birthday card for Jean (I have an idea or two!) and if I enter the Passion for ProMarkers Challenge on Tuesday. So until then - keep crafting!

With love and crafty hugs,

Sarah xxx

Thursday, 20 November 2014

Entry For Passion for ProMarkers Challenge 274 "Entertain us".

Hello crafty peeps - welcome to my crafty nook! I had fun doing Challenge 273 over at Passion for ProMarkers and enjoyed going out of my crafty comfort zone by using lace so I've decided to enter the challenge this week too which is themed around "entertain us", this can be either inspired by a film or song so I've chosen "On Top of the World" by The Carpenters. I've always loved this song plus it gave me an excuse to use one of my favourite stamp sets - santoro's simply gorjuss...! on Top of the World.

santoro's simply gorjuss ~ ....on top of the world stamped card
Close up of image coloured with ProMarkers
A little closer still! lol


Inspired by last week's challenge to make a lace flower!

Same card but with two leaf hat pins added

Close up of lace flower with added hat pins

PRODUCTS USED:

Stamp set - santoro's simply gorjuss...! ...on top of the world.

INK: Memento Tuxedo Black ink

CARDSTOCK: White 300gsm (brand unknown), Papercellar Silver card, The Works holographic card, The Works black card. Scalloped edged 8" x 8" card blank (local craft shop), DCWV cloudy sky paper from all occasions scrapbook in a stack kit.

Lace from Boyes

Gems from Poundland

Woodware Ticket corner punch

Dovecraft "Brights" Chalks (the sky)

Clear Wink of Stella Brush pen (shimmer on hair and pigeons)

Leaf Hat Pins Every Craft's A Pound

Metal World Charm taken from Avon Keyring

PROMARKERS
Skin: Almond, Sunkissed Pink
Hair: Cool Grey 3,4,5
Leggings: Cool Grey 1 and 5
Pinafore and petticoat: Ice Grey 1
Dress: Pastel Blue
Pigeons: Slate and Cool Grey 2

I hope you've enjoyed my challenge entry and if you're inspired by my card please leave a comment below with a link to your creations. Until next time - keep crafting!

Love and crafty hugs,

Sarah xxx