Translate

Showing posts with label Memento Black Tuxedo ink. Show all posts

Thursday, 12 February 2015

SHH! don't tell Chris.

Hello crafty peeps and welcome to my crafty nook! I hope you've all had a good week. Today's card is a Valentine's Day card for Chris. I'd like to enter it in the Passion for ProMarkers Blog challenge 283 - to someone I love. 


Card for my bad bad boy lol

I made this card by folding an A4 sheet of off white card stock in half to make an A5 card blank and then I stamped over the front with A lip print stamp (no idea what brand as I found it in a drawer and it has no info with it - could be Bratz, yes the dolls Bratz at one point it was difficult to buy craft stuff cos I didn't trust internet shopping which is laughable now, so I had to improvise and Bratz had a craft set available) the OX stamp is from a Clearly Besotted stamps set called Just my Type (I think!) both images are stamped in Brilliance Crimson ink and has a slight sparkle to it. I stamped the Acid Drops & Whatnots "Bad Bad Boy" image and text onto a tall scrap of 350 gsm card stock with Memento Tuxedo Black ink and coloured it in with ProMarkers:- Putty Gold metallic Berry Red Warm Grey 1 and 5 plus the blender (I coloured the stocking'd leg with WG5 then removed most of the colour with the blender). I stamped the Wild Rose Studios "Love Circles" sentiment onto a piece of white card, fussy cut it out and coloured over it with the Berry Red ProMarker. I layered it onto a scalloped circle punched out of gold card using a Woodware punch. I embossed a sheet of Colour Connection Red Glitter Card using a Sizzix Textured Impressions folder taken from the Love Set#2. I then cut it to size and layered the topper onto it with a generous amount of wet glue and weighted it down while it dried. I used thin foam tape to stick this layered topper onto the card blank. I added double thickness of foam tape to the circle and added it to the lower right hand side, then added a epoxy circle topper over the sentiment to magnify it slightly.


A slightly better photo?

Love this sentiment lol

For bad boys everywhere...

Close up of Circle sentiment

Naughty, naughty!

Close up of the image coloured with ProMarkers
Because Chris has very little sight, I've tried to introduce texture through the embossed glitter card and I've carried this through to the inside.

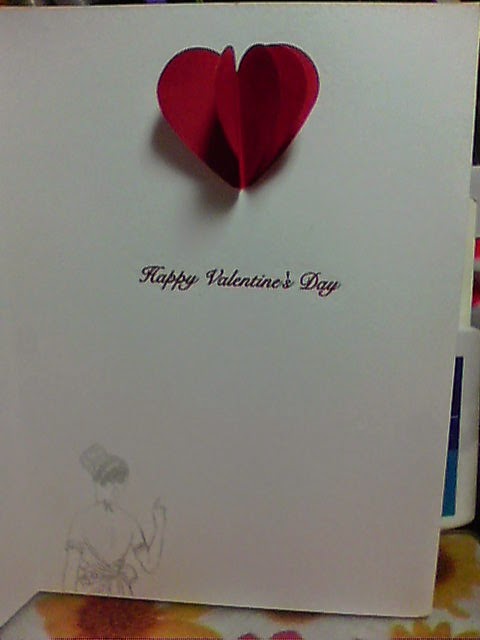
Inside of Valentine's card with 3D heart pop up

Closer look at the heart

The stamp set comes with a smaller version of the main image so I stamped this at the bottom left hand side of the card using Memento London Fog ink. The sentiment is a foiled rub on which I've had for nearly 5 years now and unlike other brands still rubs off onto the project perfectly (some brands I've had in the past dry out and stick to the carrier sheet after a few years these ones only cost 50p and are fantastic - wish I'd bought more!) To make the heart pop up I punched out 6 hearts using a Woodware punch and folded them in half vertically. I stuck one half of each heart to another until I had a heart that would lay flat in the card but pop up once opened (with a bit of fluffing). 

I hope you've enjoyed seeing my new creation, if you'd like to join in this week's challenge pop over to the Passion For ProMarkers blog. Until next time - keep crafting!

Love and crafty hugs,

Sarah xxx

Friday, 28 November 2014

Another sprinkling of fairy dust...

Hello crafty peeps - welcome to my crafty nook! First of let me apologise for any typos that may occur on this post, I'm slowly recovering from a migraine that's laid me low for the last couple of days and as I still have the residue of it I'm trying not to look at the screen too often so I don't trigger it again - thank goodness for learning how to touch type, I'm practically doing this with my eyes closed! I've decided not to enter the Passion for Promarkers challenge this week but will be concentrating on making cards for birthdays in December so I can get them sent before the post gets clogged up with the Christmas cards etc. With that in mind I have one card to share today - another fairy sprinkles card, this time for my sister Teresa.

Fairy sprinkles Birthday Card

As you can see this card is very similar to the one I made for my sister-in-law last week. Ideally I would have liked to have made the fairy into a steampunk fairy but wasn't sure how to go about it with only very limited stamps (tbh I was afraid to start stamping gears in case I totally ruined it - I think this card is really pretty!) The main differences are the distress ink blending colours and I've layered the fairy topper onto gold holographic card instead of silver. Oh and I stamped the fairy sprinkles in black ink instead of the white I used last time which turned out to be a tactical error as it wasn't as easy to colour over the sprinkles with the jelly gel pens.

PRODUCTS USED

Lavinia Fairy Stamps free with papercraft essentials magazine

Distress Inks in: Scattered Straw, Spiced Marmalade and Fired Brick

Blending tool and blending pads

Memento Tuxedo Black Ink

Clear Wink of Stella Brush marker

Cream card 300gsm
Black card (The Works)
Gold holographic card (the Works)
Black Holographic Glitter card (The Works)

8" x 8" 300gsm Card blank Craft UK Limited (local craft shop £7.20 for 25 with envelopes)

Sikorea 10 colour Jelly Gel Glitter Pens

Lol just noticed a really big difference to this card and the one I did for Sue - I've forgotten to add the butterfly rub-ons! I may add them later - I quite like the card as it is.

Well that's all my craft news for now, I have a card for my nephew to make and I'm thinking Aliens or Robots would be a good choice. So until next time - keep crafting!

Love and crafty hugs,

Sarah xxx

Thursday, 20 November 2014

Entry For Passion for ProMarkers Challenge 274 "Entertain us".

Hello crafty peeps - welcome to my crafty nook! I had fun doing Challenge 273 over at Passion for ProMarkers and enjoyed going out of my crafty comfort zone by using lace so I've decided to enter the challenge this week too which is themed around "entertain us", this can be either inspired by a film or song so I've chosen "On Top of the World" by The Carpenters. I've always loved this song plus it gave me an excuse to use one of my favourite stamp sets - santoro's simply gorjuss...! on Top of the World.

santoro's simply gorjuss ~ ....on top of the world stamped card
Close up of image coloured with ProMarkers
A little closer still! lol


Inspired by last week's challenge to make a lace flower!

Same card but with two leaf hat pins added

Close up of lace flower with added hat pins

PRODUCTS USED:

Stamp set - santoro's simply gorjuss...! ...on top of the world.

INK: Memento Tuxedo Black ink

CARDSTOCK: White 300gsm (brand unknown), Papercellar Silver card, The Works holographic card, The Works black card. Scalloped edged 8" x 8" card blank (local craft shop), DCWV cloudy sky paper from all occasions scrapbook in a stack kit.

Lace from Boyes

Gems from Poundland

Woodware Ticket corner punch

Dovecraft "Brights" Chalks (the sky)

Clear Wink of Stella Brush pen (shimmer on hair and pigeons)

Leaf Hat Pins Every Craft's A Pound

Metal World Charm taken from Avon Keyring

PROMARKERS
Skin: Almond, Sunkissed Pink
Hair: Cool Grey 3,4,5
Leggings: Cool Grey 1 and 5
Pinafore and petticoat: Ice Grey 1
Dress: Pastel Blue
Pigeons: Slate and Cool Grey 2

I hope you've enjoyed my challenge entry and if you're inspired by my card please leave a comment below with a link to your creations. Until next time - keep crafting!

Love and crafty hugs,

Sarah xxx

Monday, 17 November 2014

The Cards For my Card Designer of the Year Entry

Hello crafty peeps - welcome to my crafty nook! In my last post I shared with you all the project for the card designer of the year competition (closing date Friday 21st November 2014). I seem to be one of those crafters who needs a tight deadline to feel creative and if I'm honest when I was studying with the O.U. I tended to leave my essays until the last possible moment too, so it's no surprise to find that I've only just finished the two cards that I needed to make to complete the entry.

8" x 8" Katy Sue Simpler Times "Just A Note" card

My first card took ages to make because I kept messing it up! I love this Katy Sue Simpler Times stamp and I was lucky enough to get it and three others for the bargain price of  £1 each in the Mega Sale last July. The images are really cute and stamp like a dream! I stamped this image using Memento Tuxedo Black ink on 300gsm white card stock. The stamp isn't quite as wide as the 5" x 5" card so I drew a black line using a Letraset fine liner pen either side of the stamped image. The image was then coloured in using ProMarkers in a variety of colours (if you'd like to know what colours I used please leave a comment below) I added white detail using a white gel pen. The sky was coloured in using Dovecraft "Brights" chalks a product that I've had for many years but haven't really used up to now. I mounted this image onto black card and cut it so that there was a very thin border all around. I layered this piece on a 6" x 6" glitter card taken from DCWV "The Twinkle Glints" stack. I added this layer to a piece of black card cut to 7.5" x 7.5" and then mounted this onto a scallop edged  8" x 8" card blank. I stamped the sentiment from the stamp set onto white card and mounted it onto black card to create a thin border. I used black foam tape on the back of the sentiment and added it to the top left corner of the main image (confession time: I originally stamped the sentiment straight onto the sky part of the image but it went wonky!) finally I embellished the sentiment with three clear gems. To finish the card I stamped the image again inside the card blank using Memento "Summer Skies" ink pad, then stamped thinking of you over it using Memento Tuxedo Black ink.

Acetate Accordion Diamond fold card

This card looks complicated but is really easy to make as its just a few scores and a bit of folding. I made this by scoring an A4 sheet of 200 micron acetate in thirds (I have a scoreboard that came free with Papercraft inspirations magazine and it has a score line for a zig-zag/3-fold card which is perfect for this initial fold) and folding the side panels in half again but in the opposite direction to the first folds. My first instinct when I was working out how to make this card was to fold down the outer panels but you actually need to fold the middle panel top corner over diagonally so its side edge meets the inner score line of the side panel (its like folding the page of a book over to mark your place - not that I'd ever do that! *tongue in cheek* lol) make sure you burnish this crease well with a bone folder. Open the fold out and push the middle crease down while pressing on the diagonal creases - this is how the diamond shape is formed. Repeat with all the corners top and bottom until you have a diamond shaped front panel and two flaps angled at the back - the accordion part of the name refers to the fact that if you pull on the back flaps the card moves like an accordion. I wanted to keep the card simple so I cut two panels of docrafts Papermania "Madame Payraud's Collection" paper to 2.7" x 8" and adhered them to the side panels leaving a slight border, the remainder of the patterned sheet was just big enough to cover the central panel so I cut it into a long diamond shape. I added strips of textured white card stock to the back of the outer panels because as it's acetate you can see the sticky tape and it looks ugly. However due to the way it's folded it's hard to see the inner panel so I didn't bother covering up the back. I die cut a Crafter's Companion Die'sire Classical Frame out of black card stock, then added a panel of DCWV textured white card stock taken from a 8" x 8" All Occasion scrapbook kit in a stack, leaving a thin black border, this was then glued to the front of the card making sure that the circles slightly overlapped the sides of the panel at the top. I die cut a large stitch flower out of black card stock using Lil' inker designs stitched flowers dies and a smaller flower out of textured white card. I layered these together and added a large clear gem to its centre. I adhered the flower to the centre of the white panel and added medium sized clear gems to all four corners of the white panel. Finally I added large clear gems on the four outer corners and on the diamond points. One of the best things about this card is that it fits into a DL sized envelope.

I hope you've enjoyed looking at my latest cards, as always if you have any questions or comments please leave them below. If my instructions on how to make the acetate card are unclear I will post a step by step photo tutorial on request.

Now that I've finally sent off all the competitions I shall be concentrating on Christmas, so until next time - keep crafting!

Love and crafty hugs,

Sarah xxx

Monday, 13 October 2014

An early birthday pressie...


Hello crafty peeps - welcome to my crafty nook.My lovely hubby let me place an order with Clearly Besotted stamps last Tuesday and it arrived Wednesday! I continue to be amazed by this company. It's got to have the quickest order to delivery times of any internet craft company ever. To take advantage of the free P & P if you spend £50 or more I placed an order of £52.60 for 8 stamp sets and 4 dies which are my birthday present from Chris. He very kindly allowed me to have it straight away instead of waiting until the 25th so I've been able to have a bit of a play with two of the stamp sets.  My order consisted of the Notebook Edge Die @ £3.00, Geometric Style II Die Collection @ £5.50, Apple Die @ £1.50 (fits the apple stamp set I got in my first order), Wave Edge Die @ £2.60 (sale item), You're A Hoot stamp set @ £4.00, You're A Hoot II stamp set @ £4.00, Scientifically Speaking stamp set @ £9.00, Key To My Heart stamp set @ £4.00, Little Onesie stamp set @ £4.00, Just A Note stamp set @ £4.00, Dandelion Dreams stamp set @ £9.00 and Build A Bug stamp set @ £2.00 (sale item). Included in my order was a mini banners stamp set as a thank you for loyal custom over the two years that Stephanie Wincott has owned Clearly Besotted Stamps www.clearlybesottedstamps.com. Felt a little guilty for receiving this freebie as this was only my second order but also extremely pleased to get it as it has some fantastic sentiments on it and fits the mini banner die I got in my last order.

Dandelion Dreams stamp set £9.00

Scientifically Speaking Stamp set £9.00

Little Onesie stamp set £4.00 and Key To My Heart stamp set £4.00

Just A Note stamp set £4.00 and Build a Bug stamp set £2.00


You're A Hoot stamp set £4.00 and You're A Hoot II stamp set £4.00

My free stamp set!

Notebook Edge Die £3.00

Geometric Style II Die Collection £5.50

Wave Edge Die £2.60

Apple Die £1.50

To show my appreciation for the free stamp set I made a thank you card using the free stamp set and the Dandelion Dreams stamp set - I love these stamps as they are very versatile even though the dandelions aren't exactly what I'd call a dandelion clock but are very attractive in their styling.

Thank You card using Dandelion Dream 


I kept things simple by stamping the images out using black ink and added a splash of colour with polka dot red washi tape. I think I went a bit OTT with stamping out the individual seeds but it was very rather relaxing and I couldn't stop lol. I continued the seed theme on the inside of the card and went over the black ends of both the flower heads and the seeds with a black wink of stella marker. Finally I added a single coloured gem to the centre of the main flower.


The other stamp set which demanded instant use was the Little Onesie stamp set - deceptive in it's simplicity I've actually used it to make two very different style cards. My sister-in-law is due to have her baby girl on my birthday but I've a feeling she'll have it sooner than that so I wanted to have a new baby card ready for her.


This very simple card was made by stamping the onesie using Memento Black ink onto white card with the flower stamped using a purple ink (not sure of brand). The centre was coloured in using a yellow Promarker and some Dovecraft glitter glue was added to the top to add some sparkle. Once the glue was dry I fussy cut the onesie out (really easy with such a simple image) and then a It's A Girl printed sentiment was added behind it (originally from a card kit) and the whole thing was popped up on sticky pads and stuck down to the centre of a scalloped edge card blank. Crocheted lace and pink velvet ribbon was added on the right side and BABY was spelt out using embossed letters from the same card kit as the it's a girl sentiment.

The second baby card isn't quite finished yet so I'll share it with you all the next time I post. Until then - keep crafting!

Love and crafty hugs,

Sarah xxx


Friday, 26 September 2014

"Adrift" Birthday card

Hello crafty peeps, welcome to my crafty nook! I hope you are all looking forward to the weekend. We're picking the girls up from school tomorrow afternoon then having them over night which we're really looking forward to.

I've only made one card since my last post - a sweet sixteen birthday card for my lovely niece Charlie who's celebrating her sixteenth birthday next month, using Santoro's "Adrift" stamp set and the Clearly Besotted "Mini Banners" stamp and die sets.


I stamped the main image in Memento Tuxedo Black ink on white cardstock and coloured it in using Pro Markers then fussy cut the image out. I added glittery highlights using a clear Wink of Stella brush marker. I took a sheet of 6" by 6" coordinating  cardstock from a Santoro card stack and trimmed the edges slightly as the card blank I had was slightly smaller than 6" by 6" and curled all four corners using a thin paint brush handle then stuck it down onto the kraft card blank using red liner tape. I stamped the star and moon detail at the top of the card and also the boat image, then coloured the star and moon using Pro Markers in yellow tones. I then stuck down the coloured in "Adrift" image and coloured in the flowers which I found too fussy to cut round. I stamped the Happy Birthday in pink ink using the Clearly Besotted mini banners stamp set and cut it out using the coordinating mini banners die. I stuck it over the moon detail using sticky pads, and carefully wrote "Sweet Sixteen" on the boat like a boat name. Finally I stamped out a verse sentiment inside.


close up of sentiment
Card for Charlie


 I'm really happy with how the card turned out and I hope Charlie likes it too.

I shall write another post once I've made some more cards, until then - keep crafting!


Love and crafty hugs,
Sarah xxxx