Translate

Showing posts with label Memento London Fog ink. Show all posts

Thursday, 12 February 2015

SHH! don't tell Chris.

Hello crafty peeps and welcome to my crafty nook! I hope you've all had a good week. Today's card is a Valentine's Day card for Chris. I'd like to enter it in the Passion for ProMarkers Blog challenge 283 - to someone I love. 


Card for my bad bad boy lol

I made this card by folding an A4 sheet of off white card stock in half to make an A5 card blank and then I stamped over the front with A lip print stamp (no idea what brand as I found it in a drawer and it has no info with it - could be Bratz, yes the dolls Bratz at one point it was difficult to buy craft stuff cos I didn't trust internet shopping which is laughable now, so I had to improvise and Bratz had a craft set available) the OX stamp is from a Clearly Besotted stamps set called Just my Type (I think!) both images are stamped in Brilliance Crimson ink and has a slight sparkle to it. I stamped the Acid Drops & Whatnots "Bad Bad Boy" image and text onto a tall scrap of 350 gsm card stock with Memento Tuxedo Black ink and coloured it in with ProMarkers:- Putty Gold metallic Berry Red Warm Grey 1 and 5 plus the blender (I coloured the stocking'd leg with WG5 then removed most of the colour with the blender). I stamped the Wild Rose Studios "Love Circles" sentiment onto a piece of white card, fussy cut it out and coloured over it with the Berry Red ProMarker. I layered it onto a scalloped circle punched out of gold card using a Woodware punch. I embossed a sheet of Colour Connection Red Glitter Card using a Sizzix Textured Impressions folder taken from the Love Set#2. I then cut it to size and layered the topper onto it with a generous amount of wet glue and weighted it down while it dried. I used thin foam tape to stick this layered topper onto the card blank. I added double thickness of foam tape to the circle and added it to the lower right hand side, then added a epoxy circle topper over the sentiment to magnify it slightly.


A slightly better photo?

Love this sentiment lol

For bad boys everywhere...

Close up of Circle sentiment

Naughty, naughty!

Close up of the image coloured with ProMarkers
Because Chris has very little sight, I've tried to introduce texture through the embossed glitter card and I've carried this through to the inside.

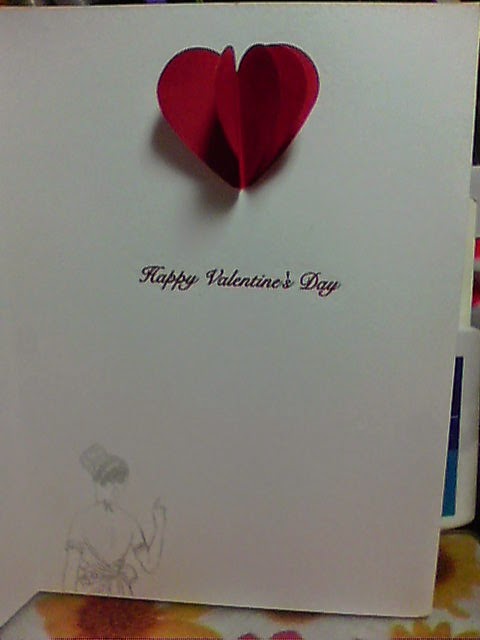
Inside of Valentine's card with 3D heart pop up

Closer look at the heart

The stamp set comes with a smaller version of the main image so I stamped this at the bottom left hand side of the card using Memento London Fog ink. The sentiment is a foiled rub on which I've had for nearly 5 years now and unlike other brands still rubs off onto the project perfectly (some brands I've had in the past dry out and stick to the carrier sheet after a few years these ones only cost 50p and are fantastic - wish I'd bought more!) To make the heart pop up I punched out 6 hearts using a Woodware punch and folded them in half vertically. I stuck one half of each heart to another until I had a heart that would lay flat in the card but pop up once opened (with a bit of fluffing). 

I hope you've enjoyed seeing my new creation, if you'd like to join in this week's challenge pop over to the Passion For ProMarkers blog. Until next time - keep crafting!

Love and crafty hugs,

Sarah xxx

Tuesday, 25 November 2014

Gardening Pocket card inspired by thefrugalcrafter - Lindsay Weirich

Hello crafty peeps - welcome to my crafty nook! Today I would like to share a card I've made for my friend Jean. It's her birthday at the end of the week and as she lives in the town I used to live in, it means I'm unlikely to see her on her actual birthday so I wanted to include a little gift with her card that wouldn't cost a fortune to post. Lindsay Weirich (thefrugalcrafter on YouTube) had a project a few days ago for making pockets to fill with paper and crayons to entertain the kids during Thanksgiving, I thought this was a fantastic idea to have as a card topper and fill with a few gardening goodies.

Gardening themed card using Lindsay Weirich's paper pocket technique
Please check out Lindsay Weirich's YouTube videos under thefrugalcrafter for instructions on how to make the double pocket, the only thing I would suggest is to stick the inside edges of the pockets with thin red liner tape as I found that the washi tape isn't strong enough to keep the edges closed. I used Docrafts Papermania Home to Nest papers to make the pocket and the green backing sheet which I stamped randomly with flowers and a butterfly stamp taken from a Katy Sue Simpler Times (sorry not sure which one I used) using Memento London Fog ink. I diecut the Happy Birthday sentiment using a few die from one of my magazine subscriptions using teal glitter card which I mounted on black card once diecut and I adhered it to the card using black foam tape (love this stuff it means if you put it a little too close to the edge it's not as noticeable as using white foam tape). I added two seed packets and a couple of plant ties and plant labels to the pockets then arranged the card as shown.

I hope you like what I've made and thanks to Lindsay Weirich for her original idea. If you have any questions or comments please leave them after this post. Until next time - keep crafting!

Love and crafty hugs,

Sarah xxx