Translate

Showing posts with label Steampunk card. Show all posts

Saturday, 9 December 2017

A card to share...

Hello crafty peeps and welcome to my crafty nook! I hope you've all had a brilliant week and are ready for a cold weekend ahead - at least the wintery weather is a good excuse to stay indoors and do some crafting. Well so much for my plan to make and share a card every day using the dies from my Crafter's Companion advent calendar - I forgot to take one little thing into consideration when I made that plan - I don't actually like a lot of the dies that came free, eek! In themselves they are quite sweet but most of them are really not to my taste, are quite small and fiddly to use because they have lots of die cut inlaid parts to them like bows and things, and I couldn't even work out what the die was on day two (I thought it was a pineapple to begin with!). There are a few dies that I probably will use, a flower garland, a very pretty butterfly and the word 'celebrate' but the first die the snowflake remains my favourite up to the 8th anyway. I've not really had a lot of time this week to make Christmas cards because I've been concentrating on making a steampunk Gorjuss Girls card for my sister who celebrates her birthday tomorrow. It probably doesn't look like it but her card took me around 3 days to make on and off mainly because there was a lot of die cutting involved.


The images are from 'The Hatter' Gorjuss Girls stamp set and they were stamped onto Sheena's Stamping card using Memento Tuxedo Black ink and coloured in with Pro Markers. The top hat and hearts were diecut out of the same card stock and coloured in with Pro Markers. The hat was die cut four times before being layered together with wet glue to form a thick embellishment - the gears on the hat were die cut from the same card and coloured with Papermania Metallic markers. The gems were added using blobs of wet glue to keep them in place. All the other die cut gears and cogs were cut out of scraps of holographic and plain silver card. The flowers were die cut out of the white card and coloured with Pro Markers (crimson and burgundy). The 6" square card front was made using white card ( Bristol Board in this particular case) and ink blended with Fired Brick Distress Ink and Black Soot Distress Ink, it was further distressed using a distress spray bottle. The card blank is a twisted easel card blank from Every Craft's A Pound, £1 for a pack of 3 with envelopes, they aren't quite 6" square so the front piece over hangs at one side and at the top.

I really like this card and it looks a lot better in real life (my camera is really rubbish!) I just hope my sister likes it. As always if you have any comments or questions then please leave them in the usual places and until next time - happy crafting!

Love and crafty hugs,

Sarah xxx


Saturday, 16 July 2016

Another HOTP Steampunk Card

Hello crafty peeps and welcome to my crafty nook! First of all please excuse any typos that may be present in this post, my cat Jinx has decided to hog the desk so the keyboard is balanced on the edge and resting against my tum! I wouldn't be surprised if the little darling decides to climb on top of either the keyboard or me while I'm writing this. I like to pretend that I'm in charge but in all honesty Jinx rules the flat with a paw of iron lol - we're just his chattels.

Today I'd like to share the Steampunk themed birthday card I made for my wonderful friend Adam, it was made using the same stamp set as the card featured in yesterday's blog post.

Envelope decorated with steampunk corner stamp

Steampunk blended distress ink birthday card

Close up of main image

Inside of card
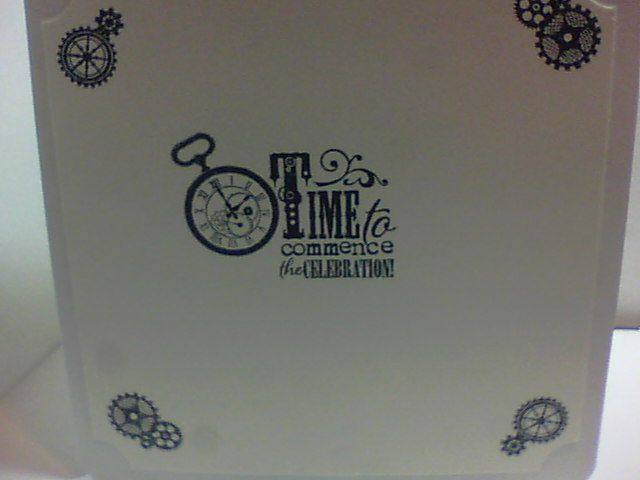
I started this card by making the card blank from a sheet of Kraft card which I cut down to 11" x 5 1/2". I scored it at 5 1/2" and rounded the corners using a punch. Only one side of this card is Kraft and the other is an off white which makes it perfect for making card blanks out of as it means you don't have to use either a white pen to add your message inside or add a paler coloured insert. For this card though, I did add an insert as I wanted to add a stamped sentiment and the inner surface is rather slick which means the message smudges unless you heat set it. To make the focal image, I cut a sheet of cream card stock to 5" square and stamped the largest stamp from the set in the middle of the card. I then added most of the colour using Distress Inks and a blending tool. I started with Spiced Marmalade and pulled the colour in towards the centre of the card using the blending tool, I concentrated the colour around the image but added a little of it over the clock when the ink was nearly gone from the foam applicator so it's a much paler colour. I added some Fired Brick and finally a little Black Soot around the edges. I then added a little more of each colour until I got the blended look I wanted. I've no idea where I got the cream card from but it is brilliant for ink blending, I don't have a mini round blending tool yet and sometimes I find I have streaks and lines left on my project after I've coloured it in but this card seems to smooth all the colours together with very little skill on my part. Once the inks had thoroughly dried I added some yellow Flex marker to the light bulb. I added a layer of Glossy Accents over the bulb and the seconds indicator on the clock face and put it to one side to dry. While the Glossy Accents was drying I cut another piece of the cream card stock for the inside of the card and removed the corners using a ticket corner punch, I then stamped the sentiment and images as shown using Memento Black Tuxedo ink. I stuck this inside the card using double sided tape. I stamped "Happy Birthday" in the four corners then added the topper to the front of the card using more d/s tape once the Glossy Accents had set. As a final little touch I added a coating of Spectrum Noir Clear Glitter brush marker over the hat band. I made a matching envelope using my We R Memory Keepers Envelope Punch Board.

I really enjoyed making this card but I think if I duplicated it I'd add a thin border of black around the topper just to make it pop a bit more. I'm hoping Adam likes it as it's a bit different to the cards I usually make him. If you have any questions or comments then please leave them in the usual places. I hope you all have a brilliant weekend and until next time - keep crafting!

Love and crafty hugs,

Sarah xxx

p.s. I thought you might like to see a photo of my 'helper'


Friday, 19 February 2016

A couple of panel cards

Hello crafty peeps and welcome to my crafty nook! It's nearly the weekend again - have you got any crafty plans? I loved making my dad-in-law card so much from the last blog post that I've made a couple of new ones.

The first card is for my sort of brother-in-law (it's for my sister's partner), I've got some really versatile stamps from Crafter's Companion called Sentimentals I bought them when CC had a sale sometime last year and one of the sets I bought were men sentiments. It has an -in-law stamp which I've never used because obviously when I make a card for my parents/sister -in-law it's from my husband and I, it seems a bit strange to put -in-law on the card as they aren't Chris's in-laws. Plus I'm really close to my in-laws (I'm very blessed in that respect) so like to call them mum and dad.

Steampunk Side Panel Card

I made the panel card in the usual way and used some extremely old Dovecraft Masculine papers that have been knocking around my craftroom for at least 8 years, I tend to be a bit miserly with them if I'm honest because most of my scrapbook papers etc tend to be on the girly side. These panel pieces are from one design but were scraps from a different project. The round metallic elements in the corners are actually white Craftwork Card Candies coloured in using a bronze Papermania Metallic Shimmer Fluid Brush Marker which went on beautifully. However I wouldn't recommend using the markers to colour in super smooth cardstock like I did on the cog elements as I found the coverage to be patchy and it wasn't easy to colour. The cogs were cut out of a scrap of 200 gsm super smooth card stock using some First Edition dies. The sentiment was stamped in Memento Rich Cocoa ink using another of the Sentimentals range - Birthdays. I didn't take a photo of the inside of the panel but I added Brother-in-law to the top and a spare cog and Card Candy to the bottom left corner just to tie the inside with the outside.
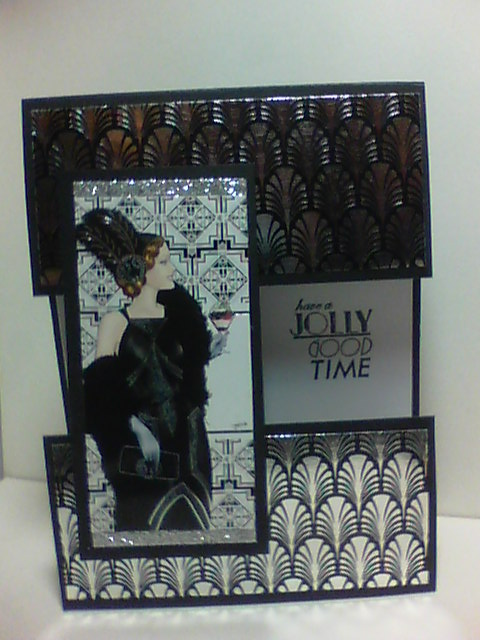
Art Deco Side Panel Card

My second side panel card was decorated using some Art Deco themed papers, stamps and toppers from Papermania and like the first papers, they were released a number of years ago. The image on the front is actually a square topper which I've cut in half and added strips of glitter card to lengthen the topper so it didn't look out of proportion on the panel. The paper used is beautifully foiled and I had to really force myself to cut into it because it's so pretty lol. This style of card is quite compact (4 1/4" x 5 1/2") so unfortunately I can't use the stamps from the collection as the images are too big to fit on the vertical panel, I did use one of the sentiments though. This card is destined to be sent to my husband's Auntie next month for her birthday, she's rather a classy lady so I thought this card would be perfect for her.

I'm really loving this style of card, if you don't trim the card down to 28 cm as I suggested in the first blog post, then you can actually make two cards out of one sheet of A4 cardstock (still score at 14 cm though and cut all but two inches off the longer piece of the scored card then cut two 2" panels off the card that's removed) which makes it a very economical make. I know it's a bit early to be thinking about Christmas but after last year's fiasco where the majority of my friends and family didn't get a card from us as I ran out of time to make them, I may make some Christmas themed cards while I'm loving this style. I don't know about anyone else but I tend to go in phases with card blanks, sometimes it's all 8" square cards, sometimes it's something more unusual like a pop up box card. You've probably noticed if you're a regular reader of my blog.

Hopefully I'll be doing some crafting over the weekend so I'll have something new to share with you soon. As always if you have any questions or comments about anything featured in this blog then please leave them in the usual places. Until next time - keep crafting!

Love and crafty hugs,

Sarah xxx

Tuesday, 15 December 2015

My comp entry

Hello crafty peeps and welcome to my crafty nook! I hope you are all well and are prepared for Christmas - I'm not. My copy of Papercraft Essentials arrived today and it's announced it's winner and runners up of the Papercrafter of the Year competition. I haven't got my entry sent back but then it was nearly four months before I got last year's returned and that was in someone else's box with their details scribbled over with a black marker. As I don't want to wait four months until they get around to sending my cards and project back, I thought I'd share them with you now as I took photos before sending it off.

Alice in Wonderland Shadow Box

For the project element of the entry I made an "Alice in Wonderland" themed shadow box. The base is made from a 12" x 12" piece of black card stock and I added panels of embossed black card onto the sides to make the shadow box look wider than it is. I highlighted the embossed areas of the black card with silver gilding wax. I quilled a 3D toadstool and made a mini pack of cards using a heart stamp and rounded the corners with a punch. The roses have been 'painted' red using a Promarker. I stamped and coloured a Docrafts Simply Gorjuss image from their 'Alice' range. The pocket watch was made using a Xcut set of dies and the metal keys and clock pieces were from Papermania. The faux metal frame was from my stash as were the jewels and the little bottle. I added a 'Drink Me' label to the neck of the tiny bottle. I really love the end result and can't wait to get it back so it can have place of pride on my wall.

You've already seen this...
My first card is one I've previously shown and it featured the HOTP steampunk colorist image.


Sorry these pictures aren't very clear - the mirror card is so shiny it effects the focus of the camera and it can't be altered manually as my camera is very basic. This card is very simple but I loved the unusual card fold and decided to do a bit of water colour envelope art to accompany it. The mirror card it embossed using two embossing folders and I added jewels to highlight parts of it. Although it is very 3D it folds completely flat for posting. It isn't the easiest card to make though as you have to align the front and middle panels very carefully otherwise they won't stand upright.

If you have any questions or comments about this post then please leave them in the usual places. I'm working on some Christmas cards and gifts so hopefully I'll be adding another post soon. Until next time - keep crafting!

Love and crafty hugs,

Sarah xxx


Saturday, 12 December 2015

Care share - Sisters.

Hello crafty peeps and welcome to my crafty nook! It's not even 6am (on a SATURDAY!!) here in my crafty nook but as my cat has decided I sleep waaay too much - he woke me at 4.30 am *gritted teeth* - I thought I should share a few cards I've made lately.

Both my sister and my sister-in-law have had birthdays in the past two weeks. My sister-in-law Susan loves dolphins so I decided to make her a dolphin pop up box card. I've been planning this card since about July which was when I first saw how to make pop up box cards. I started to order dolphin dies online ready to make this card.


I used about four different die sets for this card but I don't have them to hand at the moment so if you want to know what they are called please leave a comment below this blog post. The wave die was one from Clearly Besotted Stamps and I've had it in my stash unused for quite some time.

My sister Teresa asked for either a fairy card or a Steampunk themed card and I chose SP because the example of a fairy card that she emailed me was way beyond my craft stash - I have some fairy stamps but they tend to be cute and girly not Gothic and a bit slutty (unfortunately lol). I do however have a few dies and stamps in my stash (bought with Teresa in mind) that are SP themed. This is the card I came up with.


The card base is a Pop Up Aperture card that was featured in the QCME card school this month, unfortunately the limitations of my camera means I've not been able to take a photo that does justice to the card (sorry it's a bit blurry etc). This card took a long time to make it and I was actually working on it on and off for three days altogether. The butterfly and linked cog die cuts are very delicate and I had to cut them a few times before I was able to get a perfect cut. My card base wasn't exactly the same as that featured in Quick Cards Made Easy because I managed to misplace the magazine before I made the card. I had a general idea but my measurements are slightly different to the ones shown and unlike the cards in the mag, mine folded flat for postage because I used the floating topper as a fastener to keep the card closed. It just meant I had to make a slightly larger envelope than I was expecting. It wasn't until I found my magazine again that I realised that their versions didn't close. The other difference is the designer used clear fishing wire and I used thin jewellery wire to float my topper, because I used proper wire I was able to shape it slightly forward to make the closure. I don't tend to use a lot of gold in my crafting but I have some sheets of Dovecraft gold mirror card which is brilliant for diecutting and I thought I'd do shiny and new Steampunk instead of grungy Steampunk which I think my sister was expecting. If I were to make this card again I'd probably have black glitter card behind the Steampunk butterfly topper to match the front instead of the plain black cardstock. If you are interested in the products used for this card, then please leave a comment in the usual places.

I hope you like my sister cards, both were fun to make and I think both my sisters liked them. If you have any questions or comments then please leave them in the usual places and until next time - keep crafting!

Love and crafty hugs,

Sarah

Saturday, 19 September 2015

HOTP Steampunk Heart Card

Hello crafty peeps and welcome to my crafty nook. A while ago I was really excited to get my hands on one of the Hot Off The Press Colorist Steampunk colouring pads from Craft Stash (I think), I'll be honest with you when you add the £2.99 p&p is was rather an expensive buy but I really really wanted it and it was the last one in stock. It's been sitting on my desk for quite a while mainly because I wanted to hoard it a while but also because I've had a bit of a crafty slump the last week or so. Yesterday (the 18th) was the closing date for the National Cardmaker of the Year competition so I thought it was about time that I got my bum in gear and got on with the POTY entry. I didn't have anything in mind so just decided to have a play and go with the flow. The Steampunk pad was 'looking' at me so I decided to get my ProMarkers out and do a bit of colouring of one of the images and the steampunk heart grabbed my attention.


The uncoloured image
I decided to start on the flames, the example given on the pad is done in purple shades but I got some Sheena Douglass stamps a couple of weeks ago and one of them has a Phoenix rising from the flames and this inspired me to have flame wings behind the clockwork heart. I used three Promarkers to colour the wings; Mandarin, Pumpkin and Gold.

Wing coloured with Mandarin, Pumpkin and Gold Promarkers

Once the wings were coloured I started on the clockwork heart which I coloured in using Poppy and Red. The clock face was coloured with Cool Grey 1 Promarker. I wanted the gears and cogs to look metallic but don't like the effect you get using Metallic Promarkers so used a bronze metallic Gelly Roll Pen. The flourishes were coloured in with gold and the background of the central panel was coloured in using Burnt Umber Promarker. The outer background was coloured in using a black Flexmarker. I added Glossy Accents to the clock face and to the keyhole for a bit of shine and dimension. I added Dovecraft 3D Pearl Effects in Gold onto the ends of the flourish.

Finished Steampunk image

I layered my image onto black cardstock even though the background of the outer part of the image was coloured black because when I layered the image onto gold pearlised card it didn't 'pop'. I then layered it onto gold card,black and gold again. I cut a final square of black card to 7.5" square and added faux gold photo corners to it before adhering it to an 8" x 8" white card blank, I added the main image to this black layer using foam tape. I added splat marks to the whole card using Heidi Swapp Color Shine spray in Gold. I dabbed some of the spray off using kitchen paper for a more defused look. Finally I die cut some gears and cogs using a First Editions die set and added them around the raised panel. Some are flat but some are raised on foam pads.


Please excuse there being so many similar pictures of the card, I've actually started with a migraine as I'm writing this (thank goodness for learning how to touch type - but please excuse any typos!) and I've got the visual disturbances which has left me pretty much blind. It's my own fault, I got really excited about how lovely this card turned out and wanted to blog it straight away instead of going to sleep like a sensible person.

I'm not sure if this quite fulfills the criteria of this week's theme over at Passion for Promarkers which is "All the Trimmings" but I'm going to enter it anyway as I've used a lot of different elements and it has a lot of layers and dimension for me (I'm more a CAS kind of crafter). If it's not up to scratch I'm sure one of the design team will let me know and I'll remove it :)

If you have any questions then please leave them in the usual places and as always - keep crafting!

Love and crafty hugs,

Sarah xxxx