Translate

Monday, 16 May 2016

Anime/Manga cartoon card

Hello crafty peeps and welcome to my crafty nook! I hope you've all had a brilliant weekend, I'm finally feeling my old self but still have coughing fits (I've just coughed as if demonstrating it lol) four or five times a day so I'm not 100% quite yet. Please excuse if there are any extra letters etc in this post, the keyboard is playing silly beggars and keeps adding extra ones for some reason.

I'd like to share the card I made for my nephew Liam. He celebrated his 13th birthday yesterday. A couple of months ago I asked my sister what he was into as last year he was really into Friday Night at Freddie's. I actually saved extra prints of some of the main characters AND I know where they are so I was kind of hoping he'd want a card similar to last year. But it wasn't to be, he's now really into Anime and Manga. After looking online I can certainly see why they appeal to teenage boys (and let's face it those teens who aged but never grew up!), I was a bit flummoxed to be honest as I knew my drawing abilities were no where near what was required for an anime character (imagine stick figures and me with my tongue out as I concentrate hard to make the figures straight - you get the idea!), I didn't want to copy and print from something online as for a start I don't think that's very honest and also not very creative (I'll admit that's what I did for last year's card!) so I put in anime and manga stamps in my search box and finally Flonz Craft came up. Wow what a fantastic site! It's a New Zealand company but don't be put off by that, everything is in NZ dollars but if you click on the £ icon it converts it to our currency and the prices are amazing! I bought four stamps altogether and they only cost £2.10 each, I think the postage was about the same amount. The stamps vary from 2.5" x 3" up to 2.5" x 3.5" so aren't huge but they do sell stamps sets for about £8.99 with bigger images on but I wanted to get the least provocative images I could as without seeming a prude I didn't think some of the images were age appropriate for a 13 year old (I'm not sure Liam would agree though lol). The stamps took a couple of weeks to arrive and I did end up contacting the site in the end as my order status remained in progress for the entire time I was waiting but it was just a site error and my stamps arrived the very next day. I'll be totally honest with you, the packaging isn't great but then for £2.10 per stamp you can't expect it to be, it does come with some detailed instructions for stamp care that I liked and 12% off my next order which I really liked! Liam's favourite colours at the moment are red and black so I coloured the image in those colours and matted and layered the finished panel with black and red card stock. I forgot to take photos of the envelope before I addressed it but added some of the stamps as envelope art. Here are some photos of the finished card featuring "Neko Girl Asking".


I have a small confession to make - this image is supposed to have a tail to go with the cat ears but I slipped when i was colouring the black background so ended up going over it completely. I used a number of dies from different die companies including Sizzix (for the 13 today) and an American Crafts set for the speech bubble etc. I used Flexmarkers for the colouring with a little bit of Real Color Brush marker for the eyes (I've found a website that sells them individually so bought two to try - can't remember what the website is called though!!) I wouldn't say this was my best colouring but I find it easier to colour large images and these stamps are quite small. I am quite pleased with how it's come out and I'm considering purchasing one of the larger sets as I think this style of card may appeal to men - the 12% off  is a great incentive too!

I didn't make anything over the weekend as my husband treated me to the first six books of the Thursday Next series by Jasper Ffordes which arrived on Thursday (lol) I resisted their siren call until after I finally cleaned the oven (it took hours!!!) but I ended up getting "Lost In A Good Book" by reading "Something Rotten", I love the visual puns JF makes with names of people and places (Fay Bentos, Millon De Floss for example) and this book has had me laughing out loud quite a few times, if you've not read any Jasper Ffordes I'd really recommend you trying him.

This has turned out to be a long post so I hope I've not bored you too much! As always if you have any questions or comments then I'd love to hear from you, please leave them in the comment section below. Until next time - keep crafting!

Monday, 9 May 2016

Circle Gatefold Card

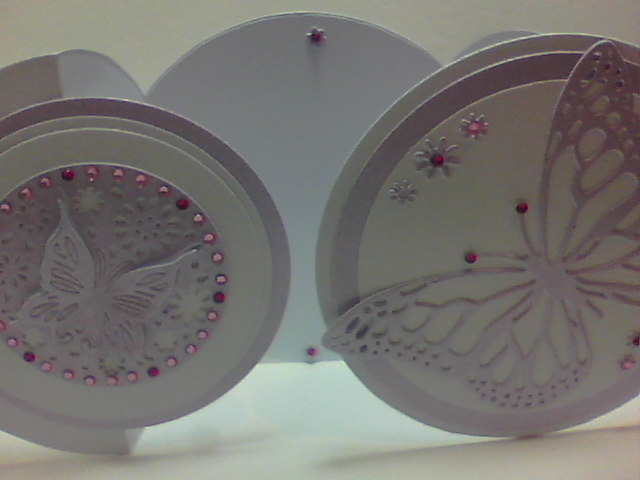
 Hello crafty peeps and welcome to my crafty nook! I hope you've all enjoyed the weekend, we've had really beautiful weather here in Bridlington and the trees on the street have burst into blossom practically overnight. I've only one card to share with you today, as I mentioned in my last post I thought it was possible to make a shaped gatefold card with a 300gsm card stock if you used a Bigz die and I was right. I don't own many Bigz dies at least not ones that cut solid shapes but I do have a 4" circle Bigz die and I have a set of Spellbinders layering circle dies so I thought I'd give it a go. The card is made exactly the same way as the the gatefold card on my last blog post so please read the next blog post and check out Dawn's video on how to construct the basic card. The main difference is because Bigz dies are solid you need to mark the centre of the edges of the dies so your piece of card lines up, you only need to cut the card to 4 1/4" by 11" as well which makes it a bit easier to centralise your card base before you cut and it's a good idea to stick the "gates" of your card down so they don't slip while you run it through the die cutting machine. I used Adorable Scoreable card stock for my layers along with my usual 300gsm super smooth card stock which I also used to make the card blank. I had planned on using stamped images on the card but nothing really gelled so in the end I used some beautiful dies from the Crafter's Companion Sara's Signature Collection.

Front of closed circle gatefold card

Close up of card front

Open Circle Gatefold card

It took ages to add the gems to the diecut holes round the edge of the panel!

Close up of open card - the inside has been left blank

This wasn't the easiest card to make not helped by the fact that I added the large die cut butterfly on the front with the card shut and when I opened it I realised it was on upside down. I ended up cutting another white panel of card and layering it over the top of the original 3D die cut butterfly, rotating the card 180 degrees and adding a second diecut 3D butterfly panel on the left side instead of the right hand panel. The only good thing was as a result of the second die cut panel, I had a few more extra flowers from the waste so I added them to the card as shown. It is possible to make this card with nesting dies alone but as I mentioned on my last post you can only cut through a maximum of 250 gsm for the first cut through the folded card which can make the central panel a bit flimsy. To be honest it probably wouldn't be too much of a problem for a circle gatefold card as it has plenty of bottom to balance on unlike my labels cards.

I hope you've enjoyed my latest card and if it inspires you to make your own version then please leave a link in the comments section as I would love to see what you come up with. Hopefully I should have a new card to share with you soon. Until next time - keep crafting!
Love and crafty hugs

Sarah xxx

Thursday, 5 May 2016

A Few New Cards To Share

Hello crafty peeps and welcome to my crafty nook! I hope you are all well and looking forward to the weekend. I've managed to make a few cards this week even though I'm still not 100% (I'm running at about 45% at the moment lol). This cough/bug is proving very hard to get rid of and I'm not feeling as creative as I would like. I'm just going to do a card share as I'm not really sure if anyone gets anything out of my usual tutorial style blog post - if you like them then leave a comment please!

The cards I'm sharing today are fairly self explanatory with the exception of the Golden Anniversary cards (identical apart from one opens from the left and the other the right) and as I didn't come up with the design I may as well just link the YouTube video I watched rather than explaining how  it's made myself - one thing I would add is to use card that's no more than 250 gsm as the thinlets dies aren't deep enough to go through all the layers for the initial cut with any thicker card stock - you may be able to use 300 gsm card stock if you have a suitable Bigz die but I haven't tried it yet. You can use thicker card for the layers but I'd suggest adding a layer to the inside panel too so it doesn't buckle from the side 'gates'. Here is the link for the YouTube video I watched https://www.youtube.com/watch?v=vUyefCETO2Y it's the lovely Dawn from Dawn's Stamping Thoughts. In my early crafting/actually having internet days I found Dawn to be an amazing demonstrator of cards and I learnt a lot from her. One of the best things about watching Stampin' Up! demonstrators like Dawn is that you get to learn loads of new card folds and techniques as well as basic card making skills. Here are the two cards I made inspired by Dawn's video, I don't own any Stampin' Up! dies so used the largest nesting labels dies that I have.

Closed Labels Gatefold Card - folds flat for posting

Gatefold Card fully opened for display

Close up of left hand panel

Close up of right hand panel which slots behind the front panel to close

My second Identical Card but panels reversed

This card opens by pulling the left panel carefully from behind the right (reversed for the first card)
 My mum asked me to make this for her neighbour's parents but didn't have a lot of details to give me which is why it's very simply decorated. The card when folded flat is only 4" x 4" but opens out to make a much bigger impression.

Verity Rose Split Panel Card

Close up of the Verity Rose Character

I made an envelope for the card using scrapbook paper

I made this card for Chris's auntie Margy who celebrates her birthday tomorrow. I had made a card for Margy a couple of months ago but ended up giving it to someone else when I was going through a bit of a creative dry spot and I needed a card in a hurry. I actually think I prefer this one. The backing patterned card is from Crafter's Companion's Kimono collection and the card is Adorable Scoreable in a pale blue colour - this card was from a prize I won years ago but I've been hoarding it for special occasions like this one, the blue is just perfect for this image which was coloured in with Flexmarkers and a little bit of silver Sparkle pen.

I've made a couple of other cards but the birthdays for the people involved haven't happened yet so I don't want to share just in case they see them. As it's Margy's birthday in a few hours I thought it would be okay to put it up a bit early. Hopefully I'll get a bit of crafting done over the weekend but it really depends how I feel - as much as I love crafting a lot of the products I regularly use like glues and alcohol markers have a detrimental effect on my chest and I spend half the night after the crafting session coughing crud up so I'm not crafting as much as I'd like to be doing. Perhaps this is an opportunity to try some different techniques I'd certainly like to improve my pencil colouring and painting with watercolours. I'd love to see what you've all come up with so please leave a link to your blogs in the comments section. Until next time - keep crafting!

Love and crafty hugs,

Sarah xxx

Friday, 22 April 2016

Happy News

Hello crafty peeps and welcome to my crafty nook! I hope you are all well and looking forward to the weekend. It's rather chilly here on the east coast but that just means it's perfect crafting weather. I don't actually have a card or project to share today, I'm still poorly so haven't been in my crudy much the past week. However, I do have some crafty news to share. The first thing I want to share is I've won a giveaway on Facebook! My prize of a paper crimper hasn't arrived yet but I'm really looking forward to having a play, as you probably know my husband is sight impaired so I try to add a lot of texture to the cards I make him so if he can't see the card (his sight isn't constant) then at least he's be able to feel the different layers and textures to it. This tool will be perfect for adding some texture in a different way so I'm thrilled to be one of the winners.

My second piece of news is even better! A few posts ago I hinted that I'd have some exciting news to share and now I can. I uploaded a Verity Rose Mother's Day card last month on the Crafter's Companion's Facebook page and the following day I got a private message from the Media Manager for Crafter's Companion who'd seen my card and wanted to feature it in the next issue of Crafter's Inspiration Magazine, she asked me to send a photo of the card via email to the magazine which I did. Unfortunately because I only have a Mini Kodak digital camera which only takes small file photos it wasn't suitable for publication (don't really understand the ins and outs of digital camera files - I've never had a problem uploading photos on my blog - apart from blurry images of course - or on Facebook) so I arranged for my mum to give me the card back so I could get my dad-in-law to scan it and email it to me. That didn't work though so my lovely sis-in-law Sue took a photo with her iPhone and emailed that to me. Luckily that was big enough and I've been waiting for the magazine to come out so I could order a copy. I managed to get it ordered on Wednesday and it came yesterday in the post. The card is in the letter page (they cobbled a letter together from my emails!) and it looks really good. Here's a couple of photos of it.


I really love the sweet comments Sara Davies wrote and I'm looking forward to receiving my £10 gift voucher. I've only got Cupcake to buy in the Verity Rose sets (there are some additional dies and a paper pad too) and as they are no longer available to buy as a collection, I might put this voucher towards it or there are some fantastic stamps and dies in the new Men's collection that I might get instead. I've had cards published in magazines before (I've even won a comp or two!) but this is the first time I've been approached via Facebook so I feel very honoured to have the card appear in such a brilliant magazine.

I hope you've enjoyed sharing my bits of good news, hopefully I'll have some cards to share soon, as I said at the beginning of the post I am still suffering from the bug/infection/dreaded lurgy I got nearly three weeks ago though thankfully I'm not as bad as I have been. I'm really lacking in energy and motivation as a result so it's a bit of a struggle to get my bum off the sofa and into the crudy but I will try to get some cards made over the weekend.  As always if you have any questions or comments then please leave them in the usual places and until next time - keep crafting!

Love and crafty hugs,

Sarah xxx

Wednesday, 13 April 2016

Get Whale Soon

Hello crafty peeps and welcome to my crafty nook! I hope you are all well and enjoying the wonderful spring weather. I'm still not very well but I've managed to make a card for my nephew Chris who is recovering after having surgery last week.


Close up of the Get Whale Soon card

New stamp for the back of my cards (my pins are at the ready!)

A departure from my usual style, I've not done any colouring on this card. The whale and sentiment are from a Clearly Besotted Stamps set called ' Whale Done!' and the waves were made using a Clearly Besotted Stamps die. The whale and spurt were stamped using Distress Inks and the clouds were die cut using a Poppy Stamps Die called Flying High (I think). I saw the stamp from the back panel on Facebook and had to order it as it made me giggle, it took a while to get here as it's from the USA but it was well worth the wait. I added some clear wink of stella to the clouds and waves and added a googly eye to the whale.

Sorry this is a shorter than usual post, I'm still feeling really ill and want to get back to my sick bed. As always if you have any questions or comments then please leave them in the usual places. Until next time - keep crafting!

Love and crafty hugs,

Sarah xxx

Friday, 8 April 2016

Four legged friend - entry for Passion for Promarkers week 340 Blog Challenge

Hello crafty peeps and welcome to my crafty nook! I hope you are all having a brilliant week - it's nearly the weekend again! I'm not very well at the moment as I'm fighting a severe infection. It's mainly in my neck/throat but it's extremely uncomfortable to have anything touching my neck (even pillows!) so I'm not getting much sleep at the moment. As I can't sleep much anyway, I decided to spend a bit of time in my crudy and have a go at this week's blog challenge over at Passion For Promarkers blog please click the link for details http://promarkerchallenge.blogspot.co.uk/2016/04/week-3404-legged-friends.html .

Basik & Sparrows card with floating sparrow

 I bought a couple of ScrapBerry stamps last year but haven't got around to using them until today. I really like the whimsical style of the images and this Cat Detective image really caught my eye. I've kept the design really simple because in all honesty I don't feel up to a lot of faffing around, I've also kept the colouring relatively simple too for that same reason and because the smell of the Flexmarkers was making me cough more than usual. I've not added a sentiment to the card yet as I'm not sure who it's for at this point.

A lot of my Promarkers and Flexmarkers are not as juicy as they used to be (I've had to throw BG1 and 2 away as they were completely dried up) which makes blending challenging and is also why my characters are floating mid air as I'm out of a pale grey to ground them. I know sparrows are usually brown but the birds on the stamp set are all different colours which makes them really quirky so I decided to colour mine brightly too. I stamped the main character onto a panel of Sheena's Stamping Card, it isn't my favourite card for using alcohol ink pens on as it tends to bleed but I had a couple of panels pre-cut just sitting on my desk so I decided to use one. I added some bird stamps but actually stamped one of the birds upside down in the air so quickly trimmed the card panel down to 7.5 cm x 10.5 cm. I coloured the images in using Flexmarkers and added highlights to the birds and the deerstalker hat and scarf using clear Spectrum Noir Sparkle brush pen. I matted and layered this image onto black card stock and some yellow polka dot paper from docrafts Papermania Spots & Stripes > Brights 6" x 6" paper pack. The beige coloured large spotted paper came from the same pack and I stamped sparrows and flowers from the Basik & K "Basik & Sparrows" stamp set that I used for the main image. I coloured them in using bright coloured Flexmarkers as shown then went over the sparrows with the clear Sparkle pen. I matted and layered this piece on yellow and black cardstock and added it to a top folding 8" square card blank. I coloured one of the spare sparrows in using Bright Green Flexmarker and fussy cut it out leaving the legs off the image. I added the green bird to a thin strip of acetate and secured it to the back of the main image panel so it floats/flies over the scene. I then added d/s sticky tape to the back panel and added it to my pre-decorated card front as shown. Here are a few more photos with close ups of the topper etc.

I spy with my little eye something beginning with - DINNER!!

Close up of Floating/Flying buffet item erm I mean cute lil birdie!

*Thinks* I may have to crash land on Harry (yellow bird)
I hope you like my latest card, hopefully I'll think of someone to send it to so it doesn't end up in a box somewhere which tends to be the fate of a lot of unplanned cards. I'll be making a few more cards as soon as I feel better - I'm a bit worried about passing the lurgy on via the cards so don't want to make too many potential snail mail time bombs aka cards! As always I'd love to hear from my lovely blog followers so please don't be shy, leave a comment below and help cheer me up *cough, cough*.  I hope everyone has a wonderful weekend and until next time - keep crafting!

Love and crafty hugs,

Sarah xxx

Monday, 4 April 2016

A card share

Hello crafty peeps and welcome to my crafty nook! I hope you all had a brilliant Easter etc. Things have been rather quiet in my crafty nook which is why I've not blogged for nearly a month. It's partly down to the state of my craft space, I sometimes think there may be something in the feng shui principal of clearing spaces to increase creativity, I certainly struggle to create anything when my crudy is as messy as it has been in recent weeks. I still have a lot of work to do in my tiny craft space but I've made a start which is something.

I have managed to make a couple of cards over the weekend. It was my mum-in-law's birthday on Saturday and it's Gramps's birthday today (Monday). I made a Verity Rose card for mum and a Wine Buffs card for Gramps (he's notorious for being difficult to buy and craft for!) The Wine Buff stamp set has a number of accessories for him to hold so I decided to add a balloon to the image.

Sorry about the slightly out of focus image

Close up of Sunbeam Verity Rose Image

Close up of die cut Flamingo - comes with matching stamps

A bit of envelope art featuring the flamingo from the Verity Rose accessories stamps

All of the images were coloured in using Promarkers (some are getting a bit dry though) and I went over the shell and part of Sunbeam's hat with clear Spectrum Noir Sparkle pen - I take back all I said about the inferior sparkle, if you shake well before each use it's even more shimmery than the Wink of Stella! The shell paper is from a Craftworks 8" x 8" paper pack called Harbour Boulevard, I bought it last year for £6.50 (36 sheets with 6 designs) but it came out 2014. I didn't want to waste any of the paper so I cut out the inside of the paper leaving a 2" frame which I then covered with some striped blue paper from my stash (not a 100% positive but think it may have come from The Works in a scrapbook kit). After stamping and colouring the Sunbeam image, I cut it into a square and matted it onto silver mirror card leaving a thin border around the image. I die cut 4 flamingos out of holographic card and stuck them down in the corners using tiny blobs of glue and added the coloured in panel to the centre as shown. I recently got a Happy Birthday die from Tattered Lace so I die cut that out of the same card as the birds.

I've got all but one of the stamp sets available in the Verity Rose range and I love them so much, Sunbeam is only the second one I've stamped with so far but I'm very excited about what I can make with them. I hope you like the card I made for mum-in-law.

How Old! Wine Buffs Card for Gramps

Close up of topper

Fabulous Fellas Sentiment 
I stamped the Wine Buffs image onto a die cut circle of Sheena's Stamping Card and though I like it for coloured pencils I think I prefer my usual supper smooth card stock for Promarker colouring as I got a slight bleed outside of the outline something that rarely happens with my regular card (which is a heck of a lot cheaper too!). I coloured the image using Flexmarkers then added some clear Shimmer pen to the balloon (which you can't actually see on the photo). The blue large dot paper was from a pack of 6" x 6" Docrafts Basics Dots and Stripes. I added this to a 5.5" square card blank and trimmed off the excess.. The sentiment on the front of the card was from the How Old! stamp set and I added silver Shimmer pen to the nails after cutting out the stamped image. I added it under the circle panel of card using foam tape. The stamped sentiment inside the card was taken from the Fabulous Fellas Sentiment stamp set. Both the stamp sets used on this card were bought in the £1 sales from Katy Sue Designs a few months ago. If you don't already shop at Katy Sue Designs (Flower Soft is probably their most well known product) then check them out online and sign up for their newsletter, they regularly have sales on and unlike other sites they don't just sell unpopular (or old) stamp sets but ones that return to the full price after the sale ends. I've had some real bargains from the site and the quality of the stamps (clear acrylic ones for ease of use) is very good - these images were the first time I've stamped with them and they didn't need any priming.

I hope you've liked the cards, I had a lot of fun making them and the Sunbeam card went down very well (Gramps hasn't opened his yet). Hopefully it won't be quite so long between blog posts and I'll have some stamps and news to share soon (look out after the 20th for some exciting news!) As always if you have any comments or questions then please leave them in the usual places and until next time - keep crafting!

Love and crafty hugs,

Sarah xxx