Hello crafty peeps and welcome to my crafty nook! I hope you all had a brilliant week, it's been lovely here on the east coast - bright with a crispness to the air. I was supposed to do my spring cleaning two weeks ago but kind of lost heart in it when my mum-in-law wasn't able to come for Mother's Day and these bright days are making me wish I'd done a bit more than I ended up doing for just my mum visiting. (It's not that I don't make an effort for my mum's visits but she knows what a untidy moo I can be and she's seen me at my worst but I wanted to make a good impression on my in-laws!)
It was my mum-in-law's birthday last Sunday and it was my Gramps-in law's birthday Tuesday so I thought I'd share the cards I made for them.
The first card features the wonderful Verity Rose from Crafter's Companion. She was coloured in using Promarkers and Spectrum Noir Shimmer markers. I added details with a Sakura stardust pen on her hat and beads. The layering piece was die cut out using a Tonic Studio die and I ink blended over it using Salty Ocean and Tumbled Glass Distress Inks.
The second card was inspired by a card made by Christine Smith AKA CraFTiPoTeNTiAl https://www.youtube.com/watch?v=Dl_yNA4vpuo - please click the link to see the original card that inspired mine. Like Christine I used the hobby themed stamps that came free with Creative stamping Magazine a couple of months ago. I stamped them onto 200 gsm card and coloured them in using Flexmarkers then I fussy cut them out which was rather challenging for the pinchers/pliers and the screwdriver because the thin parts curled up on themselves after I cut them. I die cut the pinboard frame out of white card using two stitched rectangle dies from eBay and I held them in place using some washi tape so the dies didn't shift as the card went though the machine. I also stamped out the tool box and coloured it in using the Flexmarkers and then stamped over it using the small wood grain stamp from the set and the Happy Birthday sentiment. Again it was fussy cut out and I used a scalpel to cut out the inner part of the shape so I could add some extra tools. These tools were cut out using a set of dies from the Sara's Collection of Just For Men dies. I cut a piece of adhesive backed cork to just slightly smaller than the frame and layered the two together as shown to form the pin board.I added the tools with tape runner to the board and added foam pads to the back of the tool box - the tools were stuck to these so that they peeped out from the tool box. I used papers from Papermania Mr Mister range and added them to a Dovecraft A6 card blank using a tape runner from Crafter's Companion. I added the board to the 'wall' of the shed and the tool box to the 'floor' using extra glue on the tools that covered the sticky foam pads.
I did make another card for my mum-in-law on my mum's behalf but forgot to take any photos of it so I can't share here. As always if you have any questions or comments about my latest cards then please leave them in the usual places and until next time - keep crafting!
Love and crafty hugs,
Sarah xxx
Translate
Showing posts with label CC Just For Men Signature Collection by Sara Davies. Show all posts
Thursday, 6 April 2017
Sunday, 5 June 2016
Do the Robot
Hello crafty peeps and welcome to my crafty nook! I hope you are all enjoying the weekend, it is glorious here in Bridlington though a little chilly out of the sun. It's my great-nephew's birthday later on this month so I've made him a card - aren't I organised (lol, not really). I got some Dovecraft small stamp sets from Craft Stash recently and one of them was a robot. which reminded me of another robot stamp I own and haven't used called "Roger Robot" by Woodware. The robot stamp is in parts which makes it perfect for making a movable robot card and that's what I've made.
I stamped the robot parts onto super smooth card and coloured it the images in with Flex Markers then fussy cut them all out. I used a pokey tool to put holes through the parts and added the head and limbs to the body using grey brads. I added Glossy Accents to the eyes and red elements on the robot and left it to dry. I embossed a piece of purple pearlised metallic card using the CC Just For Men Signature Collection by Sara Davies Pop Dotty embossing folder and went over the embossing with a silver gilding wax. I adhered this to a panel of black card and made a card blank out of more super smooth white card. I added the panel and decorated the inside of the card with a Dovecraft sentiment and Robot stamp. I coloured them both in with Flex Markers. Once the Glossy Accents were dry, I added the Robot to the front using foam tape on the torso only so that the arms, legs and head can be moved. Here are some more photos including the decorated handmade envelope.
The star and the "sending smiles across the miles" stamped images were made using Jillibean Soup stamp set "Flying High" which I also got in my Craft Stash order.
I hope you like my latest card, I really like Roger's movable parts and I hope my Great-Nephew likes it too. Hopefully I'll have some time later to make a few more cards. As always if you have any questions or comments then please leave them below and until next time - keep crafting!
Love and crafty hugs,
Sarah xxxx
| Roger doing the Robot |
I stamped the robot parts onto super smooth card and coloured it the images in with Flex Markers then fussy cut them all out. I used a pokey tool to put holes through the parts and added the head and limbs to the body using grey brads. I added Glossy Accents to the eyes and red elements on the robot and left it to dry. I embossed a piece of purple pearlised metallic card using the CC Just For Men Signature Collection by Sara Davies Pop Dotty embossing folder and went over the embossing with a silver gilding wax. I adhered this to a panel of black card and made a card blank out of more super smooth white card. I added the panel and decorated the inside of the card with a Dovecraft sentiment and Robot stamp. I coloured them both in with Flex Markers. Once the Glossy Accents were dry, I added the Robot to the front using foam tape on the torso only so that the arms, legs and head can be moved. Here are some more photos including the decorated handmade envelope.
The star and the "sending smiles across the miles" stamped images were made using Jillibean Soup stamp set "Flying High" which I also got in my Craft Stash order.
I hope you like my latest card, I really like Roger's movable parts and I hope my Great-Nephew likes it too. Hopefully I'll have some time later to make a few more cards. As always if you have any questions or comments then please leave them below and until next time - keep crafting!
Love and crafty hugs,
Sarah xxxx
Tuesday, 31 May 2016
Ever Decreasing Circles
Hello crafty peeps and welcome to my crafty nook! I hope you all had a brilliant Bank Holiday weekend. It's a wet and windy Tuesday here on the East coast - definitely staying inside and crafting weather. I was up most of the night unable to sleep due to the wind (and Jinx was hogging the bed!) so I've made a couple of cards to share with you today. I actually started quite a few more but they weren't going the way I'd hoped for so I'll put them away until another day and I'll try to salvage them then.
If you are a regular reader of this blog then you've probably noticed that I usually have a hand coloured image so I thought I'd challenge myself to make a couple of cards which have little or even no stamping on at all, instead I've used dies and embossing folders to embellish my cards. I wanted to make two cards using circle dies as I really like circles and I have a set of Spellbinders large nesting dies and a 4" Sizzix Bigz die. I have used both for these cards.
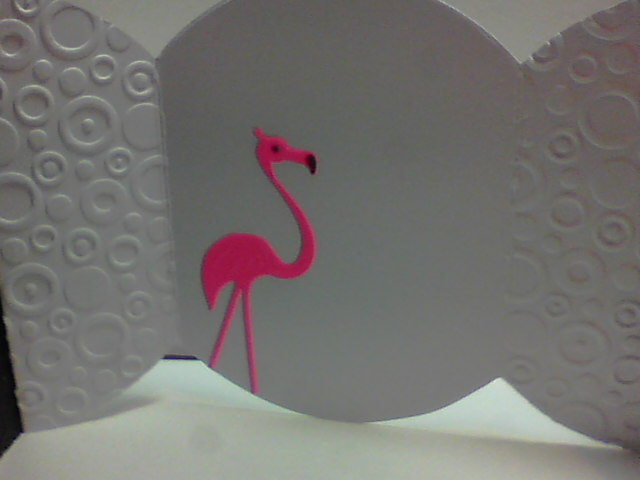
I love the way you can take the same items and yet make two very different cards with them. The flamingos were die cut out of neon hot pink vellum using a die from the Crafter's Companion Verity Rose 'Sunbeam' collection. While the vellum was still in the die, I placed it on a piece of funky foam with the die face down and embossed all the open areas with an embossing tool, I flipped the die over and added some detail to the eye and the beak using an alcohol marker. I die cut a simple heart shape out of the pink vellum scraps. For the instructions on how to make a circle gatefold card, please click on this link http://smwcraftynook.blogspot.co.uk/2016/05/circle-gatefold-card.html - I used a super smooth 300gsm cardstock for the base and embossed the front panels and the two side panels using Crafter's Companion Just For Men Signature Collection by Sara Davies 'Pop Dotty' embossing folder. I die cut a number of circles using the Spellbinders Nestabilities dies out of black and white card and embossed them as shown. I love the quirky sentiment from the CC Verity Rose 'Cupcake' stamp set and thought it was perfect for the flamingos as I personally think they are both "graceful and silly".
I used similar supplies to make this circle easel card but I used Sheena's Stamping card for the base as it's more sturdy than the super smooth card that I used for the flamingo card. I cut my card to 8.5" x 4.25" and scored it 4.25" using a scoreboard. I carefully lined the the square card blank so most of the circle of the Bigz die was covered but a little of the circle die was visible above the folded edge of the card - this is so the card appears to be a circle but remains joined together at the top to form a circle card blank. Using the scoreboard I scored the top part of the card in half (at 2" as my die is 4"), this becomes the mechanism for the easel. I die cut another circle of card using the same die out of white card then black. I die cut another circle out of the black piece so it formed a frame shape as shown using one of the Spellbinders Nestabilities circle dies. I put the spare black circle to one side for later use. I put a small piece of white card into a CC Just For Men Signature Collection by Sara Davies 'Time Piece' embossing folder and ran it through my Big Shot, once embossed I lined up a circle die around the embossed clock face and die cut it out. I then very carefully went over the hands etc of the embossed clock with a black gel pen. I die cut a gold circle out using a die and matted the clock face onto it as shown. I added foam squares to the back of the black frame and thicker foam tape to the layered clock face then die cut a lot of gears using CC Just For Men Signature Collection by Sara Davies 'Cogs and Gears' Dies out of gold mirror card. Once these were cut I added the clock face to the centre of the large white die cut circle and stuck the gears and cogs down as shown with wet glue. I added one of the circle centres from a gear onto the middle of the clock face as shown and once the gears were well stuck down I added the black frame over the edges of the cogs lining it up with the edge of the white circle. I added wet glue to the lower half of the finished panel and stuck it firmly to the easel mechanism of the card. I then die cut even more cogs and gears for the base. I cut the large gears in half both under the clock face and on the card base as the whole gear wouldn't show. I sketched around the black card circle that I'd put aside previously with a pencil and filled in the outer part of the card base with gears and cogs being careful that the edges of the halved ones were well inside the pencil circle. Once the edge was filled with gears and cogs, I added the black circle over them so that the cut edges were covered but there was still plenty of the gears etc showing. I made a stopper for the easel out of spare gears as shown.
Sorry this has been such a long blog post but I wanted to have both cards on the same post to demonstrate how you can get two very different cards using similar supplies. I really enjoy working with the Signature Collections especially the Just For Men collection. I've only got a couple of dies and the embossing folders so far but I've found them to be very versatile and not just for men as the flamingo card demonstrates! I look forward to adding to my collection soon. I hope you've enjoyed this blog post, as always if you have any questions or comments then please leave them in the comment section below. If this weather persists then I'll have some more cards to share with you soon, until then - keep crafting!
Love and crafty hugs,
Sarah xxx
If you are a regular reader of this blog then you've probably noticed that I usually have a hand coloured image so I thought I'd challenge myself to make a couple of cards which have little or even no stamping on at all, instead I've used dies and embossing folders to embellish my cards. I wanted to make two cards using circle dies as I really like circles and I have a set of Spellbinders large nesting dies and a 4" Sizzix Bigz die. I have used both for these cards.
| Flamingo Circles Gatefold Card |
| Close up of card front with hot pink vellum flamingo |
| Circles gatefold card - open |
| Sentiment from Verity Rose 'Cupcake' stamp set |
| Inside of card with embossed side panels |
| Close up of Vellum flamingo inside open card |
| Clock Circle Easel Card |
| Close up of Easel topper |
| Easel card shut for posting |
| Decorated base with raised gear stopper |
I love the way you can take the same items and yet make two very different cards with them. The flamingos were die cut out of neon hot pink vellum using a die from the Crafter's Companion Verity Rose 'Sunbeam' collection. While the vellum was still in the die, I placed it on a piece of funky foam with the die face down and embossed all the open areas with an embossing tool, I flipped the die over and added some detail to the eye and the beak using an alcohol marker. I die cut a simple heart shape out of the pink vellum scraps. For the instructions on how to make a circle gatefold card, please click on this link http://smwcraftynook.blogspot.co.uk/2016/05/circle-gatefold-card.html - I used a super smooth 300gsm cardstock for the base and embossed the front panels and the two side panels using Crafter's Companion Just For Men Signature Collection by Sara Davies 'Pop Dotty' embossing folder. I die cut a number of circles using the Spellbinders Nestabilities dies out of black and white card and embossed them as shown. I love the quirky sentiment from the CC Verity Rose 'Cupcake' stamp set and thought it was perfect for the flamingos as I personally think they are both "graceful and silly".
I used similar supplies to make this circle easel card but I used Sheena's Stamping card for the base as it's more sturdy than the super smooth card that I used for the flamingo card. I cut my card to 8.5" x 4.25" and scored it 4.25" using a scoreboard. I carefully lined the the square card blank so most of the circle of the Bigz die was covered but a little of the circle die was visible above the folded edge of the card - this is so the card appears to be a circle but remains joined together at the top to form a circle card blank. Using the scoreboard I scored the top part of the card in half (at 2" as my die is 4"), this becomes the mechanism for the easel. I die cut another circle of card using the same die out of white card then black. I die cut another circle out of the black piece so it formed a frame shape as shown using one of the Spellbinders Nestabilities circle dies. I put the spare black circle to one side for later use. I put a small piece of white card into a CC Just For Men Signature Collection by Sara Davies 'Time Piece' embossing folder and ran it through my Big Shot, once embossed I lined up a circle die around the embossed clock face and die cut it out. I then very carefully went over the hands etc of the embossed clock with a black gel pen. I die cut a gold circle out using a die and matted the clock face onto it as shown. I added foam squares to the back of the black frame and thicker foam tape to the layered clock face then die cut a lot of gears using CC Just For Men Signature Collection by Sara Davies 'Cogs and Gears' Dies out of gold mirror card. Once these were cut I added the clock face to the centre of the large white die cut circle and stuck the gears and cogs down as shown with wet glue. I added one of the circle centres from a gear onto the middle of the clock face as shown and once the gears were well stuck down I added the black frame over the edges of the cogs lining it up with the edge of the white circle. I added wet glue to the lower half of the finished panel and stuck it firmly to the easel mechanism of the card. I then die cut even more cogs and gears for the base. I cut the large gears in half both under the clock face and on the card base as the whole gear wouldn't show. I sketched around the black card circle that I'd put aside previously with a pencil and filled in the outer part of the card base with gears and cogs being careful that the edges of the halved ones were well inside the pencil circle. Once the edge was filled with gears and cogs, I added the black circle over them so that the cut edges were covered but there was still plenty of the gears etc showing. I made a stopper for the easel out of spare gears as shown.
Sorry this has been such a long blog post but I wanted to have both cards on the same post to demonstrate how you can get two very different cards using similar supplies. I really enjoy working with the Signature Collections especially the Just For Men collection. I've only got a couple of dies and the embossing folders so far but I've found them to be very versatile and not just for men as the flamingo card demonstrates! I look forward to adding to my collection soon. I hope you've enjoyed this blog post, as always if you have any questions or comments then please leave them in the comment section below. If this weather persists then I'll have some more cards to share with you soon, until then - keep crafting!
Love and crafty hugs,
Sarah xxx
Sunday, 29 May 2016
Tool Time Tool Box card
Hello crafty peeps and welcome to my crafty nook! I hope you are all enjoying the bank holiday weekend (if you are having one where you are of course). I've not really noticed the weather as I've been holed up in my crudy sorting things out and trying to make some cards. I have plenty of ideas but getting them to turn out right in the real world is being rather challenging at the moment. *big sigh*
I'd like to share a masculine card with you today, it's based on one of my favourite cards - the pop up box card. I've been making these sort of cards for about a year and love them. I got an embossing folder from Crafters' Companion that's part of the Just for Men Signature Collection by Sara Davies (I got all of the embossing folders and although I have some similar, these folders are a different size to the ones in my collection). The one called 'Checkerplate' really caught my eye as it remind me of embossed steel. My father-in-law is the person I turn to when we need any handyman stuff doing so I thought a tool box card would be perfect for him either for Father's Day or when we want to say thanks. I didn't want to make the box the same dimensions as my usual pop up box cards as a tool box tends to be shallower and narrower than a cardboard box so I started off by making a paper template before I started to cut into my card. If you ever want to alter dimensions of cards then I'd suggest trying it out with copier paper first as it's a lot cheaper than card stock - your card won't stand up obviously but you can see if your measurements actually work.
Once I'd made a paper model of the tool box I cut a sheet of A4 card down to 14 cm but left it full length. I scored the card at 4cm, 14cm, 18cm and 28cm, then rotated the card so the short side was at the top of the scoring board and scored it at 6 cm. I then burnished the score lines well. I cut down the 28cm scoreline to the 6cm scoreline then tapered the cut on an angle to the edge of the card so that I could stick this card flap to the inside of the left hand side of the card once I'd decorated the box panels. I cut all the remaining score lines down to 6cm to make box flaps but removed the shortest flaps completely leaving just the flaps on the longest sides. I cut two pieces of pale blue pearlised metallic card to 3.5cm by 7.5cm, two pieces of the same card cut to 7.5cm x 9.5cm and finally two pieces of the card cut to 5.5cm by 9.5cm. I embossed these pieces of card with the 'Checkerplate' embossing folder. I went over the embossing with some silver gilding wax then buffed it up. I added these embossed panels to the relevant parts of the card. Once the card was decorated I stuck the flap to the inside of the left hand side of the card using double sided tape. Usually a pop up box card has two strips of card inside the box to float the elements from using acetate but because this tool box is narrower than a normal box card I only added a single strip of card that was cut to 14cm x 6cm (this is deeper than a normal strip to support the weight of the die cut tools.) I scored both ends 2cm in and added wet glue to the flaps and slid it into place inside the card - the bottom of the card strip is level with the box card bottom edges. I then die cut a load of tools using My Favorite Things Die'namics "Tool Time" dies. There are a similar set of tool dies in the CC Just for Men Signature Collection by Sara Davies but I haven't bought them yet as I already had the Tool Time. As much as I love the Signature Collection (and I really want it all) I have limited funds for crafting so can't justify paying full price for an item that's really similar to the one I've already got, saying that if it's ever on sale it's be straight in my basket assuming I have some money in my account lol. Most of the MFT tools come in at least two parts (some are three) so I die cut the whole tool in either Kraft card stock or silver mirror card then die cut the matching pieces in either a coloured card or more of the mirror card depending on what piece it was, I then stuck all the tool pieces together. It was at this point that I realised I would need a second tool for each one cut for the backs of the tools as they can be seen due to the way the tool box is fully opened. The hammer and saws had to be die cut on the reverse of the card so that the outlines matched. The screwdrivers and wrenches are symmetrical so line up regardless of how they are die cut. Once the tools had backs I stuck them to the inside of the card as shown, I tried to angle the tools and placed them in different heights to make the layout look more appealing. I had a hammer left over so attached it to the outside of the tool box with it's head glued to the inside so it looks like someone's balanced it there until they need it. I haven't added a sentiment to this card yet as I'm not sure what occasion I'll use it for but I have added white card panels to the underside of the flaps. Here are some more photos of the finished card.
I really enjoyed making this card, it was quite time consuming die cutting all the parts to the tools but I'm very pleased with how they've turned out and they are certainly substantial! I really like the embossed metal effect I got using the Checkerplate embossing folder and I can see myself using it a lot for other masculine cards. I've got a few more cards to share with you but this has turned out to be a rather long blog post so I'll write about them another day. I hope you all enjoy your Bank Holiday Monday and I hope you have lots of crafty fun. As always if you have any comments or questions then please leave them in the comments section below and until next time - keep crafting!
Love and crafty hugs,
Sarah xxx
| Tool Time Pop Up Tool Box |
I'd like to share a masculine card with you today, it's based on one of my favourite cards - the pop up box card. I've been making these sort of cards for about a year and love them. I got an embossing folder from Crafters' Companion that's part of the Just for Men Signature Collection by Sara Davies (I got all of the embossing folders and although I have some similar, these folders are a different size to the ones in my collection). The one called 'Checkerplate' really caught my eye as it remind me of embossed steel. My father-in-law is the person I turn to when we need any handyman stuff doing so I thought a tool box card would be perfect for him either for Father's Day or when we want to say thanks. I didn't want to make the box the same dimensions as my usual pop up box cards as a tool box tends to be shallower and narrower than a cardboard box so I started off by making a paper template before I started to cut into my card. If you ever want to alter dimensions of cards then I'd suggest trying it out with copier paper first as it's a lot cheaper than card stock - your card won't stand up obviously but you can see if your measurements actually work.
Once I'd made a paper model of the tool box I cut a sheet of A4 card down to 14 cm but left it full length. I scored the card at 4cm, 14cm, 18cm and 28cm, then rotated the card so the short side was at the top of the scoring board and scored it at 6 cm. I then burnished the score lines well. I cut down the 28cm scoreline to the 6cm scoreline then tapered the cut on an angle to the edge of the card so that I could stick this card flap to the inside of the left hand side of the card once I'd decorated the box panels. I cut all the remaining score lines down to 6cm to make box flaps but removed the shortest flaps completely leaving just the flaps on the longest sides. I cut two pieces of pale blue pearlised metallic card to 3.5cm by 7.5cm, two pieces of the same card cut to 7.5cm x 9.5cm and finally two pieces of the card cut to 5.5cm by 9.5cm. I embossed these pieces of card with the 'Checkerplate' embossing folder. I went over the embossing with some silver gilding wax then buffed it up. I added these embossed panels to the relevant parts of the card. Once the card was decorated I stuck the flap to the inside of the left hand side of the card using double sided tape. Usually a pop up box card has two strips of card inside the box to float the elements from using acetate but because this tool box is narrower than a normal box card I only added a single strip of card that was cut to 14cm x 6cm (this is deeper than a normal strip to support the weight of the die cut tools.) I scored both ends 2cm in and added wet glue to the flaps and slid it into place inside the card - the bottom of the card strip is level with the box card bottom edges. I then die cut a load of tools using My Favorite Things Die'namics "Tool Time" dies. There are a similar set of tool dies in the CC Just for Men Signature Collection by Sara Davies but I haven't bought them yet as I already had the Tool Time. As much as I love the Signature Collection (and I really want it all) I have limited funds for crafting so can't justify paying full price for an item that's really similar to the one I've already got, saying that if it's ever on sale it's be straight in my basket assuming I have some money in my account lol. Most of the MFT tools come in at least two parts (some are three) so I die cut the whole tool in either Kraft card stock or silver mirror card then die cut the matching pieces in either a coloured card or more of the mirror card depending on what piece it was, I then stuck all the tool pieces together. It was at this point that I realised I would need a second tool for each one cut for the backs of the tools as they can be seen due to the way the tool box is fully opened. The hammer and saws had to be die cut on the reverse of the card so that the outlines matched. The screwdrivers and wrenches are symmetrical so line up regardless of how they are die cut. Once the tools had backs I stuck them to the inside of the card as shown, I tried to angle the tools and placed them in different heights to make the layout look more appealing. I had a hammer left over so attached it to the outside of the tool box with it's head glued to the inside so it looks like someone's balanced it there until they need it. I haven't added a sentiment to this card yet as I'm not sure what occasion I'll use it for but I have added white card panels to the underside of the flaps. Here are some more photos of the finished card.
I really enjoyed making this card, it was quite time consuming die cutting all the parts to the tools but I'm very pleased with how they've turned out and they are certainly substantial! I really like the embossed metal effect I got using the Checkerplate embossing folder and I can see myself using it a lot for other masculine cards. I've got a few more cards to share with you but this has turned out to be a rather long blog post so I'll write about them another day. I hope you all enjoy your Bank Holiday Monday and I hope you have lots of crafty fun. As always if you have any comments or questions then please leave them in the comments section below and until next time - keep crafting!
Love and crafty hugs,
Sarah xxx
Subscribe to:
Posts (Atom)