Translate

Thursday, 28 July 2016

Cards for Sad Occasions

Hello crafty peeps and welcome to my crafty nook! It's nearly the weekend again, do you have anything exciting planned? I wasn't going to share these cards but I was really pleased with how the Sympathy Card came out and I did my first (I think!) watercolour image for the get well card. I looked on YouTube for some inspiration and to be totally honest I found most of the sympathy cards to be unsuitable - not helped by one person who kept saying "this is a fun card/technique" which seemed a tad inappropriate for sympathy cards, after all it's not like most people would be looking out of boredom or anything I imagine most viewers would be in the same shoes that I was in - looking for some inspiration to make their own sympathy card because someone close had suffered a loss (not exactly a 'fun' occasion!). Others were too fancy or floral for a man so I decided to just work with what I had. I looked through my stash and found some Art Nouveau stamps that came free with Cardmaking and Papercraft Magazine in the last couple of months (not sure when exactly as I don't label which issue they come free with - something I'll try and do in future). Even though I was put off by all the floral sympathy cards I saw on YouTube, I was drawn to these stamps especially the one I ended up using.

Thinking of you Sympathy Card (for a man)

Art Nouveau themed card
As strange as it may seem, I think this design would make a great wedding invitation if you added a touch of silver and changed the sentiment. I personally think white, black and silver wedding invites to be very stylish (kind of wish I'd gone for this colour scheme for my own wedding instead of white, silver and summer sky blue) and the Art Nouveau stamped images are very elegant. I think sympathy cards, especially those for men should be quietly understated and I'm sure you'd agree that this certainly is that.

My second card features a Fizzy Moon stamp which I like but I wasn't too thrilled to discover that half the image shown on the front of the stamp set is actually absent from the stamp! It gives the stamped image a real 'sketchy' feel which I personally dislike and I ended up drawing the missing lines in using a black pen (luckily the one I used was waterproof!). I stamped the image onto watercolour paper and filled in the image before colouring it in using Kuretake Gansai Tambi Japanese Watercolour Paints which I am fortunate enough to own. I got mine from Amazon ages ago and this is the first time I've really used them as I'm more likely to use watercolour pencils. I was a bit disappointed that the seller removed the protective plastic cover from the paints prior to posting it as it makes a brilliant palette (I used an acrylic block to mix my colours). I've discovered why my water coloured images don't usually look exactly watercoloured - I don't use enough water! It's amazing what a difference adding plenty of water to your colours makes. 

Watercolour Get Well Card featuring Fizzy Moon

Very pleased with how this came out apart from that pink for the plasters!
 By using more water I was able to layer my colours to add shading and texture, it isn't perfect but I don't think it's bad for my first attempt, I just wish I'd been able to mix a less vile shade of pink for the plasters lol. The background colour was actually done by a wash of plain water then adding Persian Blue Zig Real Color Marker using the wet on wet technique (first time doing that too!). I die cut the shape and layered it onto a black square of card before adding it to the card blank. Again this is another simple card even if it did take a while to make. I really enjoyed experimenting with my Kuretake Gansai Tambi Japanese Watercolour Paints, the pigment in them is really good so you can add lots of water to them (I did that on an acrylic block rather than in the pans so they don't get waterlogged.)  Although there are lots of variations to the colours on this picture I only used a red, black, white and caramel but got different shades by adding more or less of the white and water to each mix. I hardly used any water on the black noses which is why they are so black and shiny (hard to see in the photo but very apparent in real life).

I've been fortunate enough to have got some new goodies online including some Letraset Aqua Markers from Cowling and Wilcox www.cowlingandwilcox.com  who have got a fantastic sale on at the moment! The Aqua Markers are only 50p each!!! And Tria Markers are only 95p each (RRP is £4.75 each!!!!). I got 9 colours and a blender which was also 50p, I'm really looking forward to trying them out. I hope you'll excuse the overuse of exclamation marks but at these prices who can blame me for being astounded - I saved £2.00 per pen on the RRP which is amazing value. 

As always if you have any questions or comments then please leave them in the usual places. I have a couple of cards to make this weekend so hopefully I'll have something new to share on Monday, if not sooner. Until next time - keep crafting!

Love and crafty hugs,

Sarah xxx

Sunday, 24 July 2016

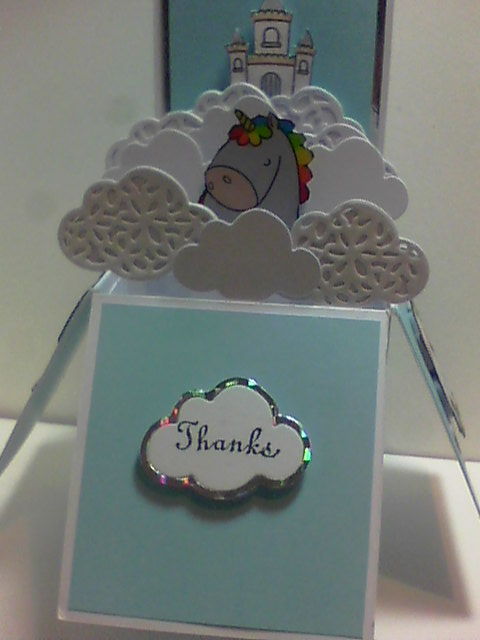
Magical Unicorns Pop Up Box Card

Hello crafty peeps and welcome to my crafty nook! I hope you've all had a brilliant weekend, although the weather's now cloudy the heat is unrelenting - it was 76.6 F in my crudy during the early hours of this morning and completely airless. It's officially the summer holidays in Bridlington now so I'm hoping for a good thunderstorm to clear the air and freshen things up! Obviously I don't want it to rain the entire 6 weeks but a shower or two soon would be most welcome. Enough weather talk - let's talk crafting!

I really should have made this card a couple of weeks ago as it's a thank you card for Quick Card Made Easy magazine. As you'll know if you read the previous post, I won a couple of giveaways on Facebook (don't hate me but I've actually won another prize but from Orangina (not on FB) this time!). The second prize came last week (finally!) and when I've made stuff with my nieces I'll post a couple of photos (pending their mum's permission of course!) so you can see what we make - it's a pirate themed fun box so it should be quite good. Obviously my favourite prize is the MFT Magical Unicorns because they're unicorns! I've had an idea buzzing around my head for a few weeks about what sort of thank you card to make and finally settled on a pop up box card because let's face it a pop up box card has a lot of wow factor and isn't that difficult to make (usually - not sure if it's the weather but I kept mucking the card base up and this card has taken me nearly 3 days - on and off - to make!). It isn't quite what I'd imagined but I'm pleased with how it's turned out.

MFT Magical Unicorns Pop Up Box Card

Close up of Pop Up Elements

The Clouds are made using a CC Die'sire Die


Every Cloud should have a silver lining especially when saying Thank You

Rainbow Unicorn on one of the side flaps

Back Panel with die cut clouds
I don't have the matching dies yet so I've had to fussy cut all the stamped images which is why the castle in the clouds is without it's flags. I coloured all the images using Flex Markers and I added a layer of Spectrum Noir Clear Glitter brush marker over the castle and unicorns, the clouds were cut out using a CC set of dies and I added a layer of glossy accents to the top cloud on the back panel. I really like how this card turned out and I'm thinking of making a similar one for my niece's birthday next month (though I have kind of promised her a cheer leader card so I'll see what her mum thinks). I shall be posting this card to QCME magazine in the next few days along with a letter of thanks, hopefully they'll like it too and know how much I appreciate my fantastic prize. As the second prize is for the girls, I thought we could make a card together to say thank you at a later date.

I'll be making a couple of cards tonight but as they are for rather sad occasions I'm not sure it's appropriate to share, hopefully I'll have some cheery cards to share soon. As always if you have any questions or comments then please leave them in the usual place and until next time - keep crafting!

Love and crafty hugs,

Sarah xxx

Monday, 18 July 2016

Unicorns and Heatwaves

Hello crafty peeps and welcome to my crafty nook! I hope you've all had a brilliant weekend and if you are in the UK - how's the heatwave for you?? I'm finding it a bit hot to do much apart from laying around gasping like a fish out of water lol. My crudy is probably the worst room because it's so small and packed to the gills and it tends to be a degree or so warmer than the rest of the flat except in winter when it's a few degrees colder! This hasn't stopped me from crafting though, I've just done it in spurts rather than having a long crafting sesh. Ideally I'd quite like to craft outdoors but having a shared garden and extremely nosy neighbours prevents this so I'd just have to grin and bear it :) - knowing typical British summers I doubt it'll last too long in any case especially as a lot of kids break up for the summer holidays at the end of this week. Enough weather talk, it's time for the important things in life -crafting! I was very lucky a few weeks ago to win two Facebook giveaways within 48 hours of each other. One of them still hasn't arrived but the second one came within two days of being notified of my win. I've not really had a lot of time to have a play with my lovely new stamps and deco-patch papers but I really love my gorgeous prize from Quick Cards Made Easy.


Close up of the unicorns
 The stamps are the Rainbow Greetings and Magical Unicorns by MFT (My Favorite Things) which I absolutely love!!! I really want the matching dies for the Magical Unicorns but they are £23.25 at the moment so I'll have to keep my fingers crossed that they'll come down in price after a while. I was inspired by AmyR on YouTube (Prairie Paper & Ink) who made some beautiful Unicorn fridge magnets using the Magical Unicorns stamp set, matching dies and Xyron creative station's magnet cartridge. I only own the stamps so made my own version by fussy cutting the unicorns and adding magnetic tape to the backs - obviously mine aren't as sturdy as they aren't laminated or have the magnetic backing but I was still pretty pleased with the result.


I made these to give to my sister-in-law so added small pieces of the magnetic tape to a pre-made box (I made this ages ago using my envelope punch board) and stuck the magnets to these so they don't move about in the box. As you can see from the second photo I added lots of Spectrum Noir Sparkle pen over the images. These unicorns are super sweet and with a bit of masking you can turn them into ordinary horses (though why would you want to do that!) you just need to add a thin line of pen at the top of the horse's fringe where it's covered by the mask. I'm in the middle of making a cloud/unicorn floating box card to send to QCME magazine as a thank you for my lovely prize and I'll share it with you once I've completed it. I hope you like my latest project, please check out AmyR on YouTube to see what inspired me and as always if you have any questions or comments then please leave them in the usual places. Until next time - keep crafting!

Love and crafty hugs,

Sarah xxx

Saturday, 16 July 2016

Another HOTP Steampunk Card

Hello crafty peeps and welcome to my crafty nook! First of all please excuse any typos that may be present in this post, my cat Jinx has decided to hog the desk so the keyboard is balanced on the edge and resting against my tum! I wouldn't be surprised if the little darling decides to climb on top of either the keyboard or me while I'm writing this. I like to pretend that I'm in charge but in all honesty Jinx rules the flat with a paw of iron lol - we're just his chattels.

Today I'd like to share the Steampunk themed birthday card I made for my wonderful friend Adam, it was made using the same stamp set as the card featured in yesterday's blog post.

Envelope decorated with steampunk corner stamp

Steampunk blended distress ink birthday card

Close up of main image

Inside of card
I started this card by making the card blank from a sheet of Kraft card which I cut down to 11" x 5 1/2". I scored it at 5 1/2" and rounded the corners using a punch. Only one side of this card is Kraft and the other is an off white which makes it perfect for making card blanks out of as it means you don't have to use either a white pen to add your message inside or add a paler coloured insert. For this card though, I did add an insert as I wanted to add a stamped sentiment and the inner surface is rather slick which means the message smudges unless you heat set it. To make the focal image, I cut a sheet of cream card stock to 5" square and stamped the largest stamp from the set in the middle of the card. I then added most of the colour using Distress Inks and a blending tool. I started with Spiced Marmalade and pulled the colour in towards the centre of the card using the blending tool, I concentrated the colour around the image but added a little of it over the clock when the ink was nearly gone from the foam applicator so it's a much paler colour. I added some Fired Brick and finally a little Black Soot around the edges. I then added a little more of each colour until I got the blended look I wanted. I've no idea where I got the cream card from but it is brilliant for ink blending, I don't have a mini round blending tool yet and sometimes I find I have streaks and lines left on my project after I've coloured it in but this card seems to smooth all the colours together with very little skill on my part. Once the inks had thoroughly dried I added some yellow Flex marker to the light bulb. I added a layer of Glossy Accents over the bulb and the seconds indicator on the clock face and put it to one side to dry. While the Glossy Accents was drying I cut another piece of the cream card stock for the inside of the card and removed the corners using a ticket corner punch, I then stamped the sentiment and images as shown using Memento Black Tuxedo ink. I stuck this inside the card using double sided tape. I stamped "Happy Birthday" in the four corners then added the topper to the front of the card using more d/s tape once the Glossy Accents had set. As a final little touch I added a coating of Spectrum Noir Clear Glitter brush marker over the hat band. I made a matching envelope using my We R Memory Keepers Envelope Punch Board.

I really enjoyed making this card but I think if I duplicated it I'd add a thin border of black around the topper just to make it pop a bit more. I'm hoping Adam likes it as it's a bit different to the cards I usually make him. If you have any questions or comments then please leave them in the usual places. I hope you all have a brilliant weekend and until next time - keep crafting!

Love and crafty hugs,

Sarah xxx
p.s. I thought you might like to see a photo of my 'helper'


Friday, 15 July 2016

A HOTP Steampunk Card

Hello crafty peeps and welcome to my crafty nook! Well it's been ages since I posted anything, sorry if you've missed my creations but I've just not really been doing much crafting the past week, hopefully that will change in the next week or so. I have managed to make a couple of cards using a lovely Steampunk themed stamp set from Hot Off The Press. The first card I made was a card "just because" for my lovely husband Chris who sometimes has a lot to put up with being married to me and this is the one I'd like to share today.


HOTP Light up my life steampunk card

Close up of topper

Close up of sentiment

Card for Chris

The stamp set comes with loads of small stamps perfect for making your own background paper so that's what I did using Memento Rich Cocoa inked images onto a panel of Kraft card stock. I stamped the chained light bulbs onto a square panel of cream card stock and coloured the bulbs in using a bright yellow Flex marker. I added clear Spectrum Noir Shimmer pen to the three light bulbs on the left and added Glossy Accents to all the bulbs, I put the panel to one side while I worked on the rest of the card. I stamped out the sentiment then used a square punch to cut it out and went around the edges with Walnut Stain distress ink to tie it in with the rest of the card. Once the Glossy Accents had fully dried I mixed a little bit of Nuvo Acrylic paint with water until it was a runny (but not too runny) consistency and then loaded up an old stiff bristled brush and flicked it onto the topper panel and the background panel. I used two colours - silver and pearlised white. I left both pieces to dry while I cut a piece of Kraft card slightly bigger than the topper. I made a card blank out of another sheet of the cream card that I used for the topper. Once the paint was dry I added the topper to the square of Kraft card using d/s tape then added the background card to the card blank. Finally I added the topper and the sentiment as shown using foam tape. The splatters of acrylic paint have dried raised which gives the card a bit of texture - as regular readers will know my husband is sight impaired so I try to add texture to all my cards so even if he can't see it very well (he has a bit of sight in one eye and can see some colours but not all unfortunately) he'll still be able to feel the various textures and enjoy the card in a different way.

I really enjoyed making this card, the stamp set is amazing and it's really going to get a lot of use especially for men's cards. I liked getting messy but I've got to say I didn't enjoy the smell of the Nuvo paint and it lingered for a couple of days in my crudy so I'll probably use it sparingly. I made a second card using this stamp set but I can't share it just yet as it's for my friend Adam's birthday (today!) and I want him to see it first.  Hopefully he'll get it today or tomorrow and I'll be able to add a new blog post over the weekend. As always if you have any questions or comments then please leave them in the usual places, I may not always respond but I love to read each and every one of them. Until next time - keep crafting!

Love and crafty hugs,

Sarah xxx

Sunday, 3 July 2016

1st Birthday Card Featuring Tiny Tatty Teddy

Hello crafty peeps and welcome to my crafty nook. I hope you've all had a wonderful weekend, I'm still trying to get my head around the fact that it's already July! I've just the one card to share with you today, a first birthday card for Taio who's celebrating his birthday on Tuesday. I decided to use one of the boy Tiny Tatty Teddy stamps combined with a bunting die by Dovecraft and a 1 today die by Sizzix. I also used one of the Birthday Sentimentals by Crafter's Companion. I decorated an envelope made with the WRMK Envelope Punch Board using the Child's Play stamp set by Clearly Besotted Stamps.


I'm still loving the split panel card design and I thought it worked very well with this image. I stamped it out onto super smooth card stock and coloured it in using ProMarkers, I fussy cut it out and added some CC Sparkle Pen in clear on Tatty's nose and patches. I added foam tape to the back and stuck it to a panel of silver glitter card. I mounted this onto a scrap of blue card stock. The card blank was made by cutting a sheet of A4 card stock at 10.5cm (sorry I'll be mixing my metric with imperial here!) and then scored it at 14cm. I lined the fold crease up to the 2 inch mark on my trimmer and cut off the short front panel (A4 is 29 and a bit cm which is hard to score exactly in half. By scoring at 14cm one side of this card blank was nearly 2cm longer than the other but as it's being cut off it doesn't matter). From this cut off piece I trimmed off a 2" section to form the bottom of the card front. I added blue pieces of card to the 2" panels as shown. I die cut the smallest size of bunting using the Dovecraft die out of some more silver glitter card and carefully glued the top edge of each triangle to a short length of baker's twine. I carefully lined the loose panel of card to the bottom edge of the card blank and held it in place with a paperclip. I added a strip of d/s tape to the top and bottom back side of the decorated panel and stuck it to the top and bottom panels of the card blank as shown. I then removed the paperclip as it was no longer required. I diecut the number 1 and the word today out of more silver glitter card and added it to the bottom panel using dots of wet glue - I'd like to point out that the t is crooked by the die design not by me mucking it up lol. I added tiny foam pads to the underside of the punting and added them to the top of the card. I stamped a sentiment on the left hand side of the card.

The envelope was made using my envelope punch board by WRMK and I decorated the front using a couple of stamps from the Child's Play set by Clearly Besotted Stamps and coloured them in using ProMarkers.

I hope you like my latest card, it's really shimmery so should appeal to a one year old (it appeals to me anyway lol) I'm expecting a delivery tomorrow from Every Craft's A Pound as they've had a load of Tonic Studio Punches available on their website, I've ordered 17 out of the 18 available (the one I didn't order was a holly punch and I have quite a few already) I've only got a couple of Tonic Studio punches in my stash because the craft shop in town and the one I used to go to sell mainly Woodware and Martha Stewart punches. I personally love the Woodware punches but wouldn't recommend the MS ones as I've broken a couple trying to punch through card - for the price of a MS punch you would expect it to be able to punch through more than paper but apparently not! I'm not really sure where exactly I'm going to store 17 border/strip punches as I imagine they'll be quite bulky but at a saving of £10.99 per punch (yes you read that right - I saved £10.99 per punch as they are only a pound each!!) I couldn't pass them up especially as I've wanted some border punches for a while (the ones I have are Martha Stewart!). If Create and Craft are to be believed the Tonic Studio punches are very powerful so hopefully they're not going to break if I punch the edge of my cards (and if they do I only paid a pound for them!)

I'm looking forward to sharing what I come up with once I've had a play with the punches. If you have any questions or comments please leave them in the usual places and until next time - keep crafting!

Love and crafty hugs

Sarah xxx