Hello crafty peeps and welcome to my crafty nook! I hope you are all well and looking forward to another crafty (or non-crafty) weekend. This post is a little later than promised, I'm not sure where this week's gone again.
I made two cards for Charlie - the first card was loosely based on one my sister shared with me on Facebook months ago, I couldn't actually find the photo of the card but had sort of an idea what it looked like.
This isn't the easiest card to photograph as it's mostly black on black. I stuck Sizzix number dies onto a piece of Centura Pearl card stock in a random pattern using washi tape and ran it through my Big Shot using a metal Precision adapter plate to ensure a crisp clean cut first time, then moved some of the numbers on the card while leaving a couple off. I made sure I kept the negative pieces of the numbers as I wanted to make a feature of the negative numbers rather than the die cut positive numbers. Once I had all the numbers I wanted cut out I added pieces of foam tape to the back of the card making sure I used plenty near but not covering the negative number spaces. I added a small scrap of pink holographic card to the 18, flipped the card over and added the interior negative pieces so the 8 was complete using small pieces of foam tape. I added some d/s tape to the back of the 18 and added the entire panel to another piece of black card stock. I added all the saved negative diecuts inside of the relative numbers as shown using more foam tape. I wanted to add some white splatters just to make the card a little more interesting so mixed a small quantity of Tonic Nuvo white acrylic paint with some DoCrafts white shimmer spray on a spare piece of acetate and flicked it onto the card front using a paint brush. I ended up with two large drops so dabbed them up using a piece of kitchen paper and it left a galaxy sort of pattern near the 18 which I rather liked. I added to the spacey feel by adding dots of white gel pen and Sakura Clear Stardust gel pen randomly to the card. It would have been a good idea to have added the Happy Birthday sentiment before I added any foam tape to the piece but luckily it was stable enough for me to stamp onto it using Versamark clear ink and then heat embossing using a detail white embossing powder. Once I was happy with the front panel, I added it to a card blank. Although this was made for a young lady it would be very easy to change it for a young man just by swapping the pink card under the 18 for another colour - you could also easily change the age for a different significant birthday.
The second card is one of my beloved pop up box cards and I loved making the last one so much that I decided to make a similar one using different star dies.
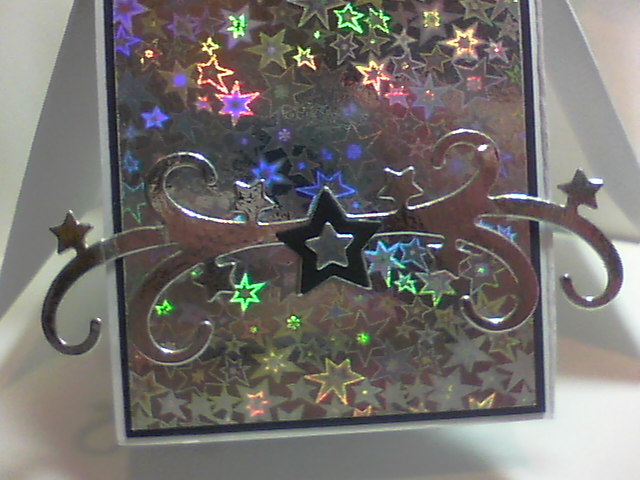
The card base was made using Centura Pearl black card stock which is black on one side and white on the other which is why the top flaps of the box card are white while the box parts are black. I die cut the star shapes out of the black card, pink holographic and silver mirror card and the 18s were also die cut out of the pink holographic card. This card was extra large so I had to make a custom envelope for it using my WRMK Envelope Punch Board and a sheet of 12" x 12" paper (punched and scored at 4 1/2 ") I really liked making this card and it certainly has that wow factor.
I've made these box cards loads of times so there are instructions somewhere on this blog. If you can't find them then please leave a comment below and I'd be delighted to write them out again. I've a card to make for one of my other niece's Isobel who will be celebrating her 2nd birthday on Thursday. I'm considering making a rocker card with balloons floating above using acetate but nothing's definite at this point. I hope you've enjoying seeing my (sort of) latest creations, I had a lot of fun making them and they seemed to go down well last Sunday. It was really wonderful to share Charlie's special birthday and it was fantastic to see my sister's family and spend some quality time with them.
I hope you all have a brilliant weekend and until next time - keep crafting!
Love and crafty hugs,
Sarah xxx
Translate
Friday, 21 October 2016
Sunday, 16 October 2016
Happy 18th Birthday Charlie and some spooky milk cartons
Hello crafty peeps and welcome to my crafty nook! Today is a very special day as my niece Charlie turns 18! I don't see my sister and her kids as often as I'd like so I'm making the most out of seeing them today by taking an early Halloween treat for her kids that still live at home. I fell in love with the milk carton embossing board that came free with one of my magazines last year so I decided to get it out again and make some spooky milk cartons filled with Halloween treats. I don't celebrate Halloween so apart from one stamp set that I bought during a Clearly Besotted Stamps sale and a skeleton die from Crafters' Companion, I don't own a lot in the theme of Halloween. Luckily I do have lots of different coloured card stock and I must confess to a sneaky purchase on ebay of a spider web die, so with a little imagination I've come up with these.
All the milk cartons are a variation of the theme but I did change things a little bit more for the birthday girl - I used Centura Pearl card and black fabric glitter tape for that added bit of bling and embossed the scary face and BOO! using white detailed embossing powder instead of stamping in black. I coloured the tiny skull pegs using a black flexmarker and added details (stripes and dots) using a white gel pen. Since taking the photos I have coloured in the naked skull peg to match the others. I added some cheap pearl effects which actually flattened out instead of staying 3D (lesson learnt!) but apart from that, I'm pleased with how they've come out. Hopefully the kids will like them as much as I did making them.
I've made a couple of cards for Charlie which I'll be sharing with you tomorrow all being well - I want the birthday girl to see the cards first. As always if you have any questions or comments then please leave them in the usual places. I hope you all have a wonderful Sunday. Until next time - keep crafting!
Love and crafty hugs,
Sarah xxx
I've made a couple of cards for Charlie which I'll be sharing with you tomorrow all being well - I want the birthday girl to see the cards first. As always if you have any questions or comments then please leave them in the usual places. I hope you all have a wonderful Sunday. Until next time - keep crafting!
Love and crafty hugs,
Sarah xxx
Thursday, 6 October 2016
60th Pop Up Box Card
Hello crafty peeps and welcome to my crafty nook! I hope you're all having a brilliant week, it's nearly the weekend so that means lots of crafty goodness to look forward to. I had my best friend Adam and his lovely wife Victoria stop by for a visit on Monday on the way to celebrate Adam's mum's 60th birthday. Perfect timing as it meant I could get Adam to hand deliver the card I'd made for her rather than sending it through the post. For such a significant birthday I decided to make one of my favourite styles of card - a pop up box card. Ros is such a star that it seemed appropriate to make her a box full of them with die cut 60s floating amongst them.
I used a set of star dies from Xcut which I got in a recent order from Every Craft's A Pound. ECAP have got a shiny new website with lots of new features and although not all items are just a pound, they remain fantastic value not least as you now get free P&P on orders over £30. This die set was only £3.00. The numbers were cut out using a die from Sizzix which didn't come from ECAP - unfortunately. I die cut the stars out of black card and silver mirror card and the numbers were diecut out of holographic card. The top flaps of the box were matted and layered using the black card and some rather lush holographic stars card which went perfectly with the star theme. The sides of the box under the flaps were matted and layered with black card and plain silver card except for the front panel which had white card for the top layer so I could write my birthday message.
Apparently there's a trick to make the box pop open as soon as it comes out of the envelope involving a rubber band but I've not come across instructions on how to get it to work. If I find them or manage to work out how to do it on my own then I'll share it here on my blog.
My next big event is my niece Charlie's 18th birthday on the 16th - I can't believe she's an adult, it doesn't feel like five minutes since she was flashing her bum at the security cameras at the local bank (she was only a toddler at the time I should point out!) For years I waited for it to appear on "You've Been Framed" (I've never done a search on YouTube though!!) but luckily it hasn't so far. Enough of niece bashing (lol) I'm thinking about making a similar sort of card for Charlie but with 18s instead of 60s. I don't usually get the opportunity to see my sister's kids on their birthdays so try to keep their cards postable (if you know what I mean), as I'll be seeing Charlie on her birthday, I'll be able to make her card as bulky as I want without worrying about how much it'll cost to send or it getting damaged in the post. It gives me lots of options on what sort of card to make so I may make several versions on the run up to her birthday.
I hope you like my latest make, as always if you have any questions or comments then please leave them in the usual places. I hope you all have abrilliant weekend and until next time - keep crafting!
Love and crafty hugs,
Sarah xxx
I used a set of star dies from Xcut which I got in a recent order from Every Craft's A Pound. ECAP have got a shiny new website with lots of new features and although not all items are just a pound, they remain fantastic value not least as you now get free P&P on orders over £30. This die set was only £3.00. The numbers were cut out using a die from Sizzix which didn't come from ECAP - unfortunately. I die cut the stars out of black card and silver mirror card and the numbers were diecut out of holographic card. The top flaps of the box were matted and layered using the black card and some rather lush holographic stars card which went perfectly with the star theme. The sides of the box under the flaps were matted and layered with black card and plain silver card except for the front panel which had white card for the top layer so I could write my birthday message.
Apparently there's a trick to make the box pop open as soon as it comes out of the envelope involving a rubber band but I've not come across instructions on how to get it to work. If I find them or manage to work out how to do it on my own then I'll share it here on my blog.
My next big event is my niece Charlie's 18th birthday on the 16th - I can't believe she's an adult, it doesn't feel like five minutes since she was flashing her bum at the security cameras at the local bank (she was only a toddler at the time I should point out!) For years I waited for it to appear on "You've Been Framed" (I've never done a search on YouTube though!!) but luckily it hasn't so far. Enough of niece bashing (lol) I'm thinking about making a similar sort of card for Charlie but with 18s instead of 60s. I don't usually get the opportunity to see my sister's kids on their birthdays so try to keep their cards postable (if you know what I mean), as I'll be seeing Charlie on her birthday, I'll be able to make her card as bulky as I want without worrying about how much it'll cost to send or it getting damaged in the post. It gives me lots of options on what sort of card to make so I may make several versions on the run up to her birthday.
I hope you like my latest make, as always if you have any questions or comments then please leave them in the usual places. I hope you all have abrilliant weekend and until next time - keep crafting!
Love and crafty hugs,
Sarah xxx
Wednesday, 28 September 2016
Get Well Soon Sis
Hello crafty peeps and welcome to my crafty nook! I hope you've all had a brilliant weekend, it's been rather quiet in my crafty nook though I have been making a few sneaky purchases on Ebay and similar. I've managed to order the stitched border dies again from a different ebay seller after my first order had to be cancelled due to it being returned back to the seller by the Chinese Customs! (I suspect a porkie or two was put on the declaration which is daft as dies aren't contraband!) It'll be a while before they arrive but the anticipation of getting an order is almost as good for me as actually getting the craft goodies. I've become ever so slightly addicted to a new to me YouTuber called CRaFTiPoTeNTiAL - if anyone checks out my YouTube history they'll stage an intervention and make me join a self help group for cyber stalking lol. Seriously though this woman is amazing, she uses things in an innovative way (my jaw dropped when I saw what she did using the shaving foam technique with her own personal twist!) and more importantly she gets the same magazines as I subscribe to and makes amazing cards with them. To my shame I more often than not look at the free gift and think wow that's great and then it rarely sees the light of day again. Now thanks to CRaFTiPoTeNTiAL and one of my other favourite YouTubers, Christina Griffiths I'm inspired to take a fresh approach to my craft freebies. I hope that wasn't too gushing - I'll admit to having a bit of a craft crush lol. Here is a link to one of her videos where she uses free gifts from a variety of craft magazines in an unexpected way https://www.youtube.com/watch?v=L6FREUaEmWw
Enough of my craft crush - here is my latest card, a split panel Get Well Soon card for my sister Teresa who's recovering from having knee surgery yesterday. Hopefully she'll be home tomorrow and will get my card through the post in a day or two.
I've made these cards quite often so I'm not going to rehash how to make them, unless anyone is interested in more details. I used a Tatty Teddy chipboard embellishment which I got free with a magazine many moons ago, it also came with a 6" x 6" paper pack and I used some blue and pink spotted paper from the pack to decorate the horizontal panels. The vertical panel was originally plain white card stock but I coloured it with a Cool Shadow Copic marker (I now own two Copics!) I added a few layers of the marker until I had a nice smooth coverage and I added dots with a white gel pen and a Stardust gel pen. I also added dots of the stardust to the centre of the flowers and added black glaze gel pen to Tatty's eyes - I think the eyes look a bit sinister now lol not exactly the look I was going for! I added some silver thread behind the topper before adding the embellishment to the green panel of card. I really like the effect of putting the thread behind things and it's been something I've wanted to try for a while. I added the sentiments to the inside of the card and decorated it with stamped stars which I coloured using the Cool Shadow Copic marker. I added Clear Spectrum Noir Shimmer marker to the stars and glossy accents to the inner ones.
I hope you like my latest creation and I wish my sister a speedy recovery. It's my niece's 18th Birthday in a couple of weeks time so I'm really hoping she'll be on the mend by then. It would be a strange coincidence if Teresa ended up being in a wheelchair post surgery for her daughter's 18th just like our mum was for hers! *cue Outer Limits or similar music*
As always please leave me any questions or comments in the usual places and I'll get back to you if appropriate. I hope you all have a brilliant rest of the week and I'll be back soon. Until next time - keep crafting!
Love and crafty hugs,
Sarah xxx
Enough of my craft crush - here is my latest card, a split panel Get Well Soon card for my sister Teresa who's recovering from having knee surgery yesterday. Hopefully she'll be home tomorrow and will get my card through the post in a day or two.
I've made these cards quite often so I'm not going to rehash how to make them, unless anyone is interested in more details. I used a Tatty Teddy chipboard embellishment which I got free with a magazine many moons ago, it also came with a 6" x 6" paper pack and I used some blue and pink spotted paper from the pack to decorate the horizontal panels. The vertical panel was originally plain white card stock but I coloured it with a Cool Shadow Copic marker (I now own two Copics!) I added a few layers of the marker until I had a nice smooth coverage and I added dots with a white gel pen and a Stardust gel pen. I also added dots of the stardust to the centre of the flowers and added black glaze gel pen to Tatty's eyes - I think the eyes look a bit sinister now lol not exactly the look I was going for! I added some silver thread behind the topper before adding the embellishment to the green panel of card. I really like the effect of putting the thread behind things and it's been something I've wanted to try for a while. I added the sentiments to the inside of the card and decorated it with stamped stars which I coloured using the Cool Shadow Copic marker. I added Clear Spectrum Noir Shimmer marker to the stars and glossy accents to the inner ones.
I hope you like my latest creation and I wish my sister a speedy recovery. It's my niece's 18th Birthday in a couple of weeks time so I'm really hoping she'll be on the mend by then. It would be a strange coincidence if Teresa ended up being in a wheelchair post surgery for her daughter's 18th just like our mum was for hers! *cue Outer Limits or similar music*
As always please leave me any questions or comments in the usual places and I'll get back to you if appropriate. I hope you all have a brilliant rest of the week and I'll be back soon. Until next time - keep crafting!
Love and crafty hugs,
Sarah xxx
Monday, 19 September 2016
Another Twisted Gatefold Card
Hello crafty peeps and welcome to my crafty nook! I hope you've had a brilliant weekend, the weather here has been a bit hit and miss and I think summer is actually over now *sad face*, at least the warm sunny weather of last week has gone and been replaced with lots of low clouds making it very dark and dull teamed with spots of rain. It's also been very cold the last day or two and my husband wanted to put the heating on but I was a mean wife and said no - I refuse to have the central heating on until my birthday at the earliest! To compound my misery, I've come down with a bit of a cold so I'm feeling very sorry for myself at the moment not helped by the fact that Chris and I watched the last episodes of season 5 "Games of Thrones" last night on DVD and we don't have season 6 - how will we cope???
I have managed to have another go at making a twisted gatefold card, these look quite complicated but they are actually really easy and it's all down to scoring. To make a twisted gatefold card, cut a sheet of A4 card down to 21 cm by 14 cm and score at 7 cm and 14 cm on the longest side. I use a Hougie board for my scoring and have drawn a line all the way down on the score board at the 15 cm mark using a black marker just for cards like this one. Line the top right outside corner of the right hand panel of your scored card blank up with the black line on your score board and slide the card over until the bottom left hand scored line on the inside of right hand panel is on the black line and score diagonally corner to corner. Move the card across so that the left hand panel right hand score line is on the black line and slide the card over until the bottom left hand outside corner is lined up and score as before. Fold these scored panels back on themselves and the two triangles resulting should match each other and meet when the card is closed to form a halved rectangle panel. Decorate as desired. Here is my version - you may notice that I scored opposite to how I described but it works either way as long as the other side is scored the opposite way to the first diagonal score line.
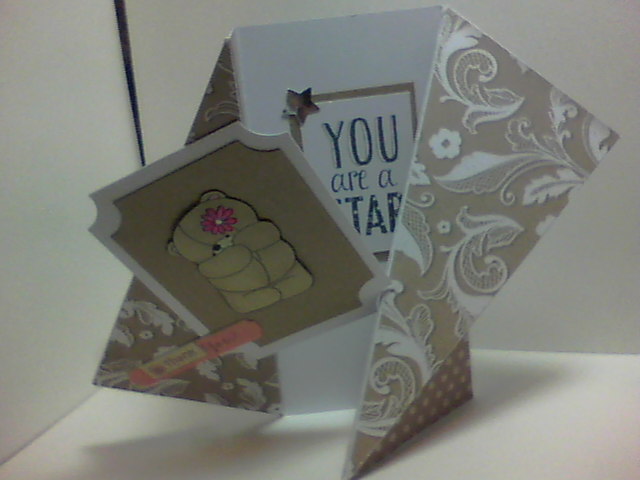
I've made this card to send to Amy Gray as a thank you for sending me the door embossing folder and stamp set last week. I decorated the card using Crafters' Companion Sara Signature 6" x 6" Floral Delight and I used a couple of stamps from a Forever Friends collection (the canvas thank you sticker came from the FF Kraft Notes collection). I added a couple of punched out silver stars to the sentiment and coloured the FF bear using Flexmarkers.
I really like the Kraft/ white combo of the papers and tried to colour the FF bear to match. The only downside to this card is it's quite difficult to find an envelope that it'll fit into and I'll probably end up making one for it. It will actually fold in on itself but then the recipient won't get the effect of the card when they open the envelope which would kind of make the whole process a bit redundant.
I hope you like my latest card, hopefully my cold won't get any worse and I'll feel well enough to make some more cards soon. As always if you have any questions or comments then please leave them in the usual places. Until next time - keep crafting!
Love and crafty hugs,
Sarah xxx
I have managed to have another go at making a twisted gatefold card, these look quite complicated but they are actually really easy and it's all down to scoring. To make a twisted gatefold card, cut a sheet of A4 card down to 21 cm by 14 cm and score at 7 cm and 14 cm on the longest side. I use a Hougie board for my scoring and have drawn a line all the way down on the score board at the 15 cm mark using a black marker just for cards like this one. Line the top right outside corner of the right hand panel of your scored card blank up with the black line on your score board and slide the card over until the bottom left hand scored line on the inside of right hand panel is on the black line and score diagonally corner to corner. Move the card across so that the left hand panel right hand score line is on the black line and slide the card over until the bottom left hand outside corner is lined up and score as before. Fold these scored panels back on themselves and the two triangles resulting should match each other and meet when the card is closed to form a halved rectangle panel. Decorate as desired. Here is my version - you may notice that I scored opposite to how I described but it works either way as long as the other side is scored the opposite way to the first diagonal score line.
I've made this card to send to Amy Gray as a thank you for sending me the door embossing folder and stamp set last week. I decorated the card using Crafters' Companion Sara Signature 6" x 6" Floral Delight and I used a couple of stamps from a Forever Friends collection (the canvas thank you sticker came from the FF Kraft Notes collection). I added a couple of punched out silver stars to the sentiment and coloured the FF bear using Flexmarkers.
I really like the Kraft/ white combo of the papers and tried to colour the FF bear to match. The only downside to this card is it's quite difficult to find an envelope that it'll fit into and I'll probably end up making one for it. It will actually fold in on itself but then the recipient won't get the effect of the card when they open the envelope which would kind of make the whole process a bit redundant.
I hope you like my latest card, hopefully my cold won't get any worse and I'll feel well enough to make some more cards soon. As always if you have any questions or comments then please leave them in the usual places. Until next time - keep crafting!
Love and crafty hugs,
Sarah xxx
Saturday, 17 September 2016
Twisted Gatefold Card
Hello crafty peeps and welcome to my crafty nook! I hope you've all had a good week and have something wonderful planned for the weekend. My mum is rather poorly at the moment with pleurisy so I've made a card for her to try and cheer her up. She loves butterflies so I've tried my hand at making a twisted gatefold card with a die cut butterfly embellishment on the front.
The papers used to decorate this card were from the Crafters' Companion 'Kimono' 8" x 8" paperstack and are beautifully glittered. The wavy circle was cut out using a die then embossed using an Xcut embossing folder. I used a circle die to cut out the circle and a Sara Signature die for the butterfly which I die cut twice, once in black for the outline then adding the negative pieces from one cut out of white. I added some wire for the feelers and some pale blue gems for the body. I also added the same coloured gems around the outer edge of the die cut circle as shown.
I really like how this card turned out especially as by using the wavy circle the dips act as a stopper for the opposite gatefold which is a happy accident. If anyone is interested on how I made this card then please let me know in the comments section and if you have any other questions or comments then please leave them in the same place. Until next time - keep crafting!
Love and crafty hugs,
Sarah xxx
The papers used to decorate this card were from the Crafters' Companion 'Kimono' 8" x 8" paperstack and are beautifully glittered. The wavy circle was cut out using a die then embossed using an Xcut embossing folder. I used a circle die to cut out the circle and a Sara Signature die for the butterfly which I die cut twice, once in black for the outline then adding the negative pieces from one cut out of white. I added some wire for the feelers and some pale blue gems for the body. I also added the same coloured gems around the outer edge of the die cut circle as shown.
I really like how this card turned out especially as by using the wavy circle the dips act as a stopper for the opposite gatefold which is a happy accident. If anyone is interested on how I made this card then please let me know in the comments section and if you have any other questions or comments then please leave them in the same place. Until next time - keep crafting!
Love and crafty hugs,
Sarah xxx
Tuesday, 13 September 2016
Happy Anniversary Card (for my hubby)
Hello crafty peeps and welcome to my crafty nook! I hope you've all had a brilliant weekend. My husband and I celebrated our 5th Wedding Anniversary on Sunday and we had a lovely day together. As regular readers of this blog will know, Chris is registered blind with no sight in his left eye (from birth) and little sight in his right, it's hard for me to be able to judge what he can or can't see which means making a card for him is a bit of a challenge. For example he can see some colours but others (like green) appear grey and he has a large blank area in the middle of his vision so he has to sort of peer around it. One way that I get around these restrictions is to use texture on his card so he can feel the cards and to use larger than normal elements. I was really pleased to see that this month's issue of Simply Cards & Papercrafts magazine free gift is an embossing folder, die and stamp set called 'Home For Christmas'. The embossing folder is a door in between two columns which I knew would come in very handy so I was really looking forward to my subbie copy arriving last week. Unfortunately it didn't arrive on Monday even though I knew the subscription issues must have been posted as people were sharing pics on Facebook, to cut a long story short my magazine hadn't arrived by Thursday and I was panicking a bit because I wasn't sure what card to make for Chris instead. Customer services at Practical Publishing were brilliant and have done all they could to try and get a replacement copy to me and I mentioned on the SC&P Facebook page how helpful they'd been but I was a bit disappointed not to have it yet as I wanted to make the card. Amy Gray the editor of the magazine sent me a private message asking for my address so she could send the folder herself (how nice is that!), she actually sent the entire magazine which arrived on Saturday.
Here is the card I made using the door embossing folder, a brick embossing folder from my stash, a 5 die and a couple of other items from my craft stash.
I embossed the door onto some Sheena Douglass stamping card as it's a good thickness for embossing then fussy cut around it. I cut three side of the door using a craft knife and a metal ruler then used an embossing tool and the ruler to score down the uncut side. I cut a piece of green Centura Pearl cardstock slightly bigger than the door and embossed it in the folder. I trimmed it so that it was the door size and used a small hole punch to make a hole where I wanted the door knob to be. The door knob is a Tim Holtz Hitch Fastener that comes in two parts. The first is a small flat bolt that I threaded through the punched out hole then I screwed the knob piece onto it. I covered the back of the green door with red liner tape and lined it up with the white door before sticking it firmly down. I added a die cut 5 to the front of the door to represent the number of years we've been married. I ran another piece of white stamping card through the Big Shot using a brick patterned embossing folder then blended Fired Brick Distress ink over the embossed card. I needed a sentiment to go on the front of the card and I wasn't sure which stamp set to use as most of my anniversary sentiments are quite small, I found a set of scrolls and matching sentiments in with my stamps from Papermania which I haven't used in years and the Happy Anniversary stamp was the perfect size for this card. I stamped the scroll first then added the words inside - it isn't perfect but it's handcrafted so perfection isn't expected. I fussy cut the scroll out using sharp scissors. I then spend about an hour going through all our wedding photos trying to find one that would fit inside the door way. I cut the photo I chose to use slightly bigger than the door frame and taped it inside the door way as shown. I adhered the door to the embossed brick panel then added it to a white card blank.
I really like how the card turned out and I love the door embossing folder and stamp set - it's really nice to get a Christmas themed free gift that can actually be used all year round. I've been crafting a long time and subscribing or buying relevant magazines for almost as long so as you can imagine I have a huge collection of Christmas stash - I kind of dread August onwards as I know that I'll have at least 3 if not 4 months of Christmas stuff coming free with my magazines and they soon add up! Most of the freebies are non consumables like stamps or embossing folders so my Christmas stash never gets any smaller and that doesn't even take into account the goodies I end up caving in and buying myself, so having something that I can use all year round is perfect as it means I don't have to buy even more storage boxes for something I only access about a quarter of the year.
By the way another copy of Simply Cards and Papercraft magazine turned up today and I can't tell if it's my original subscription copy or the replacement ordered on Friday so I could potentially end up with THREE 'Home For Christmas' sets. I smell a future giveaway! :)
I hope you like my latest card, this month's free gift with Simply Cards & Papercraft has a lot of potential and would make a fantastic new home card or 18th/21st birthday card - it's quite easy to get hold of small key charms so you could hang one off the door knob if you wanted to and have the door number be the relevant birthday. The stamp set even includes a set of numbers and various door adornments like a knocker, letter box and a carriage lamp.The die that comes with it has separate holly leaves and berries so you could swap them for hearts for Valentines or small flowers for spring and summer cards - the possibilities are endless!
I've made a couple of other cards which I will share with you in my next post, so until next time - keep crafting!
Love and crafty hugs,
Sarah xxx
Here is the card I made using the door embossing folder, a brick embossing folder from my stash, a 5 die and a couple of other items from my craft stash.
I embossed the door onto some Sheena Douglass stamping card as it's a good thickness for embossing then fussy cut around it. I cut three side of the door using a craft knife and a metal ruler then used an embossing tool and the ruler to score down the uncut side. I cut a piece of green Centura Pearl cardstock slightly bigger than the door and embossed it in the folder. I trimmed it so that it was the door size and used a small hole punch to make a hole where I wanted the door knob to be. The door knob is a Tim Holtz Hitch Fastener that comes in two parts. The first is a small flat bolt that I threaded through the punched out hole then I screwed the knob piece onto it. I covered the back of the green door with red liner tape and lined it up with the white door before sticking it firmly down. I added a die cut 5 to the front of the door to represent the number of years we've been married. I ran another piece of white stamping card through the Big Shot using a brick patterned embossing folder then blended Fired Brick Distress ink over the embossed card. I needed a sentiment to go on the front of the card and I wasn't sure which stamp set to use as most of my anniversary sentiments are quite small, I found a set of scrolls and matching sentiments in with my stamps from Papermania which I haven't used in years and the Happy Anniversary stamp was the perfect size for this card. I stamped the scroll first then added the words inside - it isn't perfect but it's handcrafted so perfection isn't expected. I fussy cut the scroll out using sharp scissors. I then spend about an hour going through all our wedding photos trying to find one that would fit inside the door way. I cut the photo I chose to use slightly bigger than the door frame and taped it inside the door way as shown. I adhered the door to the embossed brick panel then added it to a white card blank.
I really like how the card turned out and I love the door embossing folder and stamp set - it's really nice to get a Christmas themed free gift that can actually be used all year round. I've been crafting a long time and subscribing or buying relevant magazines for almost as long so as you can imagine I have a huge collection of Christmas stash - I kind of dread August onwards as I know that I'll have at least 3 if not 4 months of Christmas stuff coming free with my magazines and they soon add up! Most of the freebies are non consumables like stamps or embossing folders so my Christmas stash never gets any smaller and that doesn't even take into account the goodies I end up caving in and buying myself, so having something that I can use all year round is perfect as it means I don't have to buy even more storage boxes for something I only access about a quarter of the year.
By the way another copy of Simply Cards and Papercraft magazine turned up today and I can't tell if it's my original subscription copy or the replacement ordered on Friday so I could potentially end up with THREE 'Home For Christmas' sets. I smell a future giveaway! :)
I hope you like my latest card, this month's free gift with Simply Cards & Papercraft has a lot of potential and would make a fantastic new home card or 18th/21st birthday card - it's quite easy to get hold of small key charms so you could hang one off the door knob if you wanted to and have the door number be the relevant birthday. The stamp set even includes a set of numbers and various door adornments like a knocker, letter box and a carriage lamp.The die that comes with it has separate holly leaves and berries so you could swap them for hearts for Valentines or small flowers for spring and summer cards - the possibilities are endless!
I've made a couple of other cards which I will share with you in my next post, so until next time - keep crafting!
Love and crafty hugs,
Sarah xxx
Subscribe to:
Posts (Atom)