Translate

Saturday, 17 October 2015

"Bubble" Card for Charlie

Hello crafty peeps and welcome to my crafty nook! Woo hoo! - it's the weekend. Have you got anything exciting planned? I've come down with something icky so I don't think I'll be doing much personally. My replacement stamps didn't arrive today (Friday) but hopefully they'll come tomorrow. I did get a couple of interesting (ish) items in the post though - a metre of magnetic tape (£1.39 and free P&P on ebay) and a set of twelve tiny pots of metallic mica powders (£6.90 with free mini mister bottle and P&P also ebay) I thought the mica powders were Perfect Pearls as that's what I put into the search thing on ebay but they don't appear to be the real deal, I'm not hugely bothered as long as they do what they're supposed to do. One of the reasons I wanted them was to try out a technique by Jennifer McGuire called 'Pearlised Water', you can make mica sprays with most powders as long as they have a binder included in their formulation and basically to make the 'pearlised water' you just add some white mica powder to some water in a spray bottle, give it a really good shake and start spraying. Jennifer recently shared a set of thank you cards which used the pearlised water to stamp an image onto a distress ink background, as the distress inks are water reactive the stamped image became lighter on the card and had a beautiful pearlised finish. I'm planning (doesn't mean I'll actually get round to it though lol) on making a set of notelets as a present for someone this Christmas and I thought this technique would be a perfect design for the cards as it's fairly simple to do and can be done production line style. Assuming I get around to it, I'll be sharing the finished item at a later date.

Today (Friday) is my niece's 17th Birthday so as promised I'd like to share the card that I made for her. I think 17 is one of those awkward ages to craft for, I don't want to make a card using images that are too grown up but on the other hand nothing too babyish either. I decided that this "Dollie" image from Crafter's Companion's Scruffy Little Kitten range was perfect and teamed it up with a Scruffy Little Cat embossing folder which I think is called "Bubbles".

"Dollie" card for my niece

Sentiment from CC Sentimentals 

Bowed embossed acetate over the image
 I coloured the Dollie image in using FlexMarkers and stamped the sentiment on a thin strip of scrap card cut to the desired size, I added three silver glittered enamel dots in a variety of sizes as shown and added it underneath the bath. I then cut a sheet of acetate 3 cm larger than the front of my card and embossed it in the CC embossing folder, it was part of the Scruffy Little Cat range and doesn't appear to still be available on the website (FYI if you sign up to the Every Craft's A Pound newsletter they'll send you updates about new stock and they quite often sell Crafter's Companion embossing folders etc so if you like this folder they may have it in at some point). Once the acetate was embossed. I scored two thin strips at the longest sides and added red liner tape to it before sticking it over my topper. Because the acetate is a little bit wider than the topper it bows over it like a bay window. I added this to the front of the card front using more red liner tape and I stamped a sentiment inside the top folded card. Because of the arched acetate I had to sent the card in a padded envelope but if you make one similar, I would recommend making a box if you are hand delivering it.

I hope you like this fun design, I'm hoping I got the balance right and Charlie doesn't think it's too babyish for a seventeen year old. If I feel a bit better over the weekend then I shall be doing a bit of crafting and will share with you what I come up with. If you have any questions or comments then please leave them in the usual places and until next time - keep crafting!

Love and crafty hugs,

Sarah xxx

Thursday, 15 October 2015

"Out Of This World" Customer Service

Hello crafty peeps and welcome to my crafty nook! I hope you are all doing well and enjoying the ever changeable Autumn weather. Autumn is probably my favourite times of the year, I love to see the leaves change colour and find lots of inspiration from the warm oranges, browns and red leaves that carpet the streets. Another reason I'm fond of Autumn is it's my birthday season, my lovely husband is planning on giving me some money for craft stuff so I shall be having a splurge in the next week or two. I've already had a bit of a splurge on my own behalf and ordered the Kuretake Gansai Tambi Japanese Watercolour Paint Set - 36 Colours from Amazon, it's on its way from Japan at the moment which is rather exciting! The seller (Snow Drop, Japan) even sent me an email explaining that as the paints are delicate,they've opened it and put an 'air pocket' inside to protect the paints - isn't that nice of them?

The reason for this post isn't just about boasting about my new paints to be (sorry about boasting) but to highlight the brilliant service I got from Clearly Besotted Stamps. I ordered some stamp sets from the company last week as they've got a sale on at the moment and as regular readers will know I LOVE Clearly Besotted Stamps, there's been a couple of stamp sets I've wanted for a while now including the animal balloon set which is really cute and all over YouTube and a set called "Out Of This World" which is an alien/monster themed set. Neither set were in the sale (not that I expected them to be) but I managed to resist the new release stamps (go check them out - there's a good mixture of cute and more traditional - there's even a really funny set that I was tempted by!) so I decided to get them both as I'm fairly sure I'll get lots of use out of them. I don't tend to use my new stamps straight away so they remained in their packaging until yesterday. I noticed on Facebook that a friend's son is celebrating his birthday soon so decided to make him a card using the alien stamp set. One of the stamps included is a moon surface so I knew I needed to stamp the chosen alien first, mask it off then overstamp with the moon. However when I stamped the alien the side of its 'foot' was missing, I thought it was maybe part of the design as open drawn images were popular for a while (not my 'thing' as I wouldn't know where to colour to) but it turned out that part of the stamp was missing.

Alien with a poorly foot 
I emailed Clearly Besotted Stamps last night and they emailed me back this morning to apologise and to let me know that they're sent a replacement stamp set which hopefully I should get tomorrow! I did manage to save the image by going over it with a black pen but as I don't have a very fine line pen the alien looked really chunky on top of the moonscape so I had to go over that too. My hand slipped while outlining the eye so I covered it up with a wobbly eye. Below is some photos of the finished card including quite a few close ups because the card is A5 and some of the colouring doesn't show well on the long view.

Out of this world card

Close up of birthday alien and sentiment - love the font

Main image with meteor shower starry background

Flying Saucer image - my favourite stamp

Wobbly eyed alien

Please excuse the photo quality, I couldn't take a crisp image for some reason. Originally the background was just white dots but I gave the card to my husband Chris so he could hold it close to his eye which has some sight and he accidentally smudged a couple of the dots which hadn't dried thoroughly (serves me right for not checking!). It turned out to be a happy accident though as I liked the shooting star look so deliberately smeared the rest. The main image is matted onto some silver holographic card which I debossed using a Crafter's Companion 'Angelina and Friends' boy embossing folder called "Starry Eyed". Not much of it shows around the topper but I like the effect of the debossed stars.

I really like the cartoon images and I hope Liam does too. I'm not sure how old he is but I think this card is one that is suitable for all ages. Damaged stamp aside, this is a brilliant stamp set with lots of images and sentiments and it even has a couple of sentiments suitable for Halloween and at £9.00 not a bad price either as the stamps are (usually) of a very high quality.

I hope you like my little card share, I will be sharing the card I made for my niece's birthday in the next day or two (she turns 17 tomorrow). As always if you have any questions or comments then please leave them in the usual places and until next time - keep crafting!

Love and crafty hugs,

Sarah xxx

Sunday, 11 October 2015

Box with Drawer

Hello crafty peeps and welcome to my crafty nook! I hope you've all had a good weekend. I saw a brilliant tutorial on Youtube to make a box cube with a drawer recently, so decided to give it a go. The tutorial I followed was posted by Linda Parker, it's a really long video (28 mins) but her instructions are very good and she makes and decorates the box in real time as far as I can tell.


Linda used Stampin' Up card stock but I wanted a vintage feel to my box so used dual sided kraft card stock which is kraft on one side and white on the other, I prefer solid kraft card but have quite a lot of this two colour card so need to use it up. The kraft side is rather attractive so if anyone is interested in buying some it's from Every Craft's A Pound website. Linda used ribbon on her drawer to pull it out but I've got a few Tim Holtz Hitch Fasteners which look like drawer handles so I use one on this box. I like the effect so I've ordered a few more packs from Amazon so I can make some more. If you want to make your own box (it's surprisingly roomy) then please check out Linda Parker's channel on YouTube.

Once I've got some more hitch fasteners, I shall be making some more boxes and stacking them together to make a set of storage drawers. Each drawers uses 2 sheets of A4 card but if you had a lot of card the same colour these boxes would be fantastic stacked together to make an Advent calendar and it's one that could be re-used for many years to come, I'm thinking about making one myself but with ribbon pulls instead of the hitch fasteners.

This might not be the most exciting project I've shared but the boxes have a lot of potential and I'm looking forward to making more in the week to come.

As always if you have any questions or comments please leave them in the usual places and until next time - keep crafting!

Love and crafty hugs,

Sarah xxx

Wednesday, 7 October 2015

Christmas is coming...

Hello crafty peeps and welcome to my crafty nook! I hope you are all well and enjoyed World Card Making day over the weekend. I did actually manage to make a card over the weekend but as it's for my niece's 17th birthday next week I'm not going to share it until the day in case she sees it on here or Facebook. I was really pleased to get crafting again as I've had a bad case of craft block! I know inspiration should come from things I already have but in all honesty I tend to be most crafty when I have new stash and apart from getting a couple of items last month I haven't bought anything craft related in ages. All I've found myself doing in the last three weeks or so is tidying up, trying different card folds (I love to experiment) and half colouring in images only to think they are rubbish and throw away. So it was quite a relief to make a card for Charlie which I liked and it's sparked a bit of a crafty spurt as well.

Christmas will be here before we know it and up until yesterday, I hadn't made a single card, present or decoration. Clearly Besotted Stamps brought out a stamp set ages ago called "In Print" which features a fingerprint and a range of doodled creatures that you stamp over the fingerprint. I fell in love with them but (typically of me) hadn't got around to using them. Because I haven't done any card making for quite a while I decided to make a couple of very simple Christmas cards and one of the images on this stamp set was perfect - a deer. The stamp set doesn't have any Christmas sentiments with it but one of my subscription magazines "Creative Stamping" arrived on Saturday and had lots of Christmas and holiday sentiments with it.

Oh Deer - Christmas is coming...

I stamped the fingerprint using Memento Rich Cocoa ink and over stamped it with the deer face using Memento Tuxedo Black ink. I stamped the Merry & Bright sentiment in the black ink and added a red glittered enamel dot over the deer's nose. The cards are 3" x 4" and I made an envelope for each one using some 6" x 6" scrapbook papers and my We Are Memory Keepers Envelope Punch Board. I used a second stamp from the Creative Stamping set to add a sentiment to the inside of the cards.

A simple sentiment for a simple card
As I had the stamps out I decided to make a little joke card for my husband, he's been watching (and buying!) a lot of trashy B movies recently and one of his favourites is "Big Ass Spider". He wanted me to make him a big ass spider card for Christmas but as I don't find spiders to be particularly festive I decided to make him a spider card just because... The "In Print" stamp set also has a cute little spider so I made another 3" x 4" card base and stamped the fingerprint in Hickory Smoke Distress ink and the legs and face in black Memento ink. I stamped the boo! sentiment in the same ink. Unfortunately I had a bit of ink on my finger as I stamped the legs over the fingerprint body so got a smudge of ink on the card base, I added some light green sparkly enamel dots on the card front to hide my little boo boo. I also added a silk string for the spider to hang from which is also included in the stamp set.

Big Ass Spider card lol

We don't have any children but it would be a great card to make with children for Halloween. To be honest you could make it without the stamp set just use your own fingerprints and add your own critter features with a fine tipped pen, but this way is less messy lol.

I hope you like my little card share, hopefully it won't be quite as long until my next post. I'm sorry for not posting more often but I try to keep my posts craft related and if I'm not producing anything/buying anything I have nothing to share. If you have any questions or comments then please leave them in the usual places and until next time - keep crafting! (Must take my own advice!)

Love and crafty hugs,

Sarah xxx

Thursday, 24 September 2015

Tiny Haul to share

Hello crafty peeps and welcome to my crafty nook! It's been very quiet in my crafty nook lately apart from the odd rustling of papers being put away and the odd crinkle of packaging as I've tidied a few things away. It seems as though my crafty mojo has gone on a sabbatical at the moment - I hope it returns soon! I haven't any cards to share with you just a very small haul that arrived today. Craft Stash had free P&P last week for 24 hours only and no minimum spend and as I had a tiny amount of money still in my bank account I decided to treat myself to a couple of items.


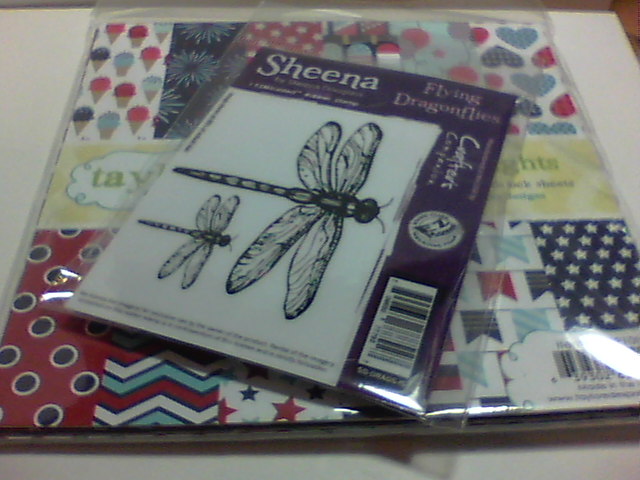
As you can see from the above photos, when I say a couple of items I MEAN a couple of items lol. The first thing that leaped into my basket was the taylored expressions "Summer Nights" 6" x 6" paper pad. I've got some Tatty Twinkles USA stamps and I thought these papers which feature a lot of star patterns would be perfect to team up with them and with the little boy Scruffy Little Kitten stamps in my stash. This is a very gender neutral collection which is brilliant. Unfortunately Craft Stash only had one left in stock or I would have bought a second. The second and final item that jumped into my basket was a Sheena Douglass "Flying Dragonflies" stamp. It's already EZ mounted which is great as it's ready to use straight away. I love dragonflies and they are a good alternative to butterflies on male cards.

Sorry I haven't any cards to share this time, hopefully my craft mojo will come back and I'll start making cards again, in the meantime please be patient and perhaps if you're a crafter too you'd like to share a link to your latest makes so I can get some inspiration from you. As always if you have any questions then please leave them in the usual places and until next time - keep crafting!

Love and crafty hugs,

Sarah xxx

Saturday, 19 September 2015

HOTP Steampunk Heart Card

Hello crafty peeps and welcome to my crafty nook. A while ago I was really excited to get my hands on one of the Hot Off The Press Colorist Steampunk colouring pads from Craft Stash (I think), I'll be honest with you when you add the £2.99 p&p is was rather an expensive buy but I really really wanted it and it was the last one in stock. It's been sitting on my desk for quite a while mainly because I wanted to hoard it a while but also because I've had a bit of a crafty slump the last week or so. Yesterday (the 18th) was the closing date for the National Cardmaker of the Year competition so I thought it was about time that I got my bum in gear and got on with the POTY entry. I didn't have anything in mind so just decided to have a play and go with the flow. The Steampunk pad was 'looking' at me so I decided to get my ProMarkers out and do a bit of colouring of one of the images and the steampunk heart grabbed my attention.


The uncoloured image
I decided to start on the flames, the example given on the pad is done in purple shades but I got some Sheena Douglass stamps a couple of weeks ago and one of them has a Phoenix rising from the flames and this inspired me to have flame wings behind the clockwork heart. I used three Promarkers to colour the wings; Mandarin, Pumpkin and Gold.

Wing coloured with Mandarin, Pumpkin and Gold Promarkers

Once the wings were coloured I started on the clockwork heart which I coloured in using Poppy and Red. The clock face was coloured with Cool Grey 1 Promarker. I wanted the gears and cogs to look metallic but don't like the effect you get using Metallic Promarkers so used a bronze metallic Gelly Roll Pen. The flourishes were coloured in with gold and the background of the central panel was coloured in using Burnt Umber Promarker. The outer background was coloured in using a black Flexmarker. I added Glossy Accents to the clock face and to the keyhole for a bit of shine and dimension. I added Dovecraft 3D Pearl Effects in Gold onto the ends of the flourish.

Finished Steampunk image

I layered my image onto black cardstock even though the background of the outer part of the image was coloured black because when I layered the image onto gold pearlised card it didn't 'pop'. I then layered it onto gold card,black and gold again. I cut a final square of black card to 7.5" square and added faux gold photo corners to it before adhering it to an 8" x 8" white card blank, I added the main image to this black layer using foam tape. I added splat marks to the whole card using Heidi Swapp Color Shine spray in Gold. I dabbed some of the spray off using kitchen paper for a more defused look. Finally I die cut some gears and cogs using a First Editions die set and added them around the raised panel. Some are flat but some are raised on foam pads.


Please excuse there being so many similar pictures of the card, I've actually started with a migraine as I'm writing this (thank goodness for learning how to touch type - but please excuse any typos!) and I've got the visual disturbances which has left me pretty much blind. It's my own fault, I got really excited about how lovely this card turned out and wanted to blog it straight away instead of going to sleep like a sensible person.

I'm not sure if this quite fulfills the criteria of this week's theme over at Passion for Promarkers which is "All the Trimmings" but I'm going to enter it anyway as I've used a lot of different elements and it has a lot of layers and dimension for me (I'm more a CAS kind of crafter). If it's not up to scratch I'm sure one of the design team will let me know and I'll remove it :)

If you have any questions then please leave them in the usual places and as always - keep crafting!

Love and crafty hugs,

Sarah xxxx

Wednesday, 9 September 2015

New Baby Box Card

Hello crafty peeps and welcome to my crafty nook! I hope you all had a great weekend, I'm slightly dazed to find it's already the second week of September, it doesn't seem like five minutes since the Bank Holiday weekend. I've not really been up to much craft wise, just watching the new craft channel HOCHANDA - talking of which I was absolutely thrilled on the 4th of September when HOCHANDA showed two of my box cards during a Hougie Board hour. They'd asked for people who already owned a Hougie to email in with any makes they wanted to share so I did not thinking I'd have a chance of them being shown. But I was thrilled when they put them up during the programme.

Someone I know is having a baby boy soon so I thought I'd get ready for the happy event by making a baby boy box card in shades of blue. As you've probably guessed I love making these pop up box cards and new babies are a perfect occasion to make one for.

Bit blurry - sorry

Close up of handmade toppers

3 Box flaps embossed with Babies Feet embossing folder

Back panel embossed with words from Our Baby embossing folder

Two side panels are embossed with swirls

Interior back panel embossed with Our Baby image

I used three stamp sets altogether. A baby boy sentiment by Tiny Tatty Teddies and two by Clearly Besotted Stamps Child's Play and Little Onesie. I've also used three embossing folders, Our Baby embossing folder by Cuttlebug, Swirl embossing folder and Babies feet embossing folder both by Crafts-Too. The stamped images were coloured in using Flexmarkers, I love Flexmarkers but I'm a bit miffed that they don't seem to be of equal quality to the ProMarkers as I've had to throw my BG1 marker away due to it drying up, I've only had it about 4 months! As far as I know they aren't refillable so I need to replace it, my sea mist marker is running out too :( . I'd like to enter this card to this week's Passion for ProMarkers blog challenge which is sentiments, I've used two - the Precious Little Boy - Congratulations and the embossed panel at the back.

Occasionally I like to mention companies which have outstanding service so I'd like to recommend http://www.craftrange.com. Craft Range is currently running a Christmas card competition with a Craftwell Cut 'n' Emboss machine worth £229.99 as the prize, they had a sponsored link on my home page on Facebook so I decided to check it out. Once I'd taken note of the details I had a look at the sort of stuff they sell and was immediately drawn to their clearance section, I was delighted to discover a couple of Indigo Blu A5 stamp sets that I've been coveting for a while at only £10.49 each and treated myself to both, they have free postage if you spend over £15. My order went through at 2.06pm and at 2.17pm a mere 11 minutes later I got an email saying my stamps had been shipped! That level of service is just mindblowing and I'm very impressed with the site. I can't wait to get my order, obviously as its free shipping it's coming second class so it'll be a few days before it's here but hopefully it'll arrive before the weekend. I hope you all have a visit and pick up a bargain or two and why not enter the Christmas card comp the closing date is 30th November and you can enter it by about half a dozen means (but only one card entry per person, just pick your favourite media - snail mail, email, twitter, FB etc), as I'm probably going to make a pop up box card I'll probably post my entry just because the cards tend to look better in real life rather than still photos. You're only supposed to enter a single photo for the non snail mail route and it's kind of hard for me to get a good photo showing all the detail in one shot so again posting it makes sense for me personally but it's good to have so many options for entering especially if you leave it last minute.

It's our 4th wedding anniversary on Friday so I'll be cosying up with hubby instead of crafting probably listening to cricket or football *snooze*. Bless him, he does enjoy his sports. Hopefully I'll be able to fit in a couple of craft sessions in between the cuddling and have a few more cards to share with you soon. As always if you have any questions or comments then please leave them in the usual places and until next time - keep crafting!

Love and crafty hugs,

Sarah xxx