Translate

Saturday, 4 March 2017

My MIA Makes

Hello crafty peeps and welcome to my crafty nook! I hope you all have something good planned for this weekend, we're babysitting two of my sister-in-law's children later on today which will be fun!

As you may know our PC has been a bit poorly in the last few weeks and while I was waiting for it to be repaired, I had ample time to make some cards (though not as many as I could have made!) A lot of them are of the same type so I thought I'd just do a gallery type of post and add them all at once rather than the usual tutorial style post. If you want to know how a particular card has been made then please leave a comment in the comments section.


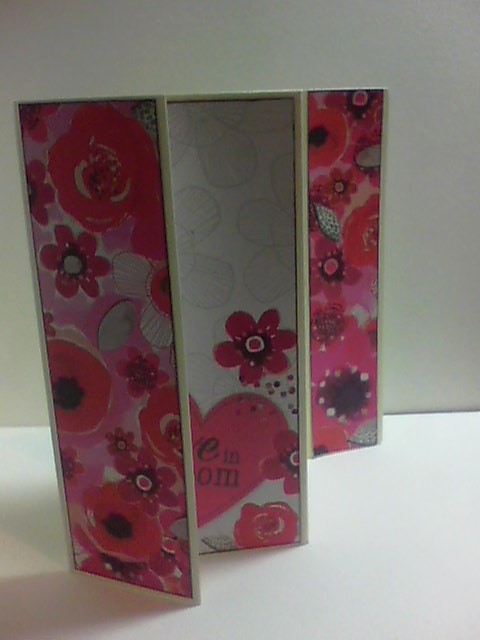
A lot of these cards are very similar because I got slightly carried away making the three panelled card - I saw a tutorial on YouTube for it and it's official name is a "Fancy Folds 12" Card" but I've adapted it so you can make it out of an ordinary sheet of A4 card and like to call it a 3,2,1 fold card (don't ask me why lol). If anyone's interested on how to make one please let me know and I'll link this post to the original YouTube video and write up a tutorial on how to make my version which is my preferred method as it means I'm not having to use up my precious (and scarce) supply of 12" x 12" card stock.

I hope you've enjoyed the new style of blog post, it's not something I'll do often just when I have a lot of cards to share. I hope you all have a wonderful weekend and until next time - keep crafting!

Love and crafty hugs,

Sarah xxx

Tuesday, 28 February 2017

MIA update.

Hello crafty peeps and welcome to my crafty nook! I hope you are all well. You may have wondered where I've been the past 2 and a half weeks - in perfect misery is the answer lol. My husband downloaded what he thought was an update to our internet anti virus and it turned out to be some kind of TTI (a textually transmitted infection!) It did something to the Windows Defender and the internet connection so we couldn't go online, though Chris did manage to play his football manager game ok I noticed! He then did his usual let's put off today trick and only took the computer in to be fixed yesterday. We've had windows 10 installed instead of Vista so it's  a lot quicker to use and apart from not finding my save folders in where I would have expected them to be i.e. in the pictures folder, it seems to be working ok so far.

I just wanted to let my lovely loyal readers know what was happening and I should be writing a proper blog post in the next day or two.

Until next time - keep crafting!

Love and crafty hugs,

Sarah xxxx

Tuesday, 7 February 2017

A Couple of Cards for my Niece

Hello crafty peeps and welcome to my crafty nook! I can't believe it's been over two weeks since my last blog post - part of that is down to the fact that my craftroom is living up to it's name and is a very cruddy crudy, the other part is because I managed to misplace my camera so I haven't been able to take any photos of my recent makes. Luckily I found my camera last night and got it charged so I could take some photos of some cards I've made.


I used a couple of stamp sets to make this card for my mum to give to Millie, the first was a set from Uniko stamps called 'Strike A Pose!' which is no longer in stock. I used the dotty Polaroid photo from this set and stamped it onto white smooth card using Memento Tuxedo Black ink. I stamped the girl panda from the free set of stamps that came with issue 142 of Papercraft Essentials magazine - the next issue comes out the 9th of this month so there may still be a copy or two available in the shops if you haven't already picked up this super cute stamp set. I added a horizon line using a Memento marker then coloured the panda and photo as shown using alcohol markers. I diecut two x 1 out of glitter cardstock using the Creative Dies numbers and special celebrations stamp set that came free with issue 141 of Papercraft Essentials magazine last month. I used the Happy Birthday sentiment from the same set. I added two strips of glitter washi to the end of the piece of card that the sentiment was stamped onto and cut a fish tail flag end. I then stuck all the pieces onto a black piece of card and added it to a white A6 card blank.


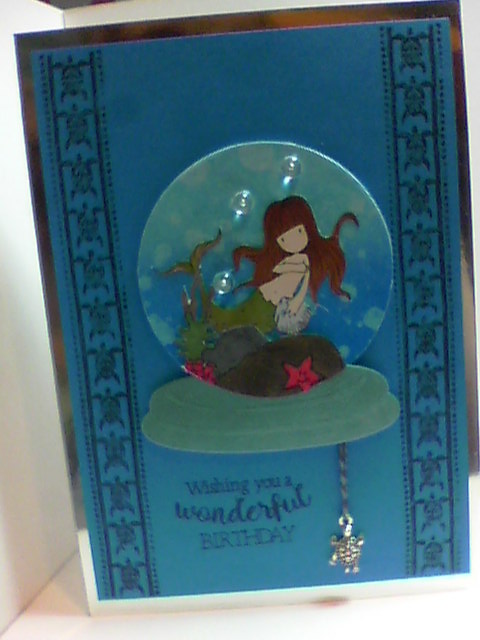
My niece is mad about turtles and even got one for Christmas. Originally I was planning on making a turtle the focal image of the card but in all honesty, after I'd coloured a large version of the turtles in the border strips of this card, I was worried the image would give my niece nightmares as it kind of freaked me out a bit lol. The border images from this No Journey's End - New Zealand & Pacific stamp set by Joy! Crafts are quite cute but the largest turtle in the set really isn't so I'll probably use it on a male card in future. I still wanted to make Millie a water themed card as I wanted to incorporate the Tibetan Silver turtle charm I got from eBay, I also wanted to try out a couple of other stamp sets I've bought in recent months but haven't used before. I blended three shades of blue distress inks onto a piece of smooth white card, starting at the bottom with Mermaid Lagoon then blending Salty Ocean before finishing with Tumbled Glass. I added drops of water onto the blended card, left for about 30 seconds and dabbed it up using some kitchen roll. As you probably know, Distress Inks are water reactive so the colour is effectively leached from the inked area leaving lighter coloured splotches, I squeezed my clear overlay Spectrum Noir Shimmer pen until the brush became saturated and flicked the shimmery fluid onto the card and dabbed it off with more kitchen roll so it left the shimmer but didn't remove any more ink. I used the second largest circle die from the Snow Globe set COL1362 by Marianne Design and diecut a circle out of the card. I diecut the snow globe base out of some teal embossed card from my stash.  I stamped the mermaid using the 'Awashed' Collectable Rubber Stamp by Santoro 'Gorjuss'. I only have the mini version and would love to buy the usual sized one. I also stamped the rocks and weed from 'Dive Right In' by Creative Expressions. Both images were coloured in using Flexmarkers and I added a layer of clear shimmer overlay to the tail of the mermaid. Both were very carefully fussy cut out using scissors and I added the mermaid first to the die cut circle using wet glue then I added the rocks and weed in front of her using thin foam tape. I cut off the parts that overlapped the edge of the circle. I added three clear dew drops using some matt adhesive and put it aside to dry. I stamped the turtle border from the 'No Journey's End' stamp set twice on a piece of deep blue card stock and then stamped a sentiment from my stash on the left side of the bottom third of the card. I added this to an A5 white card blank. Once the glue under the dew drops had dried clear, I added double sided foam tape to both the 'globe' and the base of the snow globe so they were attached to each other then I added the turtle charm to the back of the piece using some baker's twine. I stuck the snow globe to the card front between the turtle borders and above the sentiment leaving the turtle loose so it can move freely.

I really like both cards but I think the mermaid one is my favourite because as I'm sure most of my regular readers know, I adore Gorguss Girls and this one is extremely cute! Millie's birthday was yesterday (the 6th) and she hasn't got her cards yet because she's off school (and missing her mock exams!) and not up to having visitors due to illness. Hopefully she will get them later today though which is why I've added them to my blog. It's rather late now but I'm hoping to make her a quick get well card before dropping the other cards off later today - luckily I've been working on a couple of images and I think I have one that will do very nicely.

I hope you've enjoyed this blog post and hopefully it won't be quite so long before the next one though sorting out my cruddy crudy will have to take priority over crafting for awhile because at the moment it's a bit chaotic to craft and I can't find anything (I can't keep blaming craft gremlins for EVERYTHING going missing!). As always if you have any questions or comments then please leave them in the usual places and until next time - keep crafting!

Love and crafty hugs,

Sarah xxx

Saturday, 21 January 2017

A few tips for making Sympathy Cards

Hello crafty peeps and welcome to my crafty nook! I hope you are all having a brilliant week and have lots of crafty plans for the weekend.

As a crafter, I love to create cards and other projects and I made a very conscious choice about 12 years ago not to buy any manufactured cards but to make my own. It hasn't always been easy, some cards are easier to make than others but the one card style I've always found difficult to make is sympathy cards. No-one likes to be reminded that we all have a limited time on this planet and I'm no exception so like many crafters, sympathy cards are the one card I don't pre-make and I'm actually wondering if that's a bit of a mistake. I found out last weekend that a friend from my old church passed away just after Christmas, I wanted to send her husband a sympathy card to let him know how sorry I was to hear about his loss. I thought it be helpful to come up with a few dos and don'ts for anyone needing to make a similar card themselves.

Here is the card I came up with.


I used a stamp from a stamp set that came free with Creative Stamping a couple of months ago. The With sympathy sentiment came from a stamp set in my stash. I diecut a stitched rectangle from smooth stamping card and stamped the snowdrop image using Memento Tuxedo Black ink as it's suitable to use with alcohol markers. I used a Cool Shadow Copic marker to colour the inside of the flower petals and a couple of green Flex Markers to colour the leaves and stems. I added some dots of black glaze pen to the flower stamen as shown. I mounted this die cut piece onto a rectangle of silver mirror card and then diecut a stitched oval out of the same smooth stamping card I used earlier. I stamped the sentiment onto the oval using Memento ink. I made the card blank by cutting an A4 piece of card down to A5 and folding it in half, I added a black mat leaving a 1/4 " border of the white card showing beneath. I added the topper and sentiment as shown.

One of the main things I learnt from making this card is to keep it simple, both in colouring and with the layers. Avoid the bling if you can or try to make it simple and classy (avoid the glitter but a few pearls or clear gems can be a classy touch). Unless you are sure of both the recipient and the person they've lost's faith, try to avoid religious icons and imagery even if you are a believer yourself (you can write that the person receiving the card is in your thoughts and prayers). Take clues from the death notice in the paper if there is one - for example it may state that they want the funeral to be colourful so you may decide not to use black at all but keep the colours in  neutral tones (greys, kraft, browns etc) if you can.

I hope this has been useful, I will be making a few sympathy cards to put to one side because another useful thing I learnt making this card is it's a lot easier to make a card if you are not grieving as you make it. I shall add them to this post (without a tutorial) as and when I make them.

I should be making a few birthday cards over the next couple of days as I've some birthdays coming up. If you have any questions or comments then please feel free to leave them in the usual places and I'll try to respond to them as soon as I can. Until next time - keep crafting!

Love and crafty hugs,

Sarah xxx

Thursday, 12 January 2017

Rainbows, Glitter and Unicorns

Hello crafty peeps and welcome to my crafty nook! I hope you've all had a brilliant week and that you haven't been effected by the bad weather. We've not had any snow yet but there are warnings posted on the sea front warning that flooding is expected and not to walk along the sea front until the weather improves. Hopefully this will stop people playing chicken with the high waves but probably not! We aren't in any danger of sea flooding as we live on the edge of town (and in a first floor flat too) but I'm praying that the flooding isn't as bad as expected.

I forgot to take any photos of the desk tidy I was planning on sharing with you but I have a rather cute card to share with you instead. I was blessed so much last year to win a couple of MFT stamp sets in a Facebook giveaway featuring unicorns (with optional wings) rainbows and a load of sentiments. A lot of the sentiments I probably won't use as they have the American spellings and I prefer to have sentiments spelt correctly (or rather using the English spellings) because I'm rather fond of the 'u's in favours, flavours and favourites (lol all my f words have been underlined in red!) Luckily the sentiment I chose for this card is spelt the same in either country.


I'd like to apologise for the quality of these photos, they don't seem to be as bright as normal (though at least they aren't blurry for a change lol) I didn't have long to take many photos because I needed to get it posted and with impeccable timing my camera had very little charge left and switched itself off just after I took the third photo - still at least you're not having to wade through lots of nearly identical photos ☺.

I've been buying a lot of cheap dies on Ebay that usually come from China - sometimes they take a couple of months to arrive and the packaging they come in are just flimsy cellophane bags but considering how cheap they are (and they cut very well, at least I've not had a bad one yet!) it's worth having to repackage them and wait a while for them to arrive. The stitched sun and rainbow as well as the cloud die came in a recent order, one that actually only took a couple of weeks to arrive and I've totally fallen in love with them. I've been admiring all the stitched dies that have been doing the rounds for the past year or so but apart from the odd one, I've not been able to add any to my stash because to be honest the named brands dies are really expensive and I've chosen to spend my limited funds on other items instead. I'm so happy that I can now use a variety of stitched dies on my projects and I'm particularly pleased with how this one turned out. I teamed the sun, rainbow and clouds with the MFT Birdy Brown Magical Unicorn stamp set and I think they go perfectly together especially as I coloured the unicorns' manes and tails in rainbow colours. I made the glitter background by adding strips of extra wide d/s tape onto a piece of card and after removing the backing paper, I sprinkled the sticky surface with fine glitter and rubbed it into the surface firmly with my finger - it's a rather messy technique but as long as you rub the glitter hard, it shouldn't shed afterwards. I die cut all elements out of plain white card and coloured in as needed. The rainbow die doesn't stay in one piece but that makes it easier to colour separately. The original panel of card was A6 and the sun hung over the corner which looked good but I was worried about it getting damaged on an A6 card blank, my first thought was to add a double wonky stitch line around the edges of a blue card piece to frame the panel but I didn't have a blue that went with the greenish blue glitter on the panel so I ended up folding an A4 sheet of card in two to make an A5 card blank then repeating the glitter background using more d/s tape (FYI - I bought the extra wide d/s tape after seeing Christine Smith AKA CRaFTi PoTeNTiAl using it on some of her YouTube videos, she uses Tonic Studios Nuvo extra fine glitter or micro beads but I just used what I had on hand) and glitter directly onto the front of the card blank. I then added the panel onto the glittered front using a strong wet glue and held it in place with an acrylic block while the glue dried. I stamped the unicorn, stars and sentiment inside and coloured using very basic colours of ProMarkers as I wanted to keep the colouring simple. I added a tiny clear jewel to the tip of the unicorn's horn using some matt adhesive so if it oozed out it couldn't be seen then added some clear Shimmer brush marker to the unicorns' manes and tails and the rainbow. I added gold Shimmer brush marker to the inside unicorn's hooves and silver metallic marker to the outside unicorn's horn, hooves and wing - I went over these parts with a layer of Glossy Accents. I added some clear and blue sequins as shown and adhered a tiny clear gem to the centre of each sequin using more of the matt adhesive.

I really love this card and I just hope the recipient likes it too! I might not do the glitter back ground much until I've had a chance to bulk buy some fine glitter because it did use rather a lot especially as I ended up doing two backgrounds in the end - it was worth all the mess though! I've made an envelope for it using some embossed card stock in red but unfortunately my camera died before I could take a photo.

Weather permitting, my lovely friend Jean and her son are coming to visit on Saturday and I'm going to have a good tidy up session tomorrow so it'll be a few days before I'll have another chance to make anything. As always if you have any questions or comments then please leave them in the usual places. I love to read what people have to say and enjoy it when we get to exchange ideas. Until next time - keep crafting!

Love and crafty hugs,

Sarah xxx
Saturday, 7 January 2017

Belated Happy New Year and a birthday card for my mum

Hello crafty peeps and welcome to my crafty nook! I hope you all had a wonderful New Year and have lots of brilliant crafty plans for 2017. I can't believe how quickly this week has gone, it doesn't seem like 5 minutes ago I was waiting for Big Ben (on tv) to ring in the new year and now it's already my mum's birthday. I've still got a chesty cough and croaky voice so haven't ventured outdoors yet, but hope to get into town next week. My mum's coming up tomorrow for a Sunday lunch so I'll be giving her part of her birthday present then and the rest when an order arrives (Monday), I was expecting her to come today but after speaking to her this morning we decided an extra day of rest might do me some good (and I think she's worried she might catch it) so I didn't need to stay up half the night making her card. My crudy (craft/study space for any newbie readers) is in desperate need of a sorting out but it's been too cold to work in there recently (average temp hovers around 14.4C in the winter!) but it's warmed up the last day or so. The only problem is my crafty mojo becomes more and more sluggish the more cluttered my crudy gets and I end up spending most of my crafty time trying to find homes for my new stuff before I can make anything but I don't have the energy or inclination to have a proper cleaning session in my crudy between crafting times. This cold or whatever it is has really zapped my energy and I'm spending a lot of time just napping at the moment.


Inside the DL sized card

Close up of the Dovecraft Diecut sentiment

Close up of the Dovecraft Butterfly die cut from watercolour card

Close up of top butterfly

Close up of middle butterfly - the layers are reversed on this for a different effect

Bottom Butterfly

I've made a DL sized butterfly card for my mum using a two layer die from Ebay on the outside and a couple of Dovecraft dies that came free with this month's issue of Crafts Beautiful magazine. I sometimes find the free gifts with Crafts Beautiful to be a bit naff frankly but the for the last few months they've really improved on the quality. The Dovecraft butterfly and painted script with love die are particularly good quality though they shouldn't have cost as much as the magazine is claiming they are worth because this style of die is priced at around £2 each in the shops. They are exclusive to Craft Beautiful magazine though so you can't get them in the shops on their own at present. The backing paper behind the butterflies on the front panel came from a pack of 8" x 8" butterfly themed papers from Tonic Studio. I actually cut the butterflies part off the paper as it looked a bit odd with the 3D butterflies on top. I removed the corners of the paper using a Tonic Studio corner punch (it's a double punch and also does a ticket style corner), I've been very fortunate to be able to really build up my Tonic Studio supplies recently as Every Craft's A Pound has had dies, punches, paper packs and memory clay packs in for a few months now, they haven't had any of the Nuvo range in but I'm keeping my fingers crossed that they'll have some in sometime this year. I layered this piece onto a mat of silver mirror card and added the panel onto a DL sized card base from which I also removed the corners using the same punch - I was very impressed that the punch with a bit of weight behind it actually went through both layers of the card as I used Sheena's Stamping card which is at least 300gsm. I added the butterflies to the front of the card as shown with double sided tape just on the centre part of the butterflies so the wings could be folded upwards. I added the die cut sentiment inside and another butterfly on the bottom right corner of the card. The butterflies were die cut out of silver mirror card and watercolour card that had been painted using Leonie Pujol shimmer brush markers in Frosty Christmas in an ombre effect. I added some blue bling to the bodies as shown. I've kept the front sentiment free because my mum loves butterflies and may choose to have this card on permanent display. If I think the recipient will do this then I tend to put any sentiments on the inside so the card is more generic.

I really enjoyed making this card, as usual it didn't end up the way I expected (I planned on making an A5 card to begin with) but I think it's very pretty and hopefully my mum will like it. I'm planning on making her a desk tidy today so hopefully I'll have a blog to share very soon with a how to make tutorial (might even have a photo tutorial but no promises!) as they are rather charming and make great gifts. I was supposed to make quite a few as Christmas presents but ran out of time - this year I really must start my Christmas crafting more in advance!

I hope you have enjoyed my latest make, I'm hoping to make a few changes to the blog including adding it to Bloglovin as it's an easier way to subscribe to my blog but I haven't had chance to do any research as of yet. In the meantime you can subscribe via email by filling in a brief form in the sidebar or if you are a member of Google + you should be able to follow me via that. A lot of my sidebar content has vanished (such as my photo etc from the Facebook button) which is one of the reasons I shall be making some changes to this blog in the next few months. One of my goals this year is to grow my audience so I'd really appreciate any comments or suggestions on how to do that in the usual places. Thank you for getting to the end of a rather long post and until next time - keep crafting!

Love and crafty hugs,

Sarah xxx

Friday, 30 December 2016

A few things to share...

Hello crafty peeps and welcome to my crafty nook! I am so sorry I've not added a blog post for over a month, I came back from the wedding terribly run down and ended up with a chest infection, then with Christmas looming, I just haven't had time to blog the few things I've made. To make matters worse I've come down with a really heavy cold over Christmas and I've lost my sense of smell and taste completely which has made me feel pretty miserable as you can imagine - all those lovely Christmas goodies and I can't taste (or smell!) a single one! My cold started on the 23rd and I'd lost my sense of smell and taste by the 24th and it's still not come back yet. For the first year ever, I made Christmas lunch for my mum and I (my husband chose to spend Christmas or at least the meal with his family at a pub!) and I couldn't even taste it - apparently it was very nice though. I'll have to try and re-create it when I'm better.

I thought I'd share a couple of Christmas cards I made earlier this month. For the second year running most of my friends and relatives haven't actually had a Christmas card off me but I'm planning on whipping up some simple Happy New Year cards to send out instead.

Penguin/Igloo card made for my Niece and Nephews

Close up of the Igloo

I call this penguin Charlie after my niece :) 

The boys :)

Jack the penguin

Liam the penguin

Ross the penguin with snowball

On thin ice...

I absolutely love the stamp set and embossing folder that came free with Papercraft Essentials magazine a couple of months ago, my subscription needs renewing so I ended up paying full price of £5.99 for the magazine but it is well worth it as it also included a little die set that cuts out three skates, the ear muffs (though these could be headphones as well) and the little bobble hat. You have to fussy cut the scarf and the actual characters but that's easy enough to do. As well as the penguin characters, there is a bear and a seal along with some accessories like a pile of snowballs and a sledge but I've only really used the penguins. Although this is a Christmas/winter set I can see it being used all the year through because it is very versatile. The little sprig of holly on Liam's head actually came from the embossed door/wreath cover gift that came out around September time - for the life of me though I can't remember which magazine it came free with . I kept the colouring fairly simple on this card and used a combination of ProMarkers and Kaiserfusion pens the latter only because I have a lot of icy colours in that brand whereas for some reason Promarkers don't seem to have many icy/frosty colours and it's boring always colouring ice the same tired blue or pale grey. I added Spectrum Noir Clear Shimmer Overlay to the igloo, ice pond and to other parts of the card. As always though it's rather hard to see the sparkle in a photo. I also added a bit of Woodware Fluffy Stuff to the bobble of a hat and the snowball in Ross the penguins hand for added texture. It's a thick liquid which fluffs up when you apply heat to it - a fantastic product that I'm always surprised isn't made more of in the crafting community (it's been out for years and I've had the same bottle for almost 8 years now because a little goes a long way.)

We Three Kings

Close up of card

I made this card using a die and embossing folder that came free with Die Cutting Essentials magazine. I'll admit that Die Cutting Essentials magazine is rather pricey at £9.99 but I found I was usually buying it online at more.mags.com at the full price plus postage so it made sense to start a subscription to the magazine. This die came with my first subbie copy and I really love it. I actually made around a dozen cards using the die but each one was slightly different as I used different ways to colour the background panel that goes behind the black die cut outline. My favourite ones were made using distress ink and blending three colours together in an ombre effect but I was very pleased with how this watercolour panel piece came out using Karetake Gansai Tambi Watercolours, I used a heat gun to speed the drying process up and it caused the watercolours to run which I rather like as it looks as though there are tongues of flame in the sky which is rather dramatic. Probably the hardest thing about making this card is sticking down the diecut to the back panel just because some of the design is rather delicate but a steady hand and a glue pen soon solved that.

It'll be rather a shame to put away the Three Kings die once the Christmas period is well and truly over as I had a lot of fun experimenting with different backgrounds. The penguin set will be staying out in my regular stash as I'm sure I'll be able to use it for other non Christmassy cards during the year - not least because I've recently found out that my sister's OH loves penguins! (That's the theme for his next card sorted!)

I really want to improve my blog during 2017 and grow my audience so one thing I do need to tackle is the frequency of blog posts. Until I can save for a decent digital camera, my photos are still going to remain a little on the poor side but I hope you my lovely reader (s) will look past that and continue to support my blog as it develops and grows. It would be fantastic if you could become a follower by clicking the follow button in the side bar or by subscribing via email. As always I would love to hear your questions and comments so feel free to leave them in the usual places.

I hope you all had a brilliant Christmas and I wish you all a healthy and prosperous New Year. Until next time - keep crafting!

Love and crafty hugs,

Sarah xxx